Summary: This paper is divided into five parts to tells the best methods for you to recover deleted and lost data from your Samsung Galaxy Tab S8/S8+/S8 Ultra, no matter with or without backup file.
At the recent Samsung spring product launch, the Galaxy Tab S8 series tablet will appear together with the Galaxy S22 series. Samsung Galaxy Tab S8 series is equipped with super wide-angle front camera, three-microphone configuration and intelligent automatic composition technology, providing excellent video calling experience for users to easily conduct online meetings. Samsung Galaxy Tab S8 series revolutionary Multi-active Windows and Samsung DeX mode can help users easily handle complicated affairs. Its simple and safe Quick Share function is protected by encryption, which is convenient for users to share files. Samsung Galaxy Tab S8 series ultra-fast 4 nm processor with ultra-smooth S Pen stylus guarantees efficient work.
In addition, through the Second Screen and Buds Auto Switch, Samsung Galaxy Tab S8 series can be closely connected with the devices in the entire Galaxy ecosystem and go hand in hand.
Undoubtedly, as the annual work of Samsung, Galaxy Tab S8 series has super-high performance and numerous bright spots. However, no matter how high the equipment is configured, data loss caused by users in daily use cannot be avoided. I believe you can’t wait to know the specific data recovery plan. Without further delay, next, please follow our following methods and try to recover your deleted and lost data on Samsung Galaxy Tab S8/S8+/S8 Ultra.
Samsung Cloud can be used to recover files on your Samsung Galaxy phone and Galaxy Tab that you accidentally deleted.
Note: Samsung Cloud cannot be used on Verizon mobile phones or tablets, and is not supported in some countries. You can set the version, which may vary depending on the business and software. Please check our smart switch transfer guide to transfer data.
Step 1: Unlock your Tab S8/S8+/S8 Ultra, and run “Settings” app, tap your name at the top of the screen.
Step 2: Tap “Samsung Cloud”, and then tap “Restore data”.
Step 3: Choose a backup file as you needs, then select the required contents and press “Restore”.
Step 4: The backup will begin to download. Wait for it to finish, then tap “Done”.
Samsung Kies is an important mobile PC software, which is easy to operate and convenient to use. It provides users with many functions, including easily backing up or transmitting data, powerful multimedia file management and upgrading mobile phone system/firmware, etc.
Step 1: Run Samsung Kies and connect your Galaxy Tab S8/S8+/S8 Ultra to computer.
Step 2: Tap on the “Back up/Restore” tab in the homepage and tap on “Restore data”.
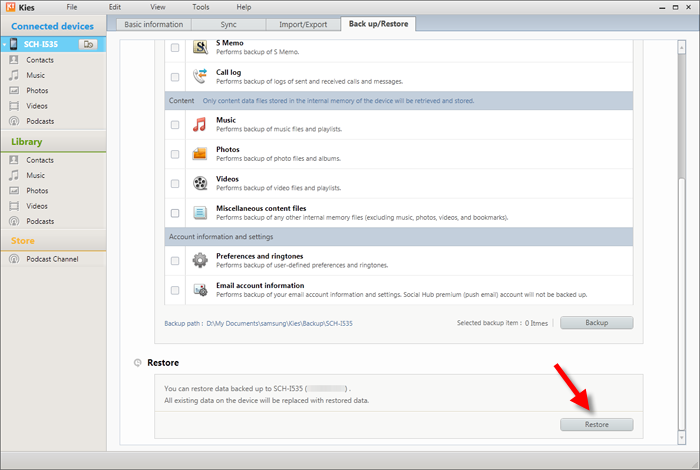
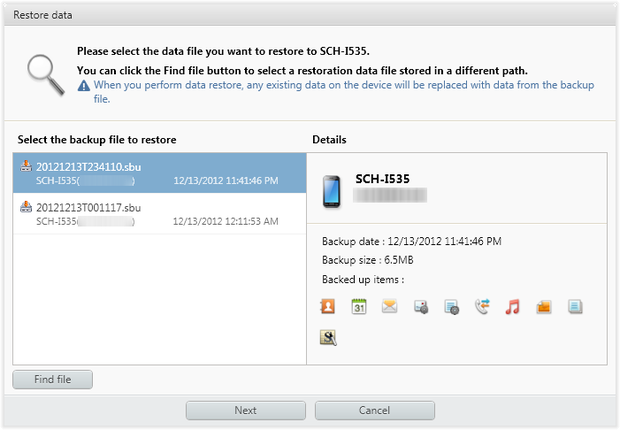
Step 3: Select the required backup file from the drop-down, and check the file types that you want to restore, then tap on “Restore”.
Note: Some items may require additional settings. Choose the desired option and click “OK” to continue.
Step 4: Wait for the restore to finish, tap on “Complete”.
Usually, what makes users sleepy is not how to recover data from backup files, but that users have no backup files at all. If you have the same trouble, please don’t be depressed, to recover deleted and lost data on your Samsung Galaxy Tab S8/S8+/S8 Ultra, you only need Samsung Data Recovery software.
Samsung Data Recovery is a highly compatible data recovery software, which can restore deleted and lost data including WhatsApp chats and attachments, SMS and attachments, photos, videos, contacts, call history, audio, documents and more from any Samsung Galaxy devices, include your Samsung Galaxy Tab S8/S8+/S8 Ultra.


Step 1: Download, install and run the software on your computer, and then tap on “Android Data Recovery”.

Step 2: Connect your device to computer via USB, then enable the USB debugging mode on your Samsung Galaxy Tab S8/S8+/S8 Ultra.

Step 3: Once your device is recognized, select the file types to be scanned, and then click “Next” to begin scanning your device under the Standard Scan mode.

Step 4: When the scanning process is finished, all the found result will be listed. Please select the files that you wish to restored, then tap on “Recover” to complete the restore process.

Samsung Data Recovery can also backup your data of any Samsung Galaxy devices, and restore data from backup to any supported devices. If you have ever backed up your phone data via this software, please follow the below steps to extract and restore data from backup file to your Samsung Galaxy Tab S8/S8+/S8 Ultra.
Step 1: Run the software and tap on “Android Data Backup & Restore” option.
Step 2: Connect your Galaxy Tab S8/S8+/S8 Ultra to computer by using its USB cable, and select the “Device Data Restore” option.

Step 3: Select the required backup file from the list and press “Start” to begin to extract all the restoreable file in the selected backup.

Step 4: Wait patiently for all the files to be extracted, then select the files that you wish to restored, and click on “Restore to Device” to save them back to your Galaxy Tab S8/S8+/S8 Ultra.

As the pioneer of data recovery software industry, Best Data Recovery is a well-known data recovery expert. With the help of this software, you can easily and directly recover deleted and lost data including images, photos, videos, audio, email, documents and more from your Samsung Galaxy Tab S8/S8+/S8 Ultra without backup.
Step 1: Download, install and run the Beste Data Recovery on your computer, then connect your Samsung Galaxy Tab S8/S8+/S8 Ultra to computer via a USB cable.
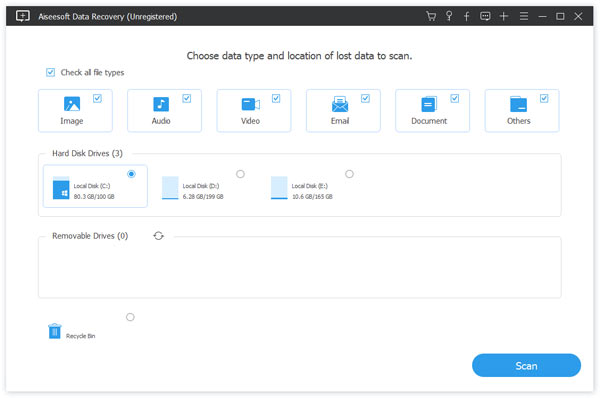
Step 2: Once the program detects your device, please select the reason of your data loss and the type of data you want to restore on the interface, then tab on “Next”.
Step 3: Then choose the disk drive name of your Samsung Galaxy Tab S8/S8+/S8 Ultra and tap on “Scan” to quickly scan your device for the lost contents.

Step 4: After scanning, all the found result is divided into different categories. Click the file as needed to view the details of a specific item, and then select them. You can use the “Filter” function to quickly find the files you want to recover. After selecting, click “Recover” on the page to save the selected files to your device or computer.