Summary: This article provides you with several solutions for data transfer and data recovery on Samsung Galaxy A12 Nacho. Helping you to directly transfer all data from any Samsung/Android phone to Samsung Galaxy A12 Nacho, and to recover deleted and lost files on Samsung Galaxy A12 Nacho.
The Samsung Galaxy A12 Nacho uses a 6.5-inch water drop LCD straight screen, HD+ with a resolution of 1600×720, a screen refresh rate of 60Hz, and an aspect ratio of 20:9. It has four colors to choose from, namely blue, black, red and white. Galaxy A12 Nacho is equipped with Exynos850 chipset and runs Samsung OneUI3.1 based on Android11 ??operating system. Samsung Galaxy A12Nacho has a front 8-megapixel selfie lens, rear 48-megapixel main camera + 5-megapixel ultra-wide-angle lens + 2-megapixel macro lens + 2-megapixel depth-of-field lens, and the rear four cameras adopt mainstream rounded-corner matrix design. The flash is located under the camera module. In terms of battery life, the Galaxy A12 Nacho has a built-in 5000mAh battery that supports 15W charging power.
When we buy a new Galaxy A12 Nacho, in order to better use this new device, we often need to synchronize the data from the old device or the backup to the new phone. Therefore, I will show you how to transfer data from old devices or backups to Samsung Galaxy A12 Nacho.
This method will introduce you to one-click synchronization of all data in Android to Samsung Galaxy A12 Nacho. To use this method, you need to use Mobile Transfer.
Mobile Transfer is a very powerful data transfer software. Its operation is very simple, you only need a few simple clicks to transfer the required data to the Galaxy A12 Nacho. Secondly, the data that can be transferred is very rich, such as contacts, photos, videos, text messages, call logs, music, apps, etc. Not only that, but the compatibility of Mobile Transfer is also very good. It is compatible with more than 7000 models of devices on the market, including Samsung Galaxy A12 Nacho. Last but not least, the security performance of the software is also very good. In the process of using it to complete data transmission, it will not leak any of your data.


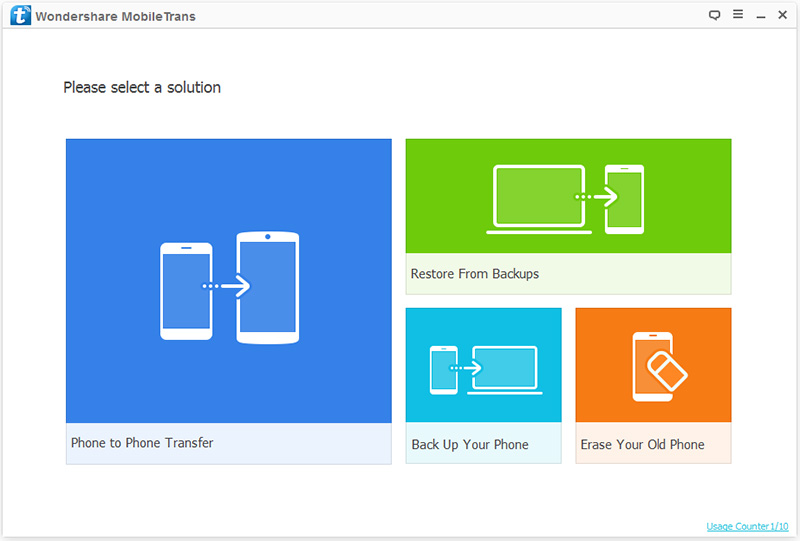
Step 1: Select the transmission mode
Download and install Mobile Transfer on your computer, and run it. Then select the “Phone To Phone Transfer” mode on the homepage of the software.
Step 2: Connect the device to the computer
Use a USB cable to connect your old Android phone and the new Samsung Galaxy A12 Nacho to the computer respectively.

Note: In order to correctly transfer the data from the old device to the Galaxy A12 Nacho, please check the display of “Source” (old Samsung/Android phone) and “Destination” (Galaxy A12 Nacho). If the page display order is reversed, you can click “Flip” to switch the positions of the two phones.
Step 3: Select data for transmission
On the page, you can preview and select the data that needs to be transferred to the Galaxy A12 Nacho. After selecting, click “Start Transfer” to start the data transfer.

Synchronizing the data in the backup to the Samsung Galaxy A12 Nacho can also quickly help make better use of the new device. In this part, I will show you how to quickly synchronize the data in the backup to the Galaxy A12 Nacho. Similarly, you need the help of Mobile Transfer.
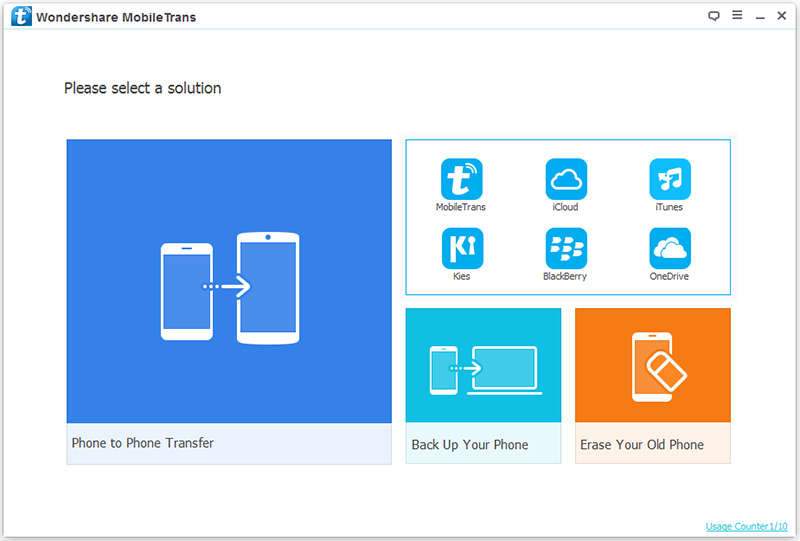
Step 1: Run Mobile Transfer on the computer, then click on the “Restore from Backups” mode on the main page of the software, and select the “MobileTrans” or “Kies” option.
Step 2: Use a USB cable to connect Samsung Galaxy A12 Nacho to the computer. Then Mobile Transfer will automatically match the model of your device. After the software successfully detects your phone, you can proceed to the next step.
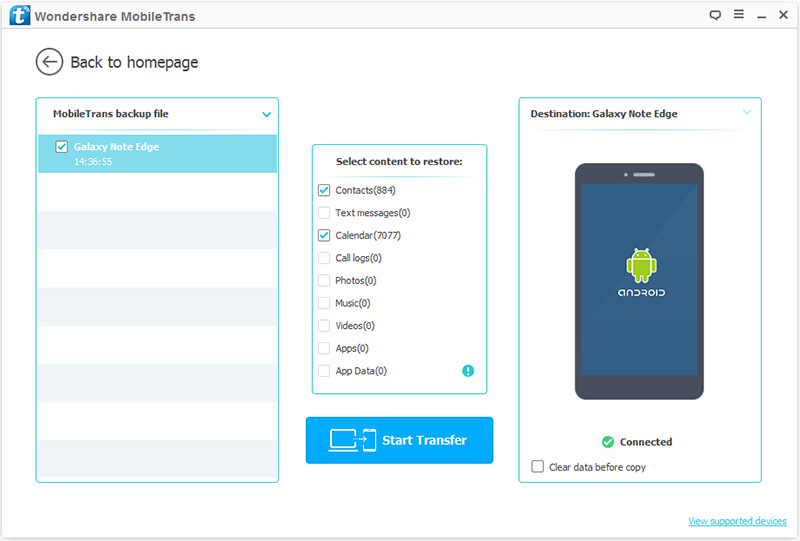
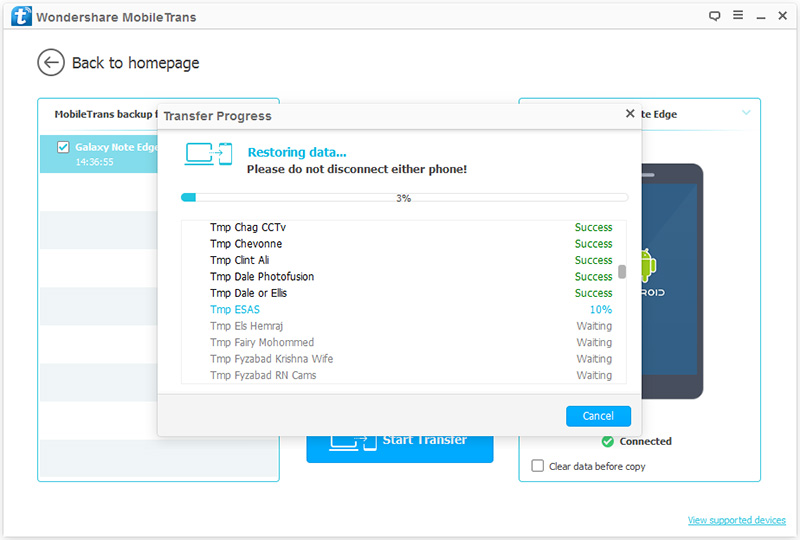
Step 3: Now you can view all the backup files on the page. Select the backup file and select the data you need to sync from the backup to the Galaxy A12 Nacho. After confirming that it is correct, click “Start Transfer” to synchronize the data in the backup file to Galaxy A12 Nacho.
During our use of the Samsung Galaxy A12 Nacho, it is inevitable that some accidents will cause the data in the device to be lost or deleted. There are many reasons for data loss or deletion in the device, such as virus attack, water in the screen, broken screen or manual deletion, etc. When the data in our Galaxy A12 Nacho is accidentally lost, you can retrieve the data you need according to the following operations.
In many cases, the data we lost is not backed up. If the data you lost in Galaxy A12 Nach is not backed up, you can choose this method to retrieve the lost or deleted data in the device. To use this method, you need the help of Samsung Data Recovery.
Samsung Data Recovery is a very good data recovery software. With its help, you will be able to use the most convenient method to retrieve all the data you need in the Galaxy A12 Nach. The data that this software can recover is very rich, including contacts, call history, photos, videos, audio, text messages, music, WhatsApp chat history, etc. If you can’t find the data you want to recover, you can also use Samsung Data Recovery’s deep scan to help you retrieve your lost data. Not only that, the compatibility of this software is also very good. It is compatible with most brands of equipment on the market such as Samsung, Nokia, Oneplus, Huawei, Honor, Xiaomi, Lenovo, OPPO, vivo, Google, LG, Meizu, etc.
Step 1: Choose the appropriate Samsung Data Recovery and download it to your computer, then follow the prompts to complete the installation and run the software.
Step 2: Select “Android Data Recovery” mode on the software’s page. Then connect your Samsung Galaxy A12 Nacho to the computer.

Step 3: Complete USB debugging on Samsung Galaxy A12 Nacho according to the following operations:

Step 4: You can view all recoverable file types on the page. Select the type of data you need to recover, and then click “Next” to scan.

Step 5: After scanning the selected file type, you can preview all the specific items of the scanned data on the page of the software. Select the data that needs to be restored to the Galaxy A12 Nacho, and then click “Recover” to restore the data to your device.

Since the Samsung Data Recovery allows you to backup and restore your phone data, if you’ve ever backed up your phone data with this software, then you can follow the below steps to restore data from backup to your Samsung Galaxy A12 Nacho.
Step 1: Run Samsung Data Recovery on the computer, and then select the “Android Data Backup & Restore” mode on the page.
Step 2: Use a USB cable to connect your Samsung Galaxy A12 Nacho to the computer.
Step 3: On the page, select the “Device Data Restore” or “One-click Restore” mode as required.

Step 4: You can view all the backup files on the page. Select the backup file you need from the backup list displayed on the page, and then click the “Start” button to extract the data in the backup.

Then you can select the data you need on the page and click “Restore to Device” to restore it to your Samsung Galaxy A12 Nacho.
