Summary: This article will answer your questions about how to transfer data from your old phone to Realme GT/Realme GT Neo and how to restore deleted or lost data from Realme GT/Realme GT Neo.
Realme GT is equipped with the current Android’s strongest processor-Snapdragon 888, and is also equipped with a full-blood version of LPDDR5, as well as UFS 3.1 flash memory technology and other industry-leading configurations, forming a solid foundation of performance strength and providing strong operation guarantee. The realme GT also has a built-in 4500mAh high-capacity battery and a 65W smart fast charging technology that can fully charge the battery in 35 minutes. Realme GT Realme GT is equipped with a 6.43-inch Super AMOLED screen, the core highlight is to support 120Hz refresh rate. Realme GT has a 20-megapixel selfie lens on the front, and a rear-mounted four-camera of 64 million + 13 million + 13 million pixels. The Realme GT Neo is equipped with a 6.43-inch AMOLED screen, supports 160Hz screen refresh, has a front 20 million pixel selfie lens, and a rear four-camera with 64 million + 13 million + 13 million pixels. It is equipped with a new Dimensity 1200 machine with a 65w flash charge.
Realme GT achieved sales of over 100 million in just 10 seconds after its first sale, and achieved good results in both mobile phone brand sales and sales on all major e-commerce platforms. You are also deeply attracted by such an excellent mobile phone. If you want to buy Realme GT/Realme GT Neo or already own it. The following content is worthy of your careful reading.
If you want to transfer your phone data in the easiest way, third-party data transfer software is a very good choice, such as Mobile Transfer.
Mobile Transfer is currently a very popular data transfer and management software, so it is often used by people to transfer data between different phones. It is widely used not only because of its simple and fast operation, but also because of its super compatibility. It can not only transfer between various Androids, but also between iOS devices, and between Android and iOS devices. In addition, it can transfer data such as contacts, text messages, photos, videos, audios, music, call logs, applications, app data, etc. The most important thing is that it has a high safety factor, it will not cause any harm to your phone during the data transmission process, and will not leak your data.


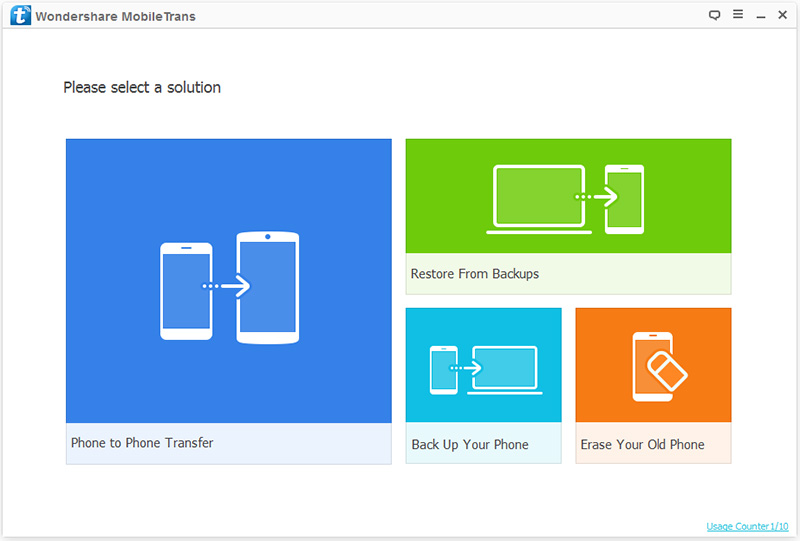
Step 1: First download, install and run Mobile Transfer on your computer. Then select the “Phone To Phone Transfer” option on the main interface, and then click on “Start”.
Step 2: Now, please use the USB cables to connect your Android/iPhone and Realme GT/GT Neo to the same computer. After the connection is successful, the old Android/iPhone device is displayed on the left panel of the main interface, and Realme GT/GT Neo is displayed on the right.

Note: If the order is not correct, in order to ensure that the next steps can be carried out, you need to click the “Flip” button to swap the positions of the two phones.
Step 3: Once your phones are recognized and be displayed on the right place, you can select the files according to your needs on the middle panel. Then click on “Start Transfer” to sync them to your Realme GT/GT Neo. At this time, you can see the progress bar of the transfer on the main interface.

Note: If you want to delete the existing data of Realme GT/GT Neo before transferring, you can check the “Clear data before copy” option. Please do not interrupt the connection between the phones and the computer during the transfer. Please be patient, the transmission speed depends on the amount of data.
Mobile Transfer also allows you to restore data from backup to any supported devices. In other words, if you have ever backed up your phone data with Mobile Transfer/iTunes/iCloud/OneDrive/Samsung Kies/BlackBerry Desktop Software, then the speed of data transfer will get a qualitative leap. The specific operations are as follows:
Step 1: Run the software, then click on “Restore from Backups” mode, and select “MobileTrans” or “Kies” among all the items.
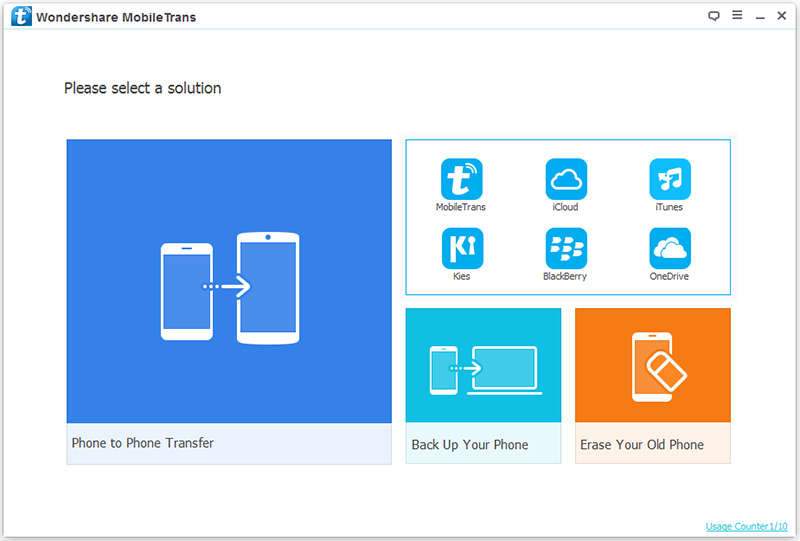
Note: The prerequisite for selecting “MobileTrans” or “Kies” is that you have backed up the data in your old phone with this Mobile Transfer software or Samsung Kies.
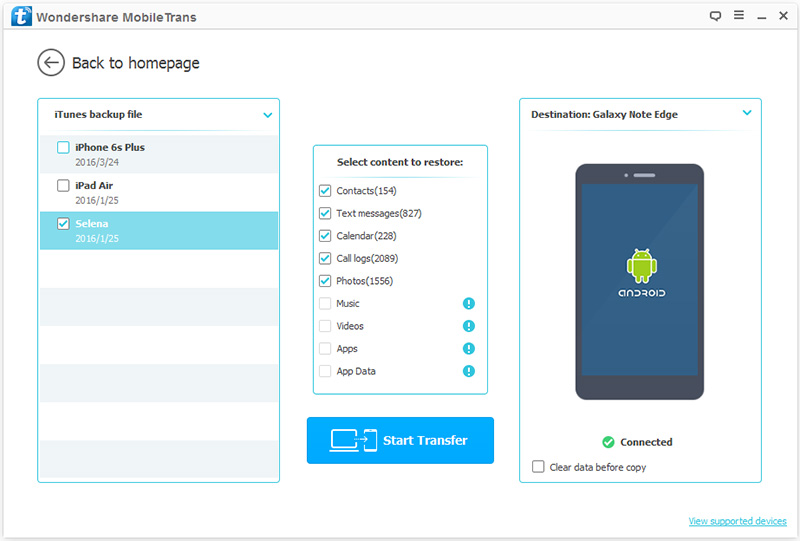
Step 2: Please select a backup file from the list according to your needs, and then use a USB cable to connect your Realme GT/GT Neo to the computer.
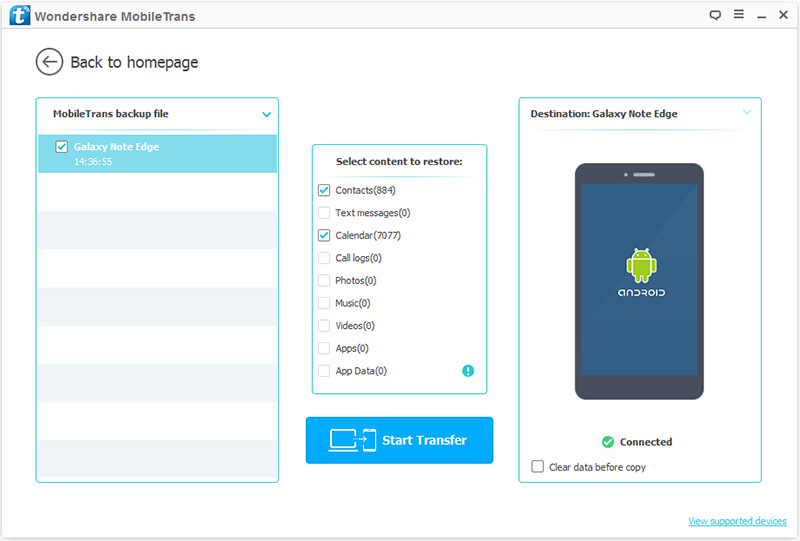
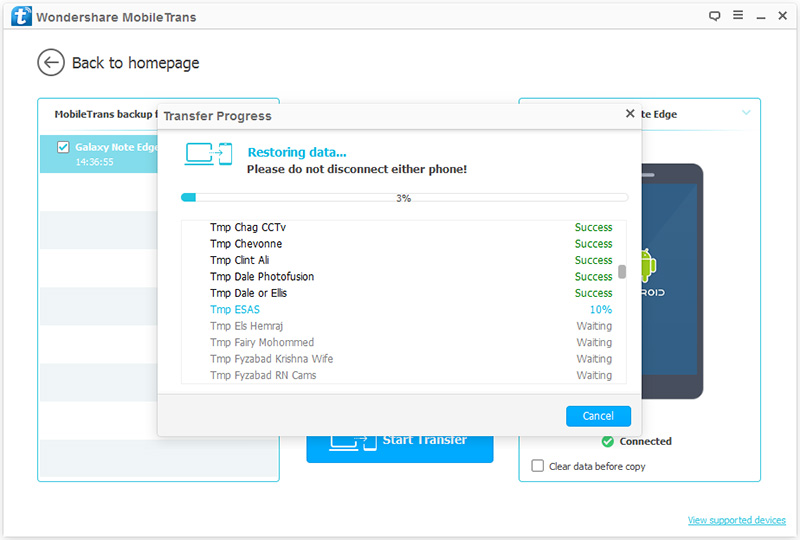
Step 3: After the computer detects your device, select the file type as needed, and then click “Start Transfer” to sync them to your Realme GT/GT Neo. At this point, you can see the transfer progress bar on the interface, please be patient.
Step 1: Run the software, then click on “Restore from Backups”, and select “iTunes” among all the options.
Step 2: Now you need to connect your Realme GT/GT Neo to your computer with a USB cable.
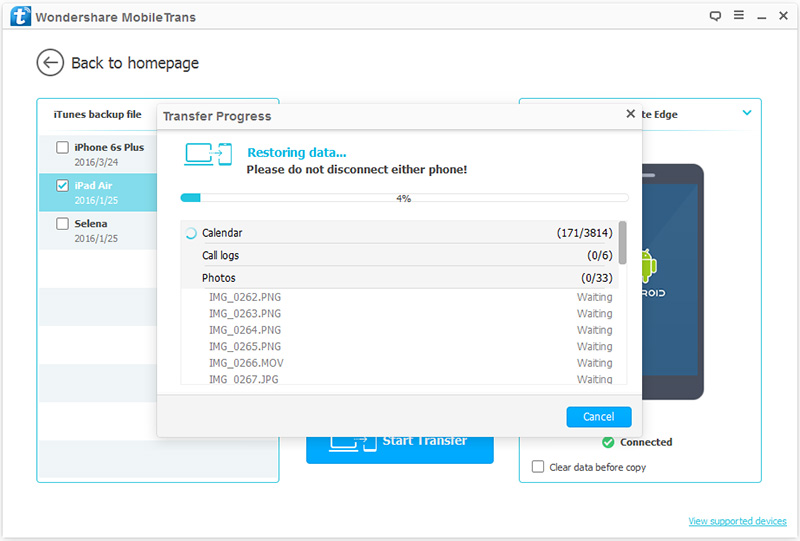
Step 3: Now, you can select one of the backup files on the left panel. The software will extract all transferable files from the selected backup file and display them on the middle panel. Please select the file type that needs to be transferred. After the computer detects your device, click “Start Transfer” to move the selected data to your Realme GT/GT Neo. At this time, you can see the progress bar of the transfer on the main interface.
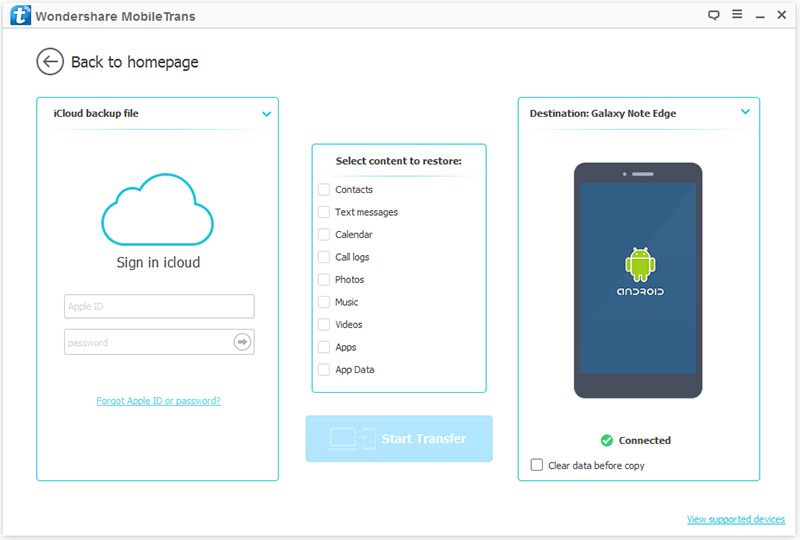
Step 1: As the same, run Mobile Transfer on the computer, then click on “Restore from Backups” and select the “iCloud” option.
Step 2: Now, login to your iCloud account and connect your Realme GT/GT Neo to the computer.
Step 3: Check an iCloud backup file as needed, then press “Download” to download it to your computer.
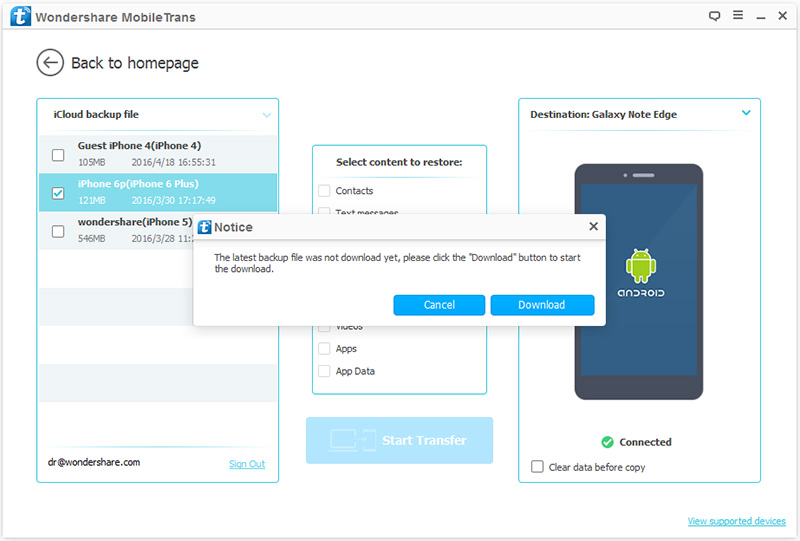
Step 4: After the download is complete, select the file types to be transferred, and then click on “Start Transfer” to click to move the select files to your Realme GT/GT Neo. You need to be patient, the speed of transmission depends on the amount of your selected data.

Tips: If you want to completely erase all data on your Realme GT/GT Neo before transfer, you just need to mark the checkbox which is in front of the “Clear data before copy” option.
The third part and the fourth part will introduce you to the easy way of how to recover deleted and lost data from your Realme GT/GT Neo, regardless of whether you have a backup file or not.
Loss of important mobile phone data has become a prominent problem that has plagued users for a long time. If your Realme GT/GT Neo data is not backed up, then Android Data Recovery will bring you great help.
Android Data Recovery is an all-in-one third-party software that can help you recover deleted and lost data faster, more efficiently, and more safely. It can recover a variety of data, such as contacts, text messages, call logs, audio, videos, WhatsApp messages, photos, pictures, etc. All in all, as long as your lost data is not overwritten by new data, you can restore them by using this software, no matter you data lost due to improper handling, accidental deletion, OS/rooting error, device failure/stuck, virus attack, system crash, forgotten password, SD card issue or any other unknown reasons. In addition, it has high compatibility and is suitable for almost all Android phone brands on the market. Most importantly, it is very safe. It neither leaks your information nor damages your data. Its function is not only to restore phone data, it can also back up phone data, and so forth.
Step 1: First download, install and run the program on your computer. After entering the program, please check the “Android Data Recovery” mode on the main interface. Then use USB to connect Realme GT/GT Neo to your computer. Immediately afterwards, the connection progress bar appeared on the main interface.

Step 2: After fully entering the program, it will automatically detect your Android version. You need to turn on the USB debugging of Realme GT/GT Neo according to the steps provided by the program, and then click “OK”.

Step 3: Now, the main interface will show a list of recoverable data, please check the type of data you need to recover, and click “Next” after confirming. Then the program will scan your phone for the lost data.

Note: Here, the program needs permission to scan for deleted and lost data. If your device pops up a window, remember to click on “Allow” on your phone to make sure the request is remembered. If your device does not pop up such a window, please click “Retry” to try again.

Step 4: After the scan is successful, the main interface will displays the type of data that can be recovered. After previewing and confirming the data you needed, then click on “Recover” to save them back to your computer. Please be patient, the length of time required for recovery is directly proportional to the amount of recovered data.

Tips: If you can not find the data you need, please click on the “Deep Scan” button to enable the deep scan mode to rescan your device.
Android Data Recovery can also back up your phone data, and restore any data from backup to any supported devices. So, if you have ever backed up your phone data with this software, or get a backup file that supported by this software, then you can easily restore it to your Realme GT/GT Neo. The specific operations are as follows:
Step 1: Run Android Data Recovery, and then click “Android Data Backup & Restore”.
Step 2: Use USB to connect your Realme GT/GT Neo to the computer. Then, select a restore mode as needed, namely “Device Data Restore” or “One-click Restore”. If you do not need to restore all the data, we recommend that you select the “Device Data Restore” mode here, which will take less time and take up less phone memory.

Step 3: Select a backup from the list, and then press “Start” to extract all recoverable files from the selected backup file.

Step 4: Wait for all the content to be extracted, select the required files, and then click on the “Restore to Device” or “Restore to PC” button to restore them back.
