Summary: When important data in Nokia G10/G20 is lost, do you know the safest way to retrieve the data? This article will introduce you three methods in detail to help you recover lost or deleted data on Nokia G10/G20.
Nokia G10 and Nokia G20 are two cost-effective devices. In terms of performance, Nokia G20 uses MediaTek Helio G35 chipset, has 4GB of RAM, and storage is 64 and 128 GB. The G10 uses a Helio G25 processor with 3/4 GB of memory and 32/64 GB of storage. In terms of cameras, the Nokia G20 has a 48-megapixel main module, combined with a 5-megapixel ultra-wide-angle camera, plus an 8-megapixel selfie camera, as well as a 2-megapixel macro and 2-megapixel depth unit. The rear camera of the Nokia G10 is a 13-megapixel main camera (plus two 2-megapixel auxiliary modules), and the front is an 8-megapixel selfie camera. In terms of screens, both Nokia G10 and Nokia G20 use 6.5-inch LCD screens with 720p+ resolution (20:9). In terms of battery life, Nokia G10 and G20 have 5050 mAh batteries, and both support 10W charging.
There is no doubt that both Nokia G10 and Nokia G20 are excellent. However, we know that no matter how good a device is, the data in the device may be lost for some reason. At the same time, the data lost by many users often has no backup. When you encounter this kind of problem, should you retrieve the lost data in Nokia G10/G20? If you don’t know how to deal with this kind of problem, then you can read the following tutorial. In the following tutorial, I have prepared three methods for you to help you retrieve lost or deleted data in Nokia G10/G20. Whether you have a backup or not, you can retrieve the data you need in Nokia G10/G20 through the following tutorial.
In this part, I will introduce you how to directly restore the lost or deleted data in Nokia G10/G20 without a backup. To use this method, you need the help of Nokia Data Recovery.
Nokia Data Recovery can help you easily restore data that is not backed up to Nokia G10/G20. The file types that Nokia Data Recovery can recover are very rich. It can help you recover almost all the data in Nokia G10/G20, including contacts, call records, photos, videos, audios, text messages, and WhatsApp chat records. Not only that, Nokia Data Recovery also has super compatibility. The software is compatible with more than 7000 models of devices on the market such as ZTE, Honor, Samsung, vivo, Lenovo, Meizu, LG, Google, Oneplus, and OPPO. Last but not least, this software is very safe. You don’t need to worry about leaking any data in G10/G20 during the process of data recovery.


Step 1: Download and install Nokia Data Recovery on your computer, and run it. After entering the main page of the software, select the “Android Data Recovery” mode.

Step 2: Use a USB cable to connect your Nokia G10/G20 to the computer. Then turn on USB debugging on Nokia G10/G20. The following are the specific steps to enable USB debugging:
Tip: If you still don’t understand how to operate, you can complete USB debugging according to the instructions of Nokia Data Recovery.

Step 3: Now the page will display all the data types that can be restored to Nokia G10/G20. Choose the data type according to your needs. After selecting, click “Next” to scan the required data.

Step 4: After the scan is completed, all specific items of the scanned data type will be displayed on the page. Preview and select the data you need to restore to your device. After selecting, click “Recover” to start recovering data to Nokia G10/G20.

Tip: If you can’t find the data you want, click “Deep Scan” button on the right bottom corner to get more lost data, but this will take longer scanning time.
If you need to restore the data from the backup to Nokia G10/G20, this method will be very suitable for you. Similarly, to use this method, you need the help of Nokia Data Recovery.
Step 1: Run Nokia Data Recovery on the computer. After entering the main page of the software, select the “Android Data Backup & Restore” mode.
Step 2: Use a USB cable to connect your Nokia G10/G20 to the computer. Then select the “Device Data Restore” or “One-click Restore” mode on the page. If you want to restore the required data selectively, please choose the former.

Step 3: After that, all your backup files will be displayed on the software page. You need to select the backup file you need from the backup list on the page. After selecting, click “Start” to extract all the data that can be restored from the selected backup file.

Wait for the extraction to complete, select the files you need to recover, then tap on “Restore to Device” or “Restore to PC” to restore the them from the backup to your device.

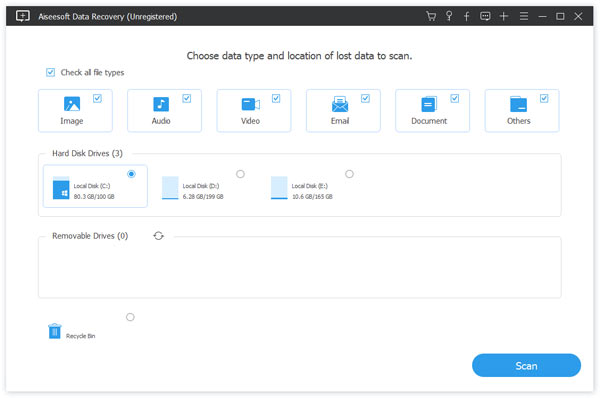
Best Data Recovery is an efficient data recovery software. It can be suitable for data recovery in all simple situations, for example, it can help you recover lost or deleted images, documents, audios, videos, emails, etc. With its help, you will be able to quickly retrieve the important data you need. This method will introduce you how to quickly restore the data you need to Nokia G10/G20 with the help of Best Data Recovery.
Step 1: Download Best Data Recovery on your computer and follow the prompts to complete the installation of the software. Then run it on the computer.
Step 2: Use a USB cable to connect your Nokia G10/G20 to the computer.
Step 3: Select the file types you need to recover on the software’s page, and select the disk name of your device. After selecting, click “Scan” to begin to scan the lost data.
Step 4: After scanning, you can preview all scanned data on the page. Select the data that needs to be restored to Nokia G10/G20 on the page according to your needs. After selecting, click “Recover” to restore the required data to Nokia G10/G20.

Tip: You can also use the “Filter” function to quickly locate the data you want to recover. If you cannot find the data you need, please click the Deep Scan button to scan your phone again.
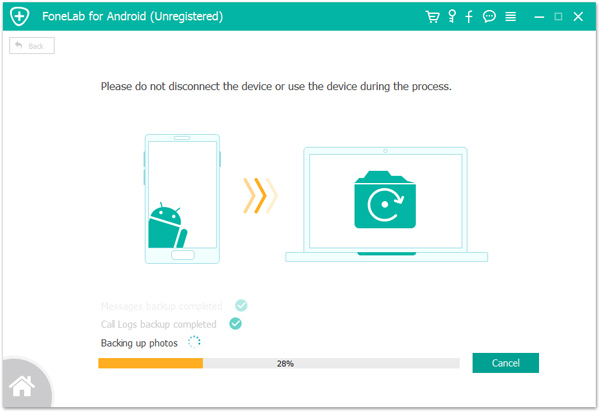
Finally, I would like to show you how to use the fastest way to back up the data in Nokia G10/G20 to your computer. With the backup file, you can save your important data well. At the same time, when your data is lost, you can also directly restore the data in the backup file to your device.
Step 1: Run Nokia Data Recovery, and then select “Android Data Backup & Restore” mode on the main page.
Step 2: Use a USB cable to connect your Nokia G10/G20 to the computer.
Step 3: Select “Device Data Backup” or “One-click Backup” option as you like on the page.
Step 4: Now, you can select the data you need to back up on the page. After selecting, you can change the save path of your backup file. Finally, click “Start” to begin backing up the data from Nokia G10/G20 to the computer.