iPhone X is “the future of the smartphone” according to Apple, but it’s going to be hard to find in stock. You’ll also need to brace yourself for the iPhone X price and release date that Apple announced last week. It costs more than any prior iPhone and ships later than expected. That’s the only bad news, though. Apple claims the iPhone X, which is pronounced ‘iPhone 10’, is worth your money and the extra wait time. This is Apple’s 10th anniversary iPhone, and it’s making big changes for 2017.
There is no doubt that iPhone X brings many new experiences to users once again. However, users still can not avoid data loss in the process of using iPhone X.
There are many ways you can lose data on an iPhone X. You may delete it by mistake, experience a system crash, forget your password, catch a virus, damage your device, or have your iPhone X stolen altogether. Besides, factory resets, iOS updates, jailbreaking/flashing, and being unable to sync backups are also common scenarios that result in you needing to recover your data. Although it’s scary to imagine, you don’t have to worry about what can happen to your data. iPhone Data recovery, which as the world’s 1st data recovery tool can get it all back in a click, what’s more, the program allows to recover almost all the deleted and lost data including Contacts, Messages, Call history, Notes, Photos, Videos, Calendar, Reminder, WhatsApp messages, Messenger, Voice memos, Voicemail, Safari’s bookmark and so on. And it’ll do all the hard work for you.
You May like:
Transfer Data Contacts Photos from Android to iPhone X
Transfer Data from iPhone to iPhone X


Now, please follow the below guides to restore the deleted and lost data from your iPhone X.
Recover Data from iPhone X with iPhone Data Recovery
Part 1 Recover Data from iPhone X Directly
Part 2 Recover iPhone X Data from iTunes Backup
Part 3 Recover iPhone X Data from iCloud Backup
Restore Data from iPhone X with Mobile Transfer
Part 4 Restore Data from iCloud Backup to iPhone X
Part 5 Restore Data from iTunes Backup to iPhone X
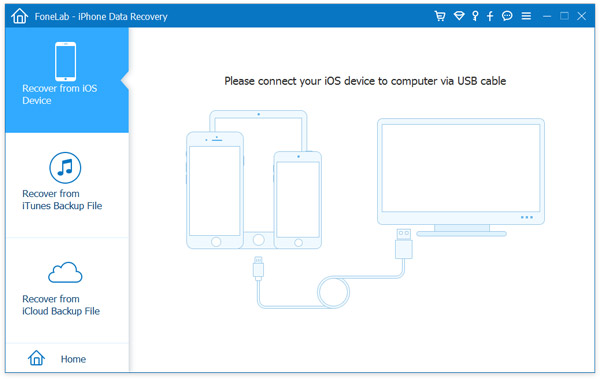
Step 1. Using your device’s USB cable, connect your iPhone X to your computer, then launch iPhone Data recovery on your computer, and let iPhone Data recovery automatically detect your iPhone. A Recover from iOS Device window should appear.
Make sure you’re running the latest version of iTunes before using iPhone Data recovery, and then disable automatic syncing in iTunes (launch iTunes > Preferences > Devices > Check “Prevent iPods, iPhones, and iPads from syncing automatically”).
Step 2. When your iPhone X is recognized by the program, you are allowed to select whatever file types that you want to recover, and click the “Start Scan” button in the window to let the program directly scan your iPhone X for deleted/lost data.
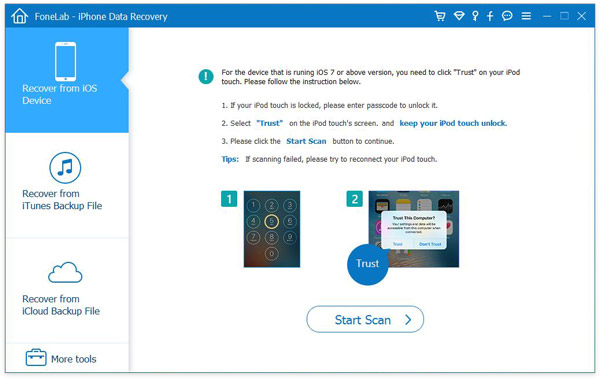
This process may take a few minutes. During the scan, if you see the data you’re looking for, click the Pause button to stop the process.
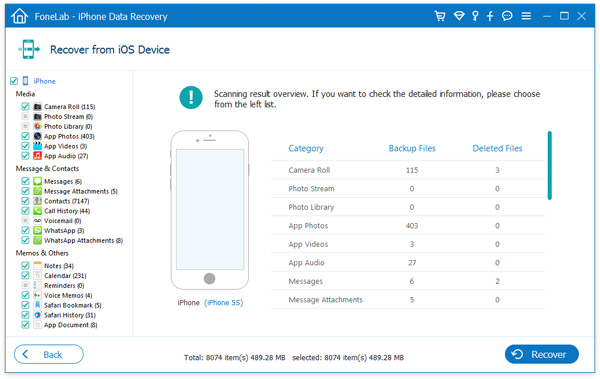
Step 3. After the scan is completed, you’ll see the scan results. Both your lost and existing data on your iPhone X should be displayed in different categories. Enable the Only display the deleted items option to filter out the deleted data, and by clicking the file type on the left side, you can preview all the found data. There’s also a search box on the top right that lets you search for a specific file.
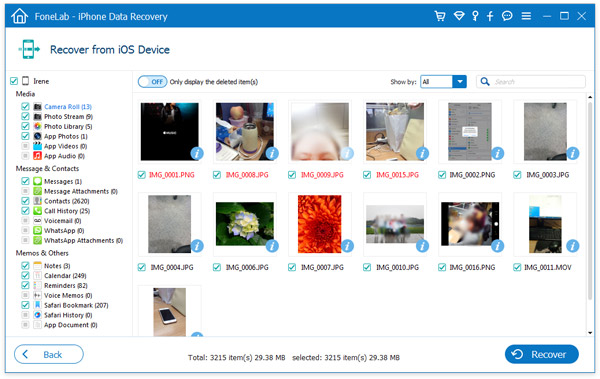
When you find all the data you need, put a check mark in front of the box to select it, then click the Recover button at the bottom right of the window, and all the recovered data should save to your computer. However, when you click Recover, all texts, iMessages, contacts, and notes will prompt a pop-up that asks you to Recover to Computer or Recover to Device . If you want to put this stuff back on your iOS device, click Recover to Device.
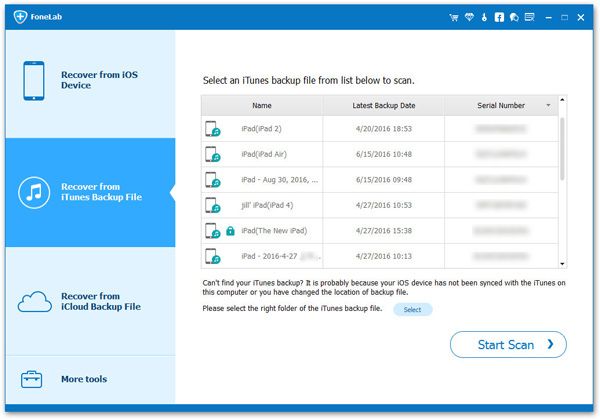
Step 1. Launch iPhone Data recovery and click Recover from iTunes Backup File , then let the iTunes backup recovery tool detect and display all iTunes backup files on your computer, just choose one of them as you like.

Step 2. Select the iTunes backup file that has the data you want to recover, click Start Scan , and let it grab all data from the iTunes backup file.
Step 3. After a while, all data in the backup file will be displayed in categories. You can preview them individually before recovery, and mark and recover those you want by hitting the
Recover button at the bottom. There’s also a search box in the window that lets you search for a specific file.
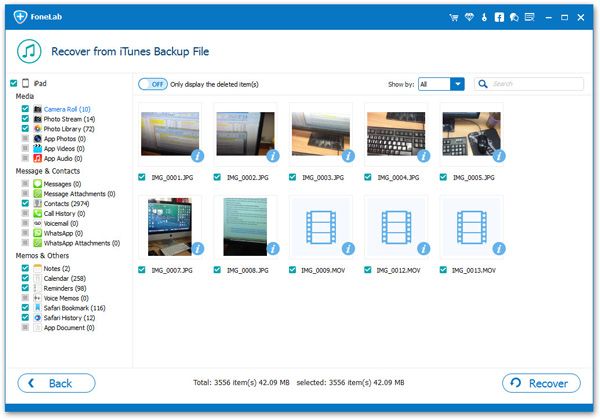
Note: Now contacts, notes and messages can be directly recovered to your iPhone X if you keep your iPhone X connected with your computer via a USB cable during the recovery process.
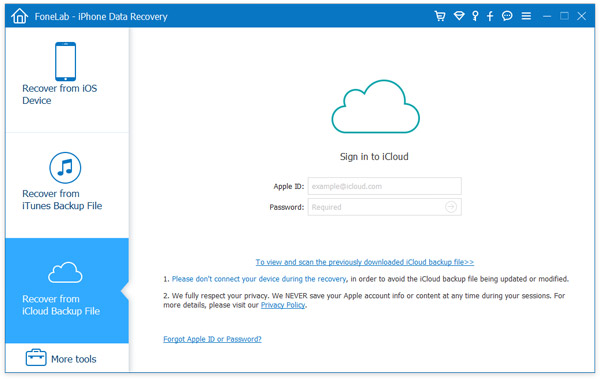
Step 1. Launch iPhone Data recovery, choose the Recover from iCloud Backup Files recovery mode on the top, and then in the window below, enter your iCloud account credentials to login. iOS Data recovery said it will not store any your Apple account.
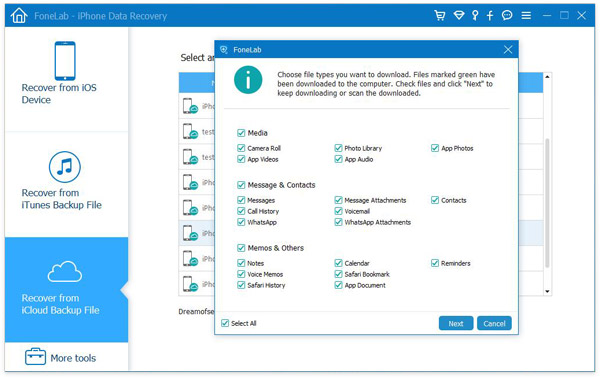
Step 2. When logged into iCloud, iPhone Data recovery can locate all the iCloud backup files in your account. Choose the file you’ll need to recover data, then click on the Download button.
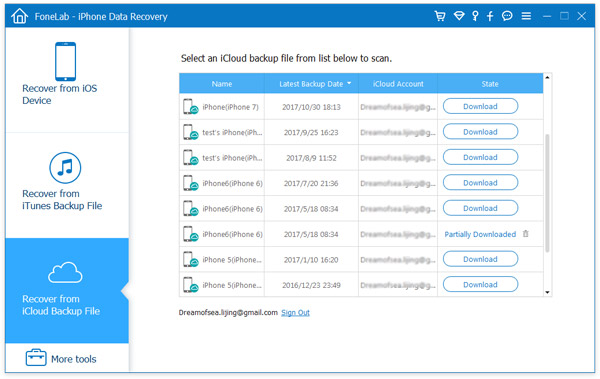
And then in the pop-up, select the type of files you want to download. After that, scan the iCloud content, and then click on the Scan button to begin. This process may take a few minutes.
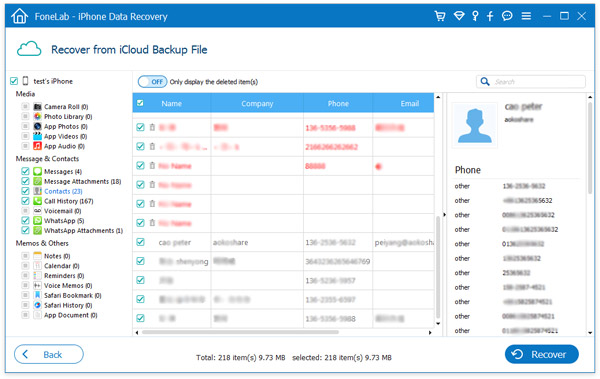
Step 3. When the scan stops, preview the data in your iCloud backup file (like contacts, messages, photos, etc), then check them individually, and click on the Recover to Computer or Recover to Your Device button to save them on your computer or your iPhone X.
Note: Now contacts, notes and messages can be directly recovered to your iPhone X, if you keep your iPhone X connected with your computer via a USB cable during the recovery process.
If you ever backed up your data from iPhone X with iTunes or iCloud, you can also use the below two ways to restore the data from these backup files to your iPhone X with the help of Mobile Transfer, which is the all-in-one data transfer and management program.
After downloaded the Mobile Transfer, please install and run it on your computer, and you can see the primary interface as below.
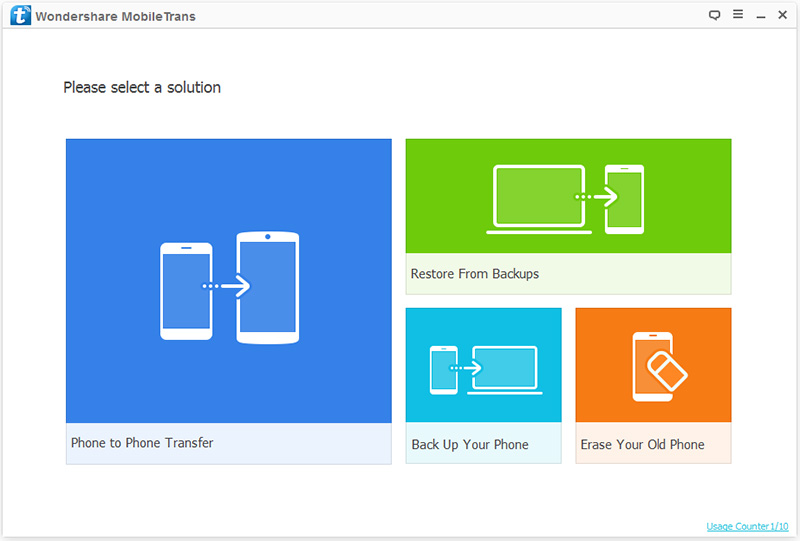
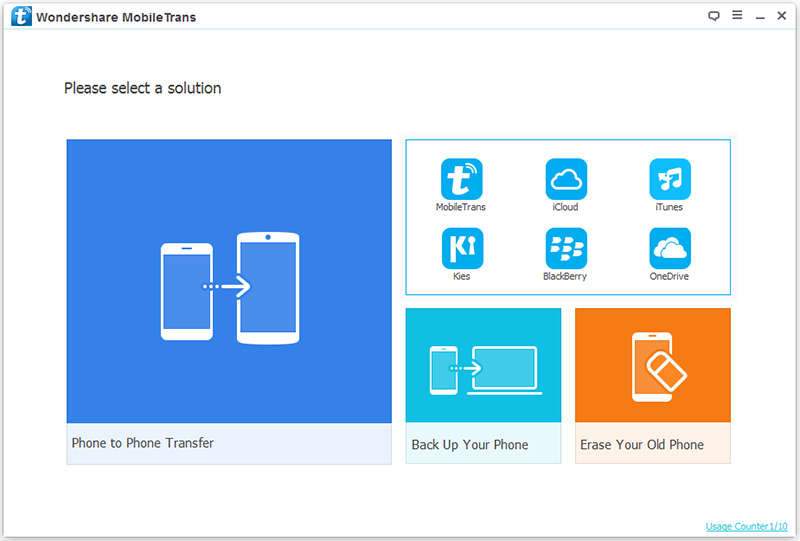
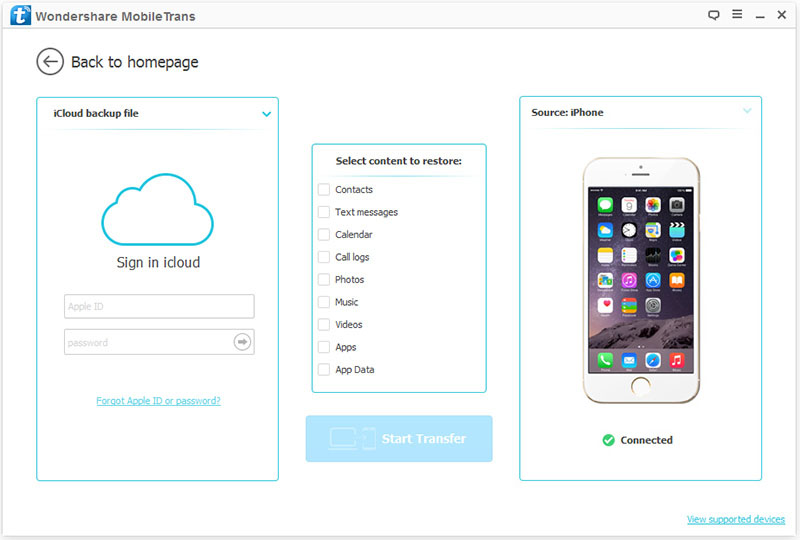
Step 1. Click on “iCloud” from “Restore from Backups” in the primary window of the software.
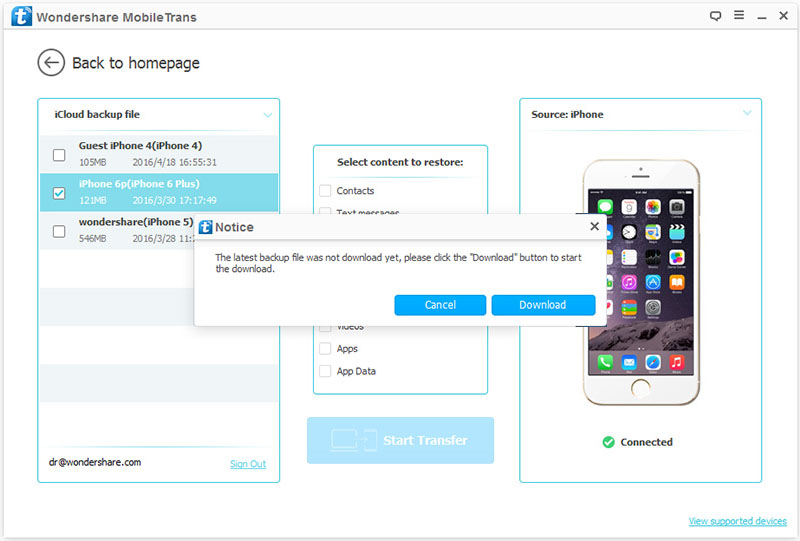
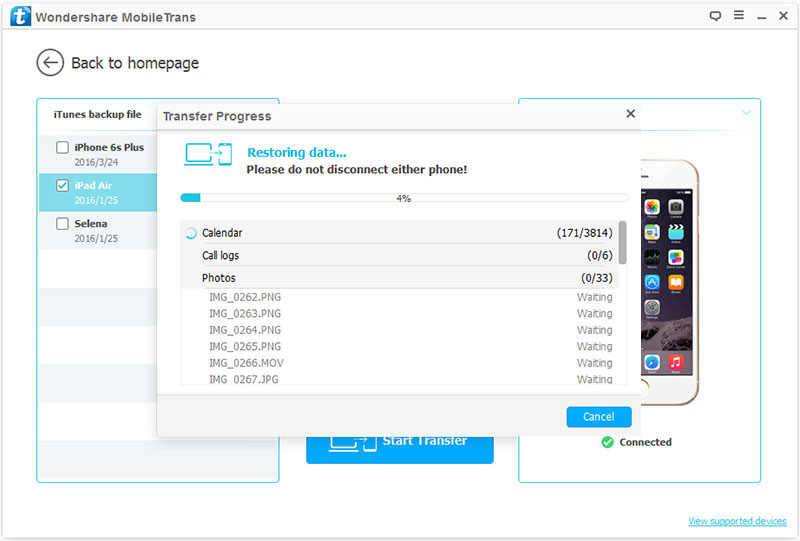
Step 2. Sign your iCloud account, then you can see all the iCloud backup files displayed. Before the data transfer, you need to wait for iCloud backup download. It will take several minutes.
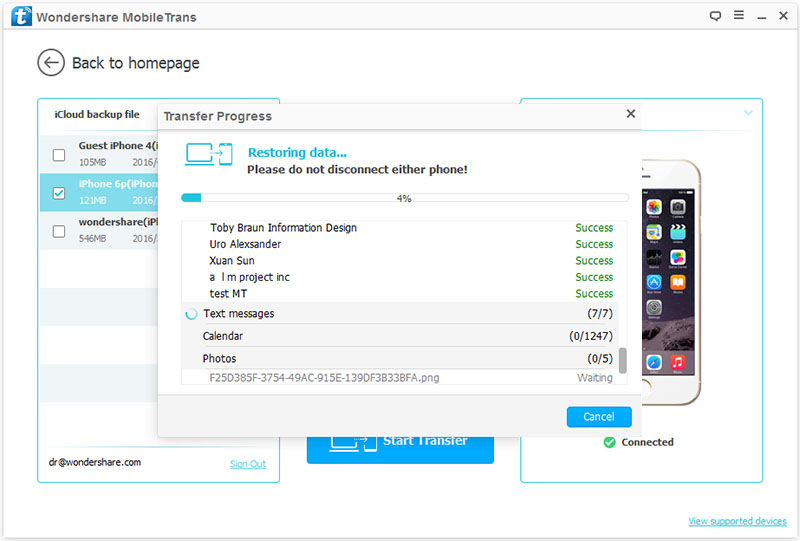
Step 3. Click on the “Start Transfer” button to begin the process.
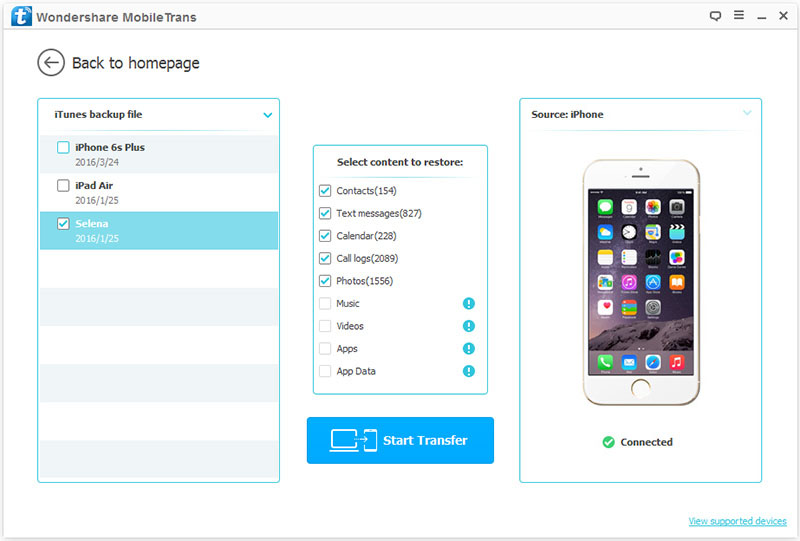
Step 1. Choose “Restore From Backups” mode on the homepage and click on the “iTunes” option to move on.
Step 2. Select the files you would like to transfer from your iTunes backup, then your Samsung S8 is detected by the program, simple press “Strat Trasnfer” to move them to your new phone.
iPhone icloud Recovery for free
Changing the iPhone, restoring the device or synchronizing music may sometimes delete your contact details. If you encounter this situation, the easiest way is to restore through iCloud. If you have enabled iCloud contact synchronization (usually selected by default), you should be able to restore your contacts in a few simple steps:
Go to Settings on iCloud.com, and then click Restore Contacts (in the Advanced section). Available versions are listed by filing date and time.
On the right side of the version you want to restore, click Restore. There may be more versions than one that can be displayed at a time.
If you find that your contacts are not in your iCloud account, you can also examine your iTunes account carefully. By connecting the iPhone to the PC and restoring iTunes, you can download all the archived information stored on iTunes. However, please note that will delete all data on your phone and replace it with the content stored in your account.
Restore photos from the iPhone
With the release of iOS, Apple can more easily retrieve deleted photos and videos from the iPhone.
You just need to follow these steps, but there’s an important caveat that I’ll explain later:
Step 1: Go to the photo app for the iPhone and click on the album on the bottom toolbar.
Step 2: Scroll down the list and then click on the latest deletion. As the name implies, you can find albums of recently deleted photos and videos here.
Step 3: If you find the lost image, just click on a single photo, then choose to restore it to add back to the album, or if you want to delete it permanently, choose to delete it.
Warning: Recent deletions show only photos and videos from the past 30 days. After that, the file will be permanently deleted.
If you’re looking for photos over 30 days, you can restore the iPhone from an old backup using iTunes
Users of the iPhone can download third-party software, etc. But before using these third-party applications, you can try another way to retrieve deleted text.
This method is invalid if you disable the synchronization option in iTunes. If you have enabled the synchronization option, you may recover lost text messages, because as long as your device is connected to the system, the synchronization function creates a backup on your PC.
There are three steps to retrieve lost mail in iTunes:
Connect the iPhone to PC/Mac (which you often use) and open iTunes.
Now select the “Restore Backup” option in iTunes (after selecting the device).
The “Restore Backup” option replaces the current data of the device with backup data. This may take a few minutes, and the message you lost will eventually be displayed on your device. However, backing up data is possible only after deleting messages.
Conclusion
It’s always better to use backup applications on smartphones. Retrieving lost messages is not easy and usually unsuccessful. Many times deleted messages cannot be restored.
Police and intelligence agencies can retrieve information because they have experts to help them. Authorities can also request help from mobile phone operators because they can also access users’messages. However, operators only provide help to the authorities, not to customers.
* Reset Your iPhone or iPad to Factory Settings
Factory reset restores the device to factory settings by resetting the entire system. All data and applications will be deleted because the drives in the device will be reformatted. To reset your iPhone’s settings (the iPad’s steps are basically the same) and clear all of the data, follow these steps:
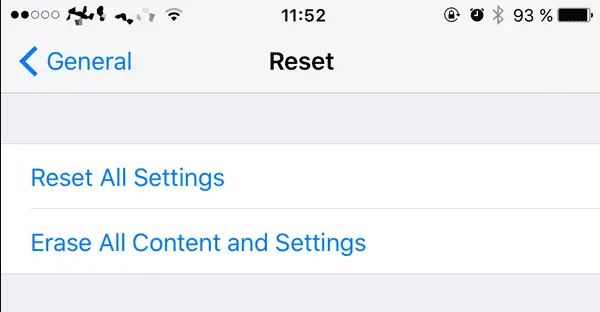
1:Go to Settings and scroll down until you find the Reset tab. You’ll see some options that you can reset, such as a keyboard dictionary or home screen layout.
2:To restore your iPhone to its factory default settings, click “Erase all content and settings” and then click “Erase iPhone.” If a password or a restricted password is set, you will be asked to enter a password before you can reset the device.
3:After entering your password, you will be asked to enter your Apple ID password. Enter it to start erasing all data in the device.
4:The reset back to factory settings will run and should not exceed a few minutes. When you see the welcome screen, it means that the factory reset is complete and there is no personal data on the device.
* Perform Reset with no Passcode using iTunes
There is a way to replace the above method, which can be done using iTunes. It’s good when you can’t open your iPhone because it’s disabled (too many wrong password attempts) or when you don’t remember the password. Proceed as follows:
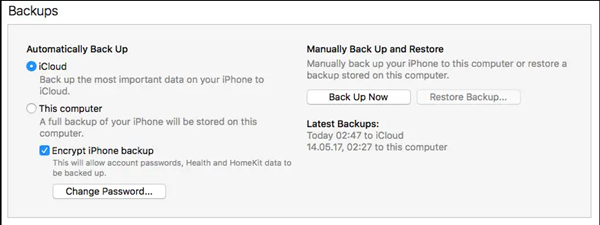
Open iTunes. To prevent any potential obstacles during the reset process, make sure your iTunes version is up to date, just click “Check for updates” in the drop down menu.
Connect your iPhone to your computer. If you want to keep some files, you can click “Backup Now” to back up. If you only want to delete everything without saving it first, you can skip the backup.
Click the “Restore iPhone” option in iTunes and click “Agree” to confirm your decision. If you change your mind and decide to restore your data on your phone, click Restore from Backup….
* Reset Your iPhone or iPad using Find My iPhone
Alternatively, you can use “Find My iPhone.” If your iPhone is lost or stolen, and you want to make sure that no one can access its data, this is very convenient. To do this, perform the following steps:
Visit the “Find My iPhone” website and sign in with your Apple ID.
If there are multiple devices in this account, select the device you want to reset from the list of available devices.
Click the “Erase iPhone” (or iPad if you are resetting your tablet) option in the device info box. You will be asked to confirm your decision. After that, the reset will begin. If the device is offline, it will start as soon as the device comes online.
Keep in mind that if you set the Family Sharing setting, you can also reset your family member’s device to the factory default settings. When you reset your iOS device, you will be asked to enter your phone number and message, which will be displayed on the screen when the reset is complete.
Thanks to the magic of apple and other smartphone makers, today we can carry all the libraries in our pockets and wallets. Take it one step further: every month, our mobile phones no longer use plastic and paper blocks such as credit cards, airline tickets, prescriptions, etc. We carry it for everyday life.
It’s convenient for everyone. But convenience comes with a compromise. Like most people, mobile phones become desk drawers for personal information. This will make things easier, but for criminals, the value of mobile phones will increase. When a mobile phone is lost or stolen, all personal information that is considered safe needs to be repaired. At the same time, there is a risk of identity theft and credit card fraud.
What to do? much External company data infringement (e.g. Equifax 2017 infringement or Yahoo! It may not be enough to prevent 2013 violations (at least individually), but what happens after you lose or steal your iPhone is often up to you. The method is as follows.
Before you lose your phone.
Please keep IOS up to date.
Digital security is an arms race between suppliers and hackers. Each new IOS update uses more security patches, making it difficult for intruders to do useful work.
Set “find my iPhone.”.
Find my iPhone, which is included in icloud, is an application that logs in to the browser and can immediately confirm the location of the phone. If you’re not sure if the iPhone is in the restaurant or in the car, that’s a useful resource. My iPhone search also offers the option to shut down or delete all data from the machine remotely if it is suspected that the phone has been stolen.
Lost or stolen mobile phone:
Please delete the credit card from Apple pay.
Another great feature of icloud: move to all browsers and delete credit cards from Apple pay. If you connect the phone again, it’s easy to add more.
Please delete the data.
If the mobile phone is believed to be stolen, it can be completely deleted to prevent the thief from accessing personal information. My iPhone search can be relaxed.
Search for deleted data.
The important parts are as follows. There’s an app that can recover data even if you wipe your phone clean. Imyfone iPhone data repair.
You can recover data in icloud, in iTunes, or on the machine itself. If the phone is lost or damaged or the password is forgotten, all valuable data can also be repaired through imyfone iPhone data. The application supports more than 20 data types. It can not only repair photos, contact information and messages, but also repair what’s app chat, voice message and call record