Summary: This is an article that will tells the best way to transfer all data from any Android smartphone and tablet to ZTE Axon 20 5G.
The ZTE AXON 20 5G screen is equipped with a 6.92-inch OLED display with a resolution of 2460×1080, supports a refresh rate of 90 Hz, has a 100% P3 wide color gamut, 10bit color depth, and can have a good viewing experience. The back of the fuselage uses a high-hardness 3D curved glass back shell, equipped with an optical coating that has been crafted through 36 crafting processes, so that the overall fuselage presents a “sparkling” colorful effect under the light. ZTE AXON 20 5G adopts the design of four rear cameras, which are 64 million ultra-high pixel main camera, 8 million pixel 120-degree ultra-wide-angle camera, 2 million depth-of-field lens, 2 million macro lens, supporting super night scene, focal separation , Professional mode, AI scene recognition, document correction and other functions. In addition, the phone has a built-in 4220mAh battery and is equipped with a 30W wired charging plug, which can be fully charged in one and a half hours.
The biggest highlight of this phone is that there are no openings on the front of the phone. The front camera is hidden under the screen. When viewed from the front, a large screen is quite impressive. If you need a full screen , Is a good choice. If you change your Android phone to ZTE Axon 20 5G, and you also need to transfer data to ZTE Axon 20 5G, then if you have a data transfer software, you can complete the transfer faster. I think Mobile Transfer can meet the requirements of most users.
Mobile Transfer also well known as Phone to Phone Transfer, which is the all-in-one yet easy-to-use data transfer tool that can directly transfer all data including Music, Contacts, Photos, Videos, Messages, Calendars, Apps, App data and other files from one Android smartphone/tablet to another. So, you can one click to sync all data from your old Android device to ZTE Axon 20 5G by using this software. Besides, you are allowed to backup and restore your phone data by using this program.


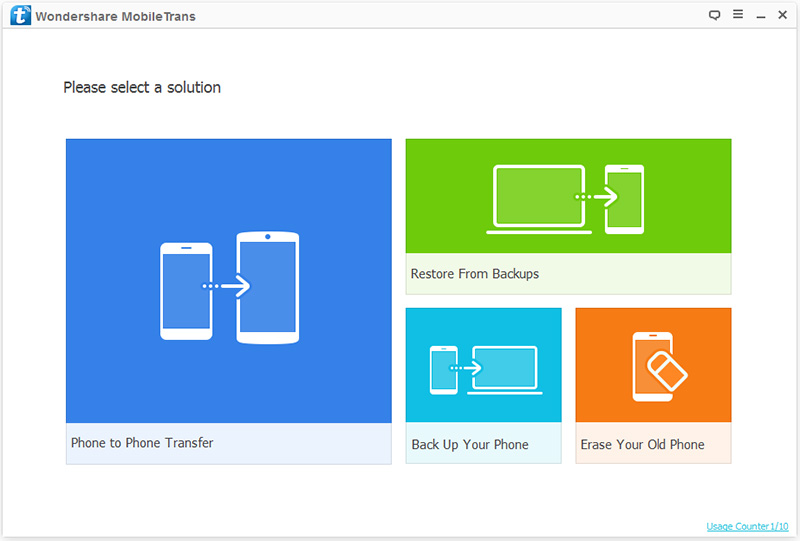
Step 1: First download, install and run Mobile Transfer on your computer. At this point, the main interface has four modes, please click the “Phone To Phone Transfer” button, and then click “Start”.
Step 2: Now, please connect your Android phone and ZTE Axon 20 5G to your computer with USB. At this time, Android is displayed on the left of the main interface, and ZTE Axon 20 5G is on the right. If the order is wrong, in order to ensure that the next steps can be carried out, you need to click the “Flip” button to swap the positions of the two phones.

Step 3: Now, you can select the data you need to transfer in the data type catalog on the main interface, and click “Start Transfer” after the preview is confirmed to transfer the data to your ZTE Axon 20 5G. At this time, you can see the transfer progress bar on the main interface.

Note: If you want to delete the existing data of ZTE Axon 20 5G before transmission, you can select the “Clear data before copy” button. Please do not interrupt the connection between the phone and the computer during the transfer. Please be patient, the transmission speed depends on the amount of data.
Step 1: Run the Mobile Transfer, then you can see that the main interface has four modes, please select “Restore from Backups”, and then click “MobileTrans” among all the projects.
Note: The premise of selecting “MobileTrans” is that you have used this Mobile Transfer software to back up data from your old Android phone. Of course, the program also supports other backup files, such as Kies backup, iCloud backup, iTunes backup, etc. If you get any kind of backup file, you can also choose it.
Step 2: Now you need to connect your ZTE Axon 20 5G to your computer with a USB cable, please ensured that you’ve enabled the USB debugging on your phone’s screen.
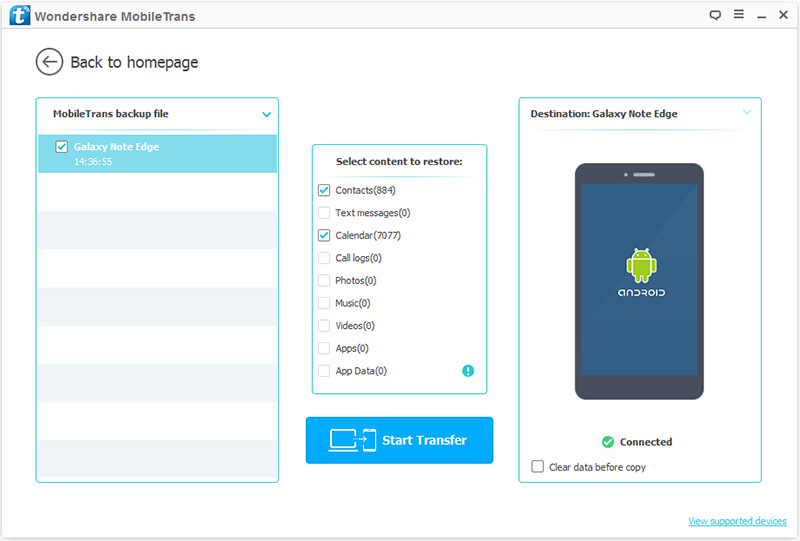
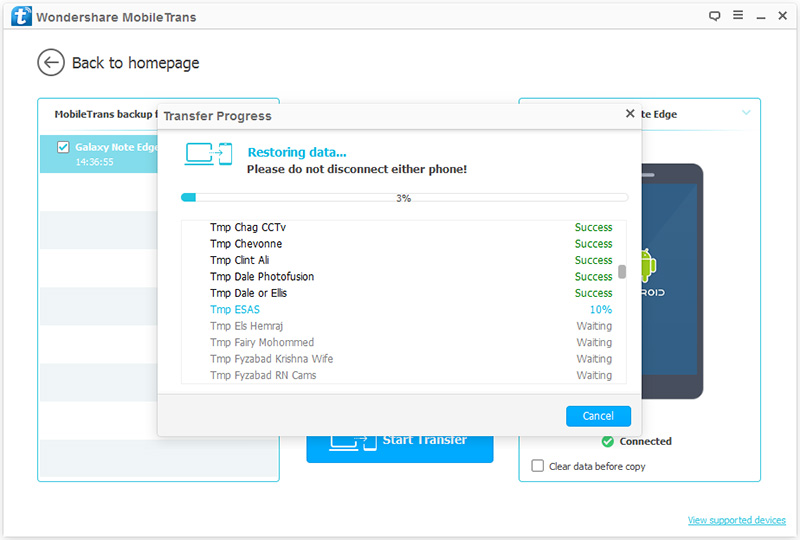
Step 3: Now you can select one of the backup files in the list. The program will extract all transferable files from the selected backup file and display them to you. Please select the file type you need to transfer. After the computer detects your device, you can click “Start Transfer” to synchronize to your ZTE Axon 20 5G. At this time, you can see the transfer progress bar on the main interface. Please be patient, the transmission speed depends on the amount of data.