Summary: Lost your data from Samsung Galaxy Z Fold2 due to several reasons? Please don’t worry, this article will tells you the best ways of how to recover deleted and lost data from Samsung Galaxy Z Fold2, no matter with or without backup.
Based on the successful experience of Samsung Galaxy Fold, Samsung Galaxy Z Fold2 follows the inner folding design. The protective effect of the inner folding method on the mobile phone screen is also obvious. In the process of closing the Samsung Galaxy Z Fold2, your fingers will not cause more damage to the screen. Putting the phone in a bag or on the table also avoids excessive contact between the screen and other objects. The Samsung Galaxy Z Fold2 first brought a 7.6-inch internal screen with a tablet-like visual sense and a 6.2-inch external screen with full-screen visual effects, creating a comprehensive immersive experience. In other interactive experiences, the internal screen of Samsung Galaxy Z Fold2 can be automatically divided into two screens when it is expanded between 80 and 160 degrees with the help of adaptive split screen mode, allowing users to use the upper part of the screen to view content, and the lower part Content related operations. The multitasking function will also stimulate people’s productivity in work and life again. Users can open multiple windows of the same application at the same time to view multiple files side by side, or run multiple applications at the same time, chatting and watching videos. Multiple programs do not interfere with each other.
Compared with the previous generation, Samsung Galaxy Z Fold2 is more complete. But even such an excellent mobile phone is powerless in the face of data loss. Therefore, we need data recovery software to recover the data we need. There are many data recovery software on the market, and we need to discern them carefully. Now, many people think that Android Data Recovery is a good software to recover data.
Android Data Recovery can help users quickly and safely recover the data they need. Moreover, its function can not only restore data but also backup data. In addition, its operation is not difficult, users only need to follow the steps. Then, it recovers many types of data including contacts, call logs, memos, pictures, audio, video, whatsapp messages, etc. In addition, it is highly compatible, including all android phone types, such as Samsung, Huawei, Xiaomi, Redmi, vivo, OPPO, Nokia, LG, etc. Last but not least, the transmission process will neither leak user information nor harm the mobile phone.


Step 1: Connect mobile phone and computer
First download, install and run Android Data Recovery on your computer, then click “Android Data Recovery”, and finally connect the Samsung Galaxy Z Fold2 to your computer with USB, and the connection progress bar will appear on the main interface.

Step 2: Turn on USB debugging of Samsung Galaxy Z Fold2
After entering the program completely, it will automatically detect your Android version. You need to turn on USB debugging according to the steps provided by the program, and then click “OK”.

Step 3: Select the data type
Now, the main interface shows the directory where the data can be recovered, tick the data you need to recover, and then click “Next”. Then the program will scan your phone.

Note: The program needs permission to scan for deleted and lost data. If your device pops up a window, remember to click the device’s “Allow” to make sure the request is remembered. If your device does not pop up such a window, please click “Retry” to try again.

Step 4: Preview and recover the selected files
After the scan is successful, the main interface will display the data types in the form of a list. Please preview and select the data you need, and then click “Recover”. All the data needed to be recovered will be saved on your computer.

Step 1: Run “Android Data Recovery” on the computer, and then click “Android Data Backup & Restore”.
Step 2: Please use USB to connect Samsung Galaxy Z Fold2 to the computer.
Step 3: The main interface has the options of “Device Data Restore” and “One-Click Restore”, just choose one.

Step 4: Select the desired backup from the backup list, and then click “Start”.

Then select the required data, and then click “Restore to Device” or “Restore to PC” to save them all to the corresponding device. During the entire data recovery process, please do not disconnect the phone from the computer.

Note: Before using this method, please make sure you have used Samsung Kies to back up your phone data.
Step 1: Connect Samsung Galaxy Z Fold2 to the computer, and then launch the Samsung Kies.
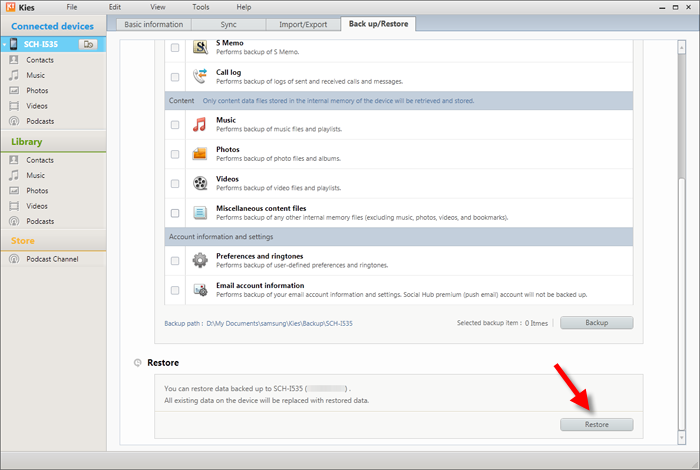
Step 2: Click the “Backup/Restore” tab at the top of the menu. Then click “Restore” to continue.
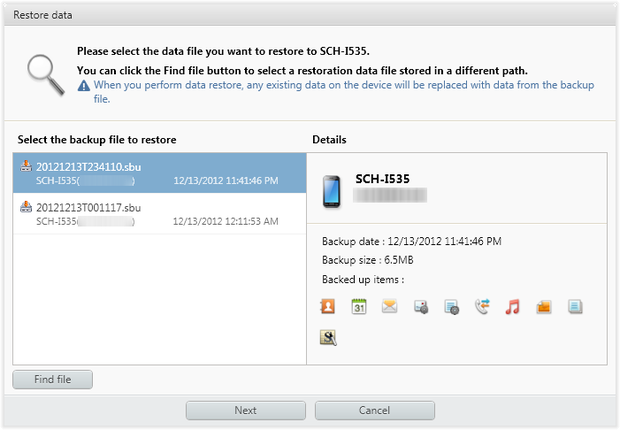
Step 3: Select the Kies backup file you created earlier, and then click “Next”.
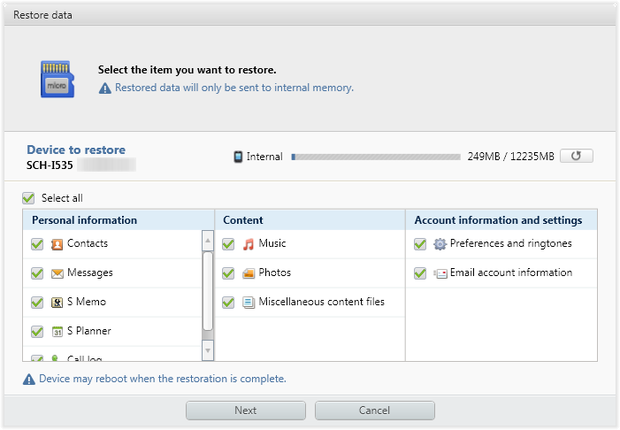
Step 4: Select the file type to be transferred and press “Next”.
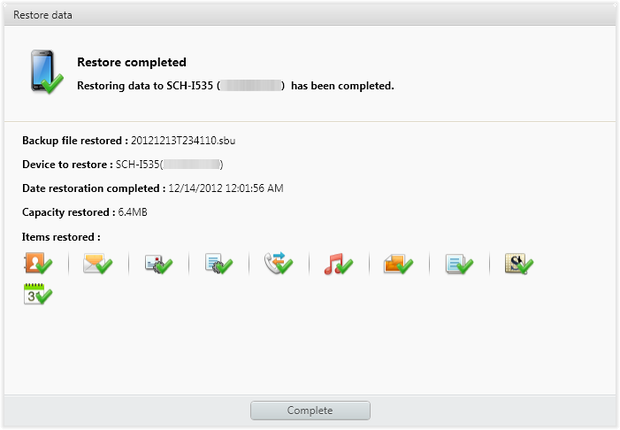
Step 5: Once your device is recognized, you can restore the selected content to Samsung Galaxy Note 20 Ultra with one click.
Step 1: Click the below button to free download a trial version of Best Data Recovery to your computer.
Then install and run this software on your computer. Then connect your Samsung Galaxy Z Fold2 to the computer via a USB cable.
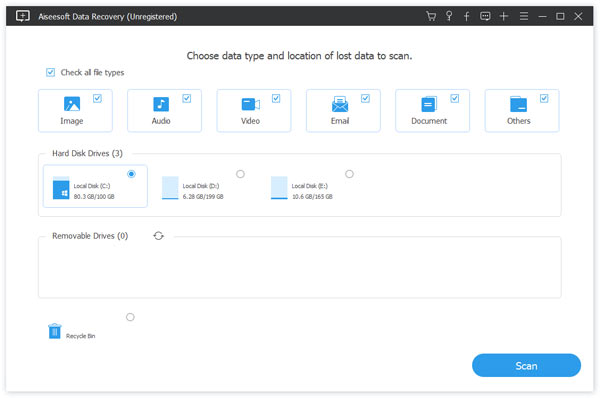
Step 2: You can find different data types and disk options on the homepage as well. Please select the file types you want to recover, and select your Samsung Galaxy Z Fold2, then click “Scan” to quickly scan your device.

Step 3: After the scanning is completed, you will find that the scanned result are divided into different formats. Click the file as needed to see the details of a specific item, and then select them. You can use the “Filter” feature to quickly locate the files you want to recover. After selecting, click “Recover” on the page to save the data to be recovered to the computer.

Step 4: After the scanning is completed, you will find that the scanned result are divided into different formats. Click the file as needed to see the details of a specific item, and then select them. You can use the “Filter” feature to quickly locate the files you want to recover. After selecting, click “Recover” on the page to save the contacts to be recovered to the computer.
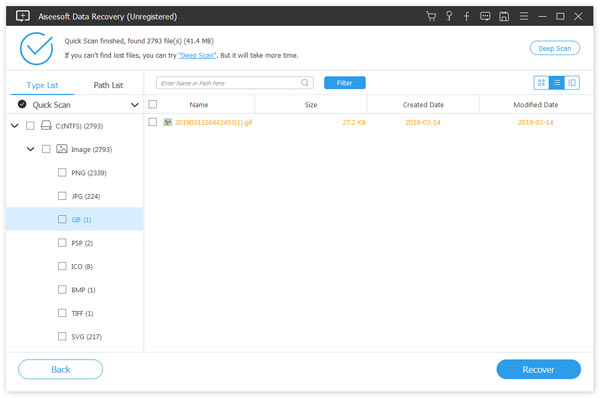
Note: If you can’t find the contacts you need, just pressing the “Deep Scan” button which is in the upper right corner of the interface to scan it again.