Summary: This article will introduces 4 best ways for users to efficiently recover the deleted and lost data from Samsung Galaxy Note20/Note20 Plus.
The Samsung Galaxy Note 20 series will provide two versions of the Galaxy Note 20 and Note 20Plus, both with a center-opening full-screen design, and the size of the opening and the width of the frame will be further reduced relative to the previous generation products. It will support a 2K resolution and a 120Hz screen refresh rate, a rear-mounted 100-megapixel main camera + 12-megapixel ultra-wide-angle + 48-megapixel periscope telephoto + 3D depth-of-field lens lens, supporting 10x optical Zoom and up to 100x digital zoom. Note 20 in the Samsung Galaxy Note 20 series continues to use a 60Hz screen, and the Plus version supports a 120Hz refresh rate.
Have you deleted important data by mistake while cleaning your phone, and the data was accidentally deleted by a child. Have you encountered these situations? Samsung Galaxy Note20/Note20 Plus may also encounter these situations. Always worried about not finding a good way? Don’t worry, if you have Android Data Recovery, these problems are not a problem.
Android Data Recovery is a software specially developed for recovering data, which has been widely used now. Although it is professional, the operation is very simple. You can restore the data you need in two or three simple steps. Compared with other data recovery software, it has many highlights. First of all, its compatibility is very good, including almost all Android phones. Secondly, it can recover multiple data types, including contacts, call logs, text messages, pictures, audio, videos, etc. The important thing is its security, which will neither leak your information nor harm your phone, but also guarantee the high-quality recovery of data.


Step 1: Connect your phone to computer
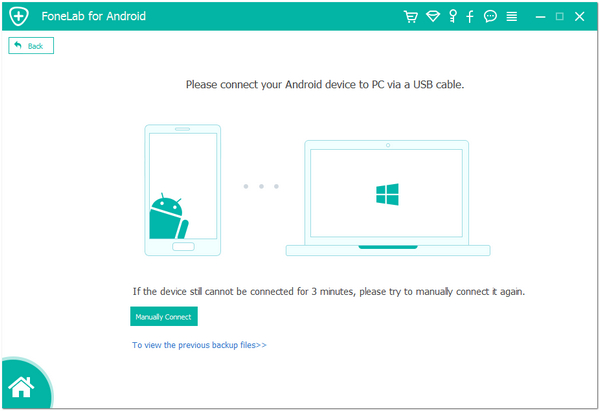
First download, install and run the program on your computer, then click “Android Data Recovery”, then connect the Samsung Galaxy Note20/Note20 Plus with your computer using its USB cable, and the progress bar of the connection will appear.

Note: If the driver has been successfully installed but still cannot be connected, please check whether the driver is disabled under “Device Manager”. You can find the driver in “Computer”-“Properties”-“Device Manager”-“Android Phone”.
Right-click on that particular node and check if it is disabled. If yes, click “Enable” and the device will successfully connect to the computer.
Step 2: Enable USB debugging for Samsung Galaxy Note20/Note20 Plus
After fully entering the program, it will automatically detect your Android version, please open USB debugging according to the steps provided by the program, and then click “OK”.

Step 3: Select the data to be recovered
The main interface shows all types of data that can be recovered, select the type of data you need to recover, and click “Next” after confirmation. Then the program will scan your phone.

Note: Here, the program needs permission to scan deleted and lost data. If your device pops up, remember to click the device’s “Allow” to ensure that the request is remembered. If no such window pops up on your device, please click “Retry” to try again.

Step 4: Preview and recover the selected files
After scanning, the type of data you need to recover is displayed in the form of a list on the main interface. Please preview and confirm the data type, and then click “Recover”. All data that needs to be recovered will be saved on your computer.

Step 1: Download, install, and run the program on your computer, and then click “Android Data Backup & Restore” on the homepage.
Step 2: Connect the Samsung Galaxy Note20/Note20 Plus to the computer via its USB cable, and make sure that you’ve enabled the USB debugging on your phone’s screen.
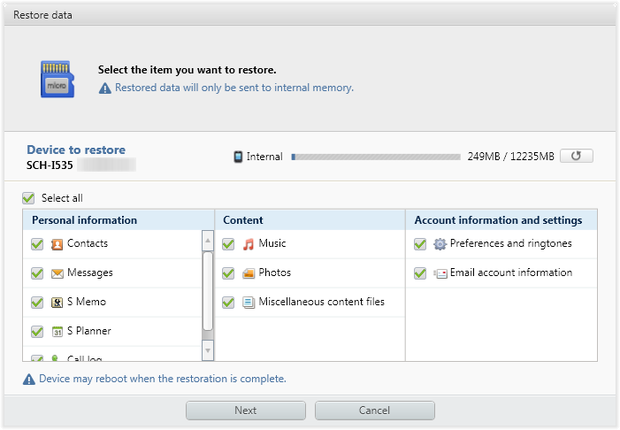
Step 3: Both the “Device Data Restore” and “One-click Restore” options can be used to restore the backup file, just select one of them.

Step 4: Select the desired backup in the backup directory, and then select the required data from the selected backup. Once selected, click “Start” to preview all recoverable file types in the selected backup.

Select the required data, and then click “Restore to Device” or “Restore to PC” to save them all to the corresponding device. During the entire data recovery process, please do not disconnect the phone from the computer.

Note: Before using this method, please make sure you have used Samsung Kies to back up your phone data.
Step 1: Connect Samsung Galaxy Note20/Note20 Plus to the computer, and then launch the Samsung Kies.
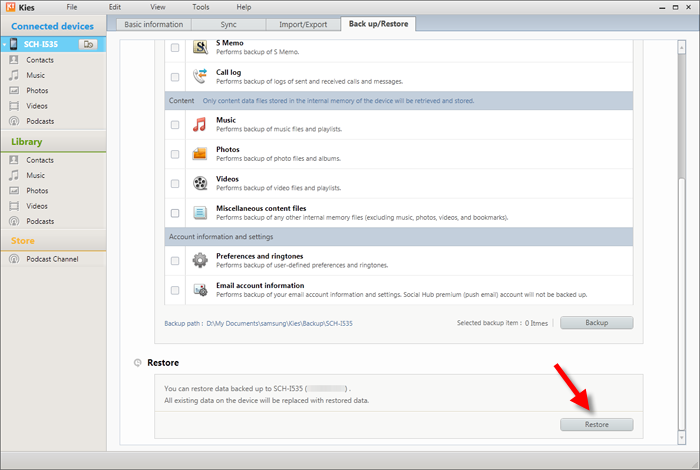
Step 2: Click the “Backup/Restore” tab at the top of the menu. Then click “Restore” to continue.
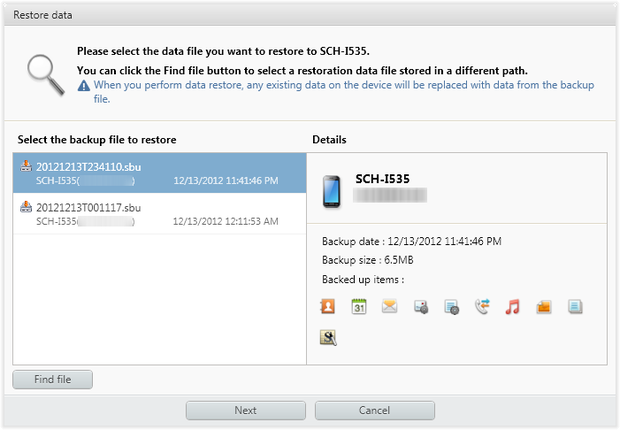
Step 3: Select the Kies backup file you created earlier, and then click “Next”.
Step 4: Select the file type to be transferred and press “Next”.
Step 5: Once your device is recognized, you can restore the selected content to Samsung Galaxy Note20/Note20 Plus with one click.
Step 1: Click the below button to free download a trial version of Best Data Recovery to your computer.
Then install and run this software on your computer. Then connect your Samsung Galaxy Note20/Note20 Plus to the computer via a USB cable.
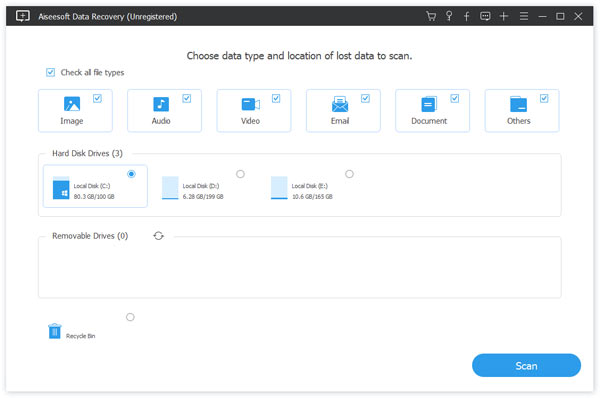
Step 2: You can find different data types and disk options on the homepage as well. Please select the file types you want to recover, and select your Samsung Galaxy Note20/Note20 Plus , then click “Scan” to quickly scan your device.

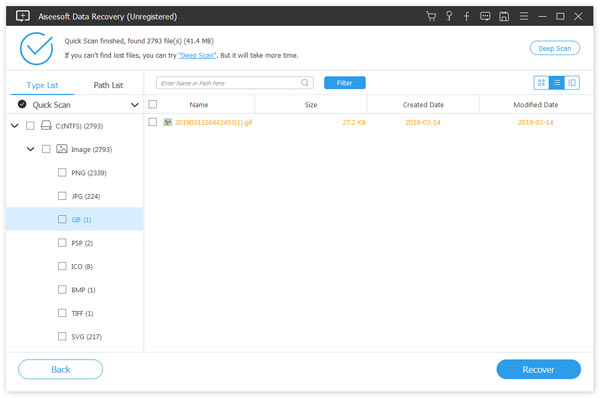
Step 3: After the scanning is completed, you will find that the scanned result are divided into different formats. Click the file as needed to see the details of a specific item, and then select them. You can use the “Filter” feature to quickly locate the files you want to recover. After selecting, click “Recover” on the page to save the data to be recovered to the computer.

Note: If you can’t find the data you need, just pressing the “Deep Scan” button which is in the upper right corner of the interface to scan it again.