As a consumer, you surely don’t want to have data transfer and data recovery problems while using ZTE Axon 40 SE, which will affect your experience of using the phone. This next article will give you several safe and effective ways to transfer all your data including pictures, photos, videos, contacts, audio, SMS, apps and more files from any Android to ZTE Axon 40 SE, as well as recover deleted and lost data from ZTE Axon 40 SE without backup.
The ZTE Axon 40 SE is a mid-range phone with a 6.67-inch FHD+ resolution AMOLED center punch screen and 60Hz refresh rate; Secondly, the ZTE Axon 40 SE is equipped with a 50MP main camera, as well as a 5MP macro camera and a 2MP depth of field camera. The ZTE Axon 40 SE also features a built-in ZTE T618 chip and a 4500mAh battery with 22.5W charging support.
The ZTE Axon 40 SE has a moderate performance in terms of screen, processor, battery, and camera. However, when purchasing and using the ZTE Axon 40 SE, users inevitably have questions about data synchronization, data backup and recovery between different devices. Therefore, this article provides users with different solutions for the following four situations. We hope you can choose according to your needs and read it patiently.
Mobile Transfer is a great software when you want to transfer or synchronize data from backups, and we highly recommend you to install it. Mobile Transfer is a secure and fast all-in-one data management software that makes it easy to transfer data between different devices. It is easy to operate and allows quick transfers with just one click. With Mobile Transfer, users can sync data to your ZTE Axon 40 SE without the risk of data leakage, so you can use it with confidence. Next, please be patient and read the specific steps of the two methods below.


Without further delay, please click the corresponding button according to your computer system to download this software to your computer. After installation, please follow the steps in Part 1-2 to learn how to use this powerful software.
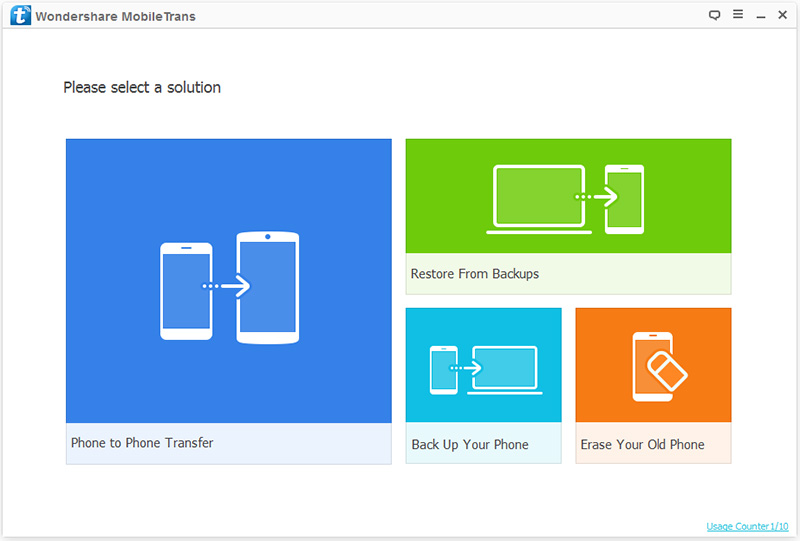
Step 1: Launch the phone transfer software on your computer, then select “Phone Transfer” from all items and click “Start”.
Step 2: Connect the old Android phone and ZTE Axon 40 SE to the same computer with two USB cables.

Note: Make sure the old Android phone is connected on the left and the new ZTE Axon 40 SE is connected on the right. If the directions are reversed, you can click the “Flip” button in the middle to correct the correct data transfer direction.
Step 3: Once your phone is detected by the program. Select the file type you want to copy and click “Start Transfer” to start transferring data. You can click on the task box to view the progress of the transfer. At this point, you can check if the selected files have been transferred to ZTE Axon 40 SE.

Step 1: Go back to the main interface of the transfer software, click “Restore from Backup”, and then select “MobileTrans” from all items.
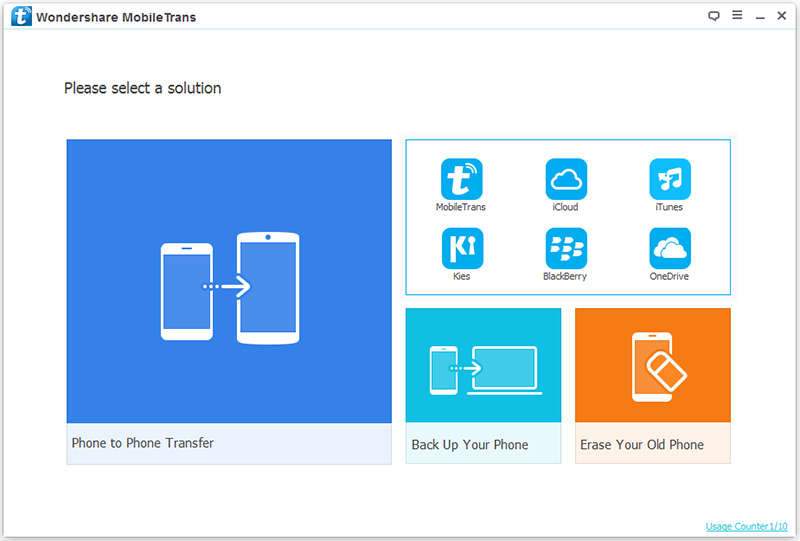
Tip: The program also supports other backup file types, if you want to sync other backup file types, you can also choose Kies, iTunes, iCloud and other options, here we just choose the “MobileTrans” option as an example.
Step 2: Connect your ZTE Axon 40 SE to your computer using the USB cable and add or select the desired backup files in the left panel of the page.
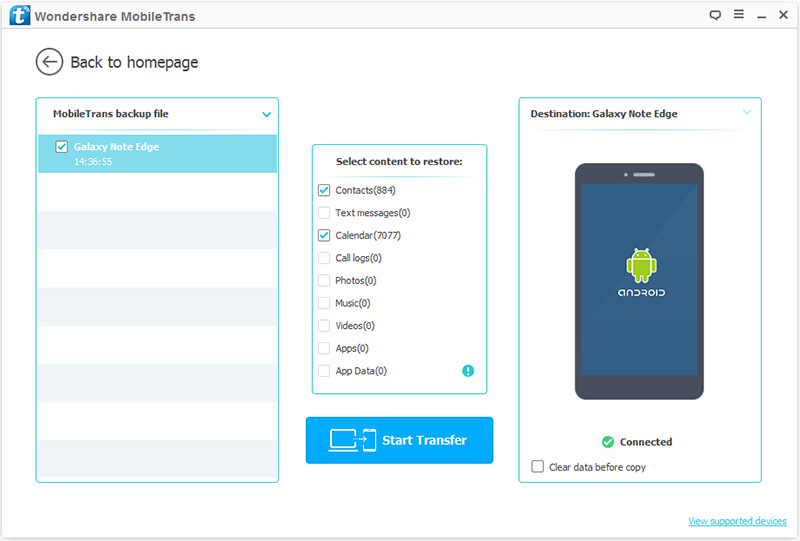
Step 3: Once your phone is detected and the selected backup files are extracted, select the items you want to restore and click “Start Transfer”.
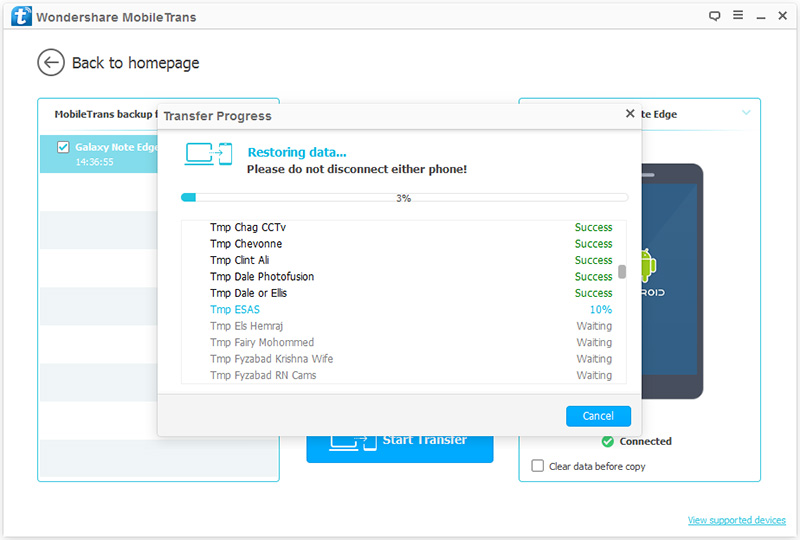
Step 4: At this moment, the program will automatically start the data transfer for you. When the transfer progress bar reaches 100%, the transfer task is completed.
The above two sections are tutorials on using mobile transfer and synchronization of data. Then again, there will be corresponding software that can help you with data recovery. Here I highly recommend Android Data Recovery to you. The following two methods can help you recover lost data to ZTE Axon 40 SE with the help of Android Data Recovery.
Android Data Recovery is a software based on users’ demand for direct data recovery and data recovery from backup to new devices. The operation page of the software is concise, easy to use, and the security is also very good, so users don’t have to worry about the leakage of data transmitted by themselves and recover. After installing Android Data Recovery to your computer, you can follow the following steps.
Without further delay, please click the corresponding button according to your computer system to download this software to your computer. After installation, please follow the steps in Part 3-4 to learn how to use this powerful software.
Step 1: Run the recovery software on the computer, and then click the “Android Data Recovery” module.

Step 2: Connect ZTE Axon 40 SE to the computer with USB cable, and the computer will automatically detect your mobile phone.

Tip: Please remember to enable the USB debugging on your phone’s screen, then tap “OK” to go on.
Step 3: Select the file type to be recovered, and then click the “Next” button to scan the selected lost contents.

Step 4: After successful scanning, preview the lost data in the selected file. Select the required file and click the “Recover” button to start restoring data to your ZTE Axon 40 SE.

Tip: If you can not find the data you wanted, click “Deep Scan” to re-scan your device to find more contents.
Step 1: Return to the homepage of the recovery software and click “Android Data Backup & Restore” button.
Step 2: Connect your ZTE Axon 40 SE to your computer using a USB cable and wait for the program to detect the phone.
Step 3: Once identified, select the “Device Data Restore” or “One-click Restore” button.

Tip: The difference between selecting “Device Data Restore” and “One-click Restore” is whether you can selectively recover the required data. The former can select any data as needed, saving more time and memory on the phone.
Step 4: Now, select the backup files you want to restore from the list and click the “Start” button to begin extracting all recoverable files from the selected backup files.

Step 5: Select the required files and click the “Restore to Device” button to begin restoring data to your ZTE Axon 40 SE or click the “Restore to PC” button to save the data back to your computer. You can view the restoration progress on the page. When the transfer progress reaches 100%, the restoration is complete.
