Summary: This article will provides you with some data transfer and data recovery solutions during the daily use of Sony Xperia Pro-I.
Recently, Sony introduced a new “Micro single phone” Xperia PRO-I, it is the biggest feature is the Sony Black Card RX100 VII version of the same CMOS to smartphones, and optimized for the mobile phone experience. If you want a professional camera phone Sony Xperia Pro-I will be your best choice.
The Sony Xperia PRO-I features a one-inch video sensor from the Sony Black Card RX100 VII, known as “The black card into the phone.”. And in order to meet the user “Pick up the phone can shoot”experience, Sony Xperia PRO-I focusing ability is more powerful. It has 315 focal points, covering 90% of the screen. In addition, Sony Xperia PRO-I also carries the front-end LSI chip, it can bring faster reading and focusing, continuous shooting speed and performance, making the phone’s video experience comparable to micro-simple. Of course, the Sony Xperia PRO-I is the most popular, is built-in 1-inch bottom at the same time the body thickness control within the acceptable range, there is no obvious bulge. This is also due to the sky plug structure adopted by Sony Xperia PRO-I main camera. The sky plug lens has a very compact lens structure and good central picture quality.
In view of the above advantages, whether you are interested in it, like it, get started quickly, a good camera phone can bring people a full sense of happiness, this article will also address issues related to data migration and data recovery.
When you have Sony Xperia Pro-I, do you worry about what to do with the important data on your old phone, and of course the best way to do that is to use a third party tool to transfer the data you need to your Sony Xperia Pro-I, we recommend Mobile Transfer because it has the ability to transfer data faster and better than other software, and it reduces your worries.
Mobile Transfer syncs data between all smartphones and tablets, so you don’t have to worry about different devices, and it also transmits all the data you might need on your phone, including contacts, photos, videos, text messages, music, call logs, apps, app data, document, and all sorts of other data, so what are you waiting for? Download and use it. We support Windows and Mac, you should download the corresponding version based on your computer system.


Supported Brands: Google, vivo, HTC, Samsung, Huawei, Honor, Redmi, Realme, iPhone, iPad, OPPO, Xiaomi, Meizu, LG, ZTE, Lenovo, Nokia, Motorola, OnePlus, etc.
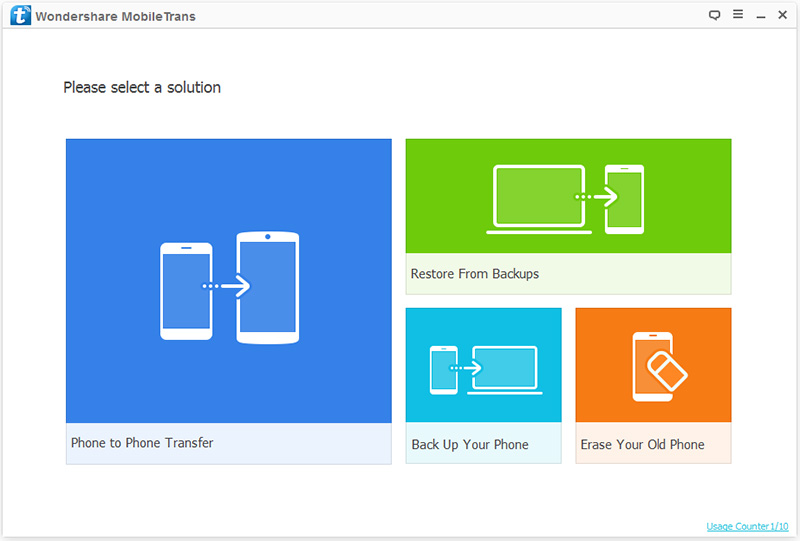
Step 1: First download and install Mobile Transfer on the computer .Then Open the software page ,and click on “Phone To Phone Transfer” and press “Start”.
Step 2: Then follow the instructions on the software page, use the USB cables to connect both of your old Android phone and Sony Xperia Pro-I to the computer.

Note: Pay attention to the location of your old Android phone and Sony Xperia Pro-I, as the source phone, your old Android phone should be displayed on the left panel of the page, and as the destination phone, your Sony Xperia Pro-I should be displayed on the right panel. You can also use the “Flip” button to exchange their position.
Step 3: Finally, choose the file type(s) as you need, then press on “Start Transfer”. The selected files will then be transferred to your Sony Xperia Pro-I. Please wait for a while.

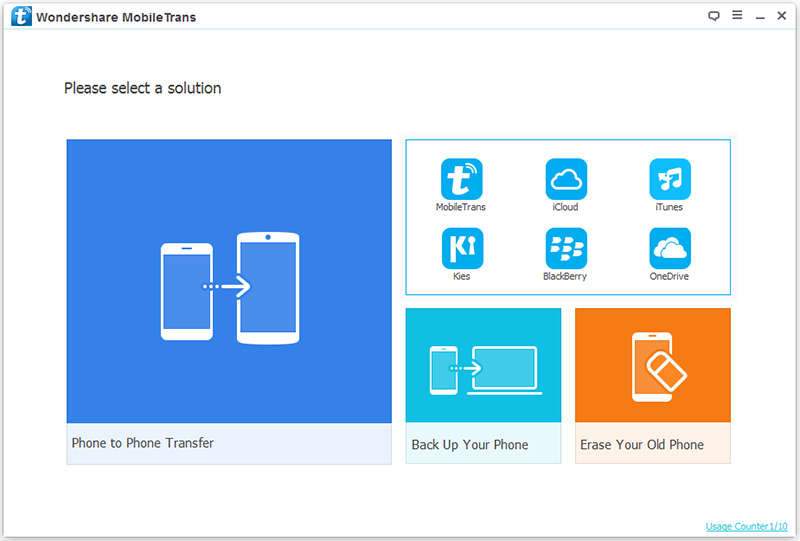
Step 1: Go back to the homepage of the software, click on “Restore from Backups”, and then select “MobileTrans”.
Step 2: Select the backup file you want from the list of backup files on the left side of the page,and use the USB cables to connect your Sony Xperia Pro-I Youth to the computer.
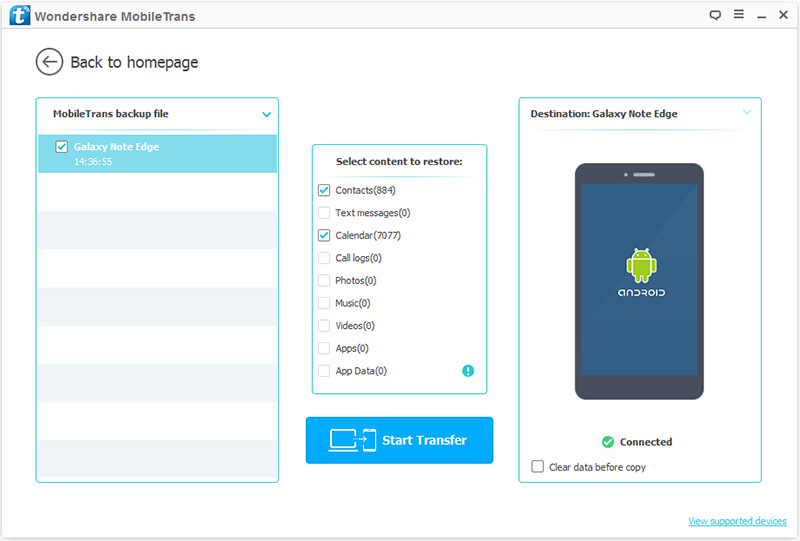
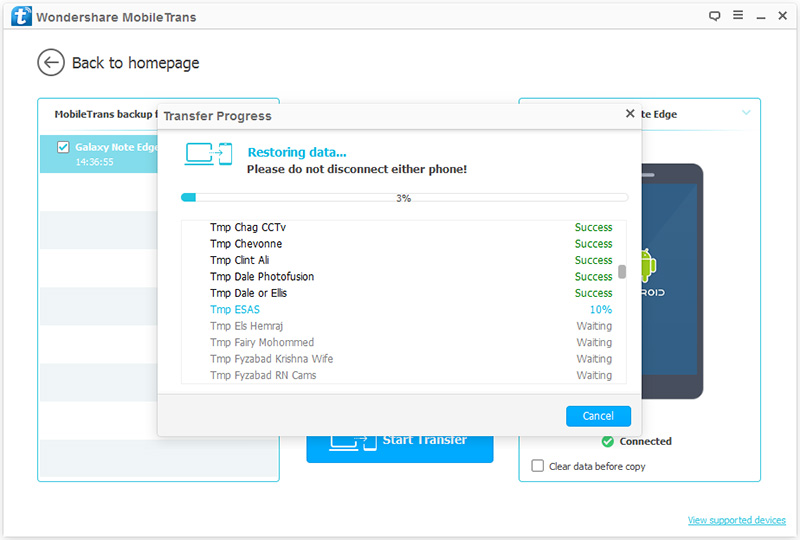
Step 3: After connecting successfully, You need to select the file you want in the backup file,and then click “Start Transfer”. Finally, the file you have selected will be transferred to your Sony Xperia Pro-I. Please wait for a while.
When you use Sony Xperia Pro-I, do you sometimes accidentally delete important files, or sometimes delete some files because of insufficient memory, but suddenly need to use the situation, don’t worry, we will solve this series of problems for you, we recommend you here is the Android Data Recovery software, which can be a perfect solution to all the problems you need to restore.
Android Data Recovery works on most Android phones and tablets, and can retrieve the data you need, such as photos, videos, call history, contacts, text messages, audio, WhatsApp messages, documents, or other data from your Sony Xperia Pro-I if you mistakenly delete them, even if you empty the recycle bin or restore the factory settings, it can be retrieved intact, so if you need it, please download it and use it as soon as possible. We support Windows and Mac, you should download the corresponding version based on your computer system.
Supported Device: Google, vivo, HTC, Samsung, Huawei, Honor, Redmi, Realme, OPPO, Xiaomi, OnePlus, Meizu, LG, ZTE, Lenovo, Nokia, Motorola, and so on.
Step 1: First download,install and run this Android Data Recovery software on the computer, then click on “Android Data Recovery”.

Step 2: According to the instructions on the page, connect your Sony Xperia Pro-I to your computer via its USB cable.
Note:
Step 3: The program will prompt you to enable USB debugging on your Sony Xperia Pro-I if you don’t open the debugging mode. It will detect your Android version and teach you how to open the USB debugging mode on your Sony Xperia Pro-I. After finishing the operations on your Sony Xperia Pro-I, click the “OK” button to go to the next step.

Step 4: Once your Sony Xperia Pro-I is detected, please choose the file type(s) you wanting to scan in the list of recoverable data, and click on “Next”. Then the program will scan and analyze your Sony Xperia Pro-I. You will be prompted to install the Rooting Tool – FoneGo to root your Sony Xperia Pro-I enabling “Install via USB” option in “Developer options”.

Step 5: When you finish installing FoneGo App, you need to authorize it to access your Sony Xperia Pro-I before scanning. If you have authorized but the program didn’t detect authorization status correctly, please click” I Have Authorized”. Or you can choose to scan authorized files.

Note: If the program detects non-authorized items on your Sony Xperia Pro-I, you will get a pop-up message to confirm your choice to go back for permissions, or continue to scan authorized files. After that, this program starts scanning your Sony Xperia Pro-I.
Step 6. Once the scan is complete, all the scanning result will be listed, you are allowed to preview all of them one by one. Then choose the files as you need, and click on “Recover” to save them all back.

Android Data Recovery software also allows you to backup and restore your phone data, if you have ever backed up your phone data with this software, then you can follow the below steps to restore them.
Step 1: Go back to the homepage of the software, and then tap on “Android Data Backup & Restore”.
Step 2: Use a USB cable to connect your Sony Xperia Pro-I to computer, then click on “Device Data Restore” option.

Step 3: Select the backup file you want from the list of backup files, and then click on “Start” to extract all data from the backup file you selected.

Step 4: Select the files you need from the backup file, and click “Restore to Device” to restore them to your Sony Xperia Pro-I.
