Summary: This article will introduce you how to safely and efficiently complete data transfer and data recovery for Samsung Galaxy A72 5G. If you just need these methods, please read this article carefully.
Samsung Galaxy A72 5G is a very good device. In terms of screen, the Samsung Galaxy A72 5G uses a 6.7-inch high-definition display, and the front camera uses a middle holed camera. In terms of core configuration, Galaxy A72 5G uses Qualcomm Snapdragon 750G processor. This SoC processor guarantees the powerful performance and smooth user experience of the Galaxy A72 5G. In appearance, the Galaxy A72 5G is equipped with a four-frame aluminum alloy process. In terms of taking pictures, the main rear camera of the Galaxy A72 5G is 64 million pixels, the secondary camera is a 12 million pixel ultra-wide-angle lens, an 8 million pixel telephoto lens, a 5 million pixel macro lens and a 5 million pixel depth-of-field lens. , The front lens is 32 million pixels. In terms of battery life, the Galaxy A72 5G has a built-in 4500mAh battery and supports 25W fast charging. In other respects, the Galaxy A72 5G uses under-screen fingerprint unlocking, and it retains the 3.5mm headphone jack.
Excellent equipment tends to attract many users. I believe that you are also attracted by the configuration of Samsung Galaxy A72 5G and bought this equipment. When we get a new phone, in order to make it easier for us to use this new device, we need to synchronize the data in the old device or the data in the backup to the new Samsung Galaxy A72 5G. Now I will introduce you how to use the most convenient method to synchronize the required data to Samsung Galaxy A72 5G. In order to better synchronize data to Samsung Galaxy A72 5G, it’s advisable for you to choose Mobile Transfer.
Mobile Transfer is a data transfer software that is very trusted by users. It can help you synchronize the data you need to Samsung Galaxy A72 5G with the simplest operation and fastest speed. In terms of operation, you only need to connect the device to the computer and a few clicks to complete data synchronization. Therefore, even if you haven’t touched data transfer, you can complete the data transfer independently under the prompt of Mobile Transfer. Not only that, the data that the software can transmit is diverse, including contacts, photos, videos, audio, SMS,message attachments, call history, App data, Apps, etc. In addition, the compatibility of Mobile Transfer is also very good. It is compatible with Samsung, Redmi, Huawei, Sony, ZTE, Google, Meizu, OnePlus, iPhone, iPad, Xiaomi, vivo, OPPO, Realme, Lenovo and other brands of smartphones and tablets.


Step 1: Choose the appropriate Mobile Transfer version, download and install it on your computer. Then run Mobile Transfer on the computer. After entering the homepage of the software, select the “Phone To Phone Transfer” mode on the page. After selecting, click “Start” to proceed to the next step.
Step 2: Use the USB cables to connect your old Android/Samsung phone and Samsung Galaxy A72 5G to the same computer. Then check the display on the software page. The old Android/Samsung phone should be displayed on the left side of the page, and Samsung Galaxy A72 5G should be displayed on the right side.

Tip: If the order displayed on the page is not correct, please click the “Flip” button to swap the positions of the two phones.
Step 3: You can view all the data that can be directly transferred from Android/Samsung to Samsung Galaxy A72 5G on the software page, such as contacts, photos, videos, audio, text messages, call history, Apps, etc. Select the data you need to transfer, and then click “Start Transfer” to complete the data transfer.

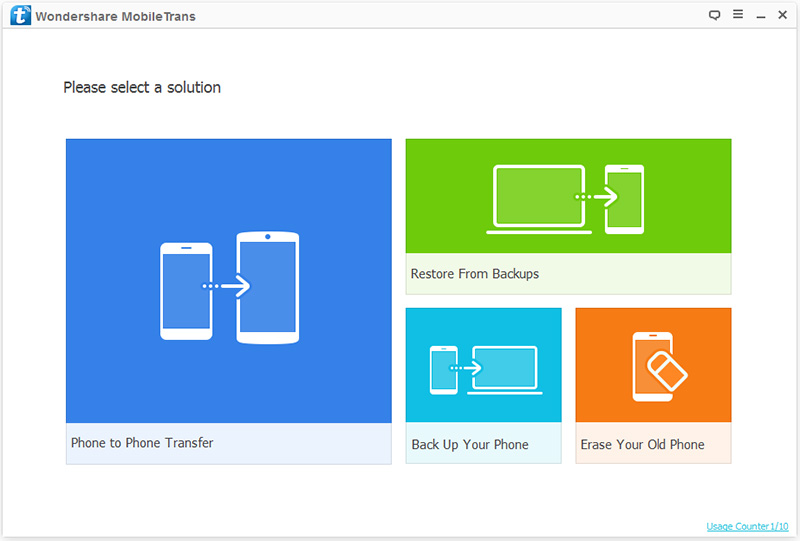
Step 1: After running Mobile Transfer on the computer, select the “Restore from Backups” mode on the main interface, and choose a backup file type as you like.
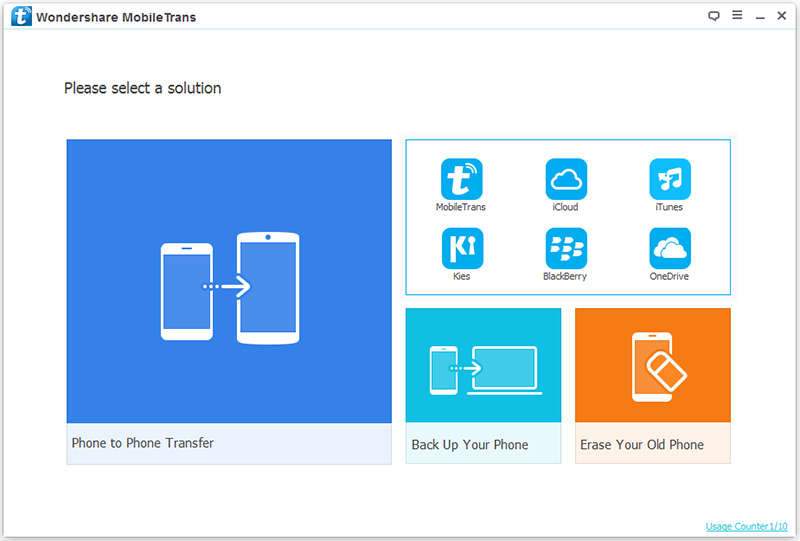
Tip: Mobile Transfer supports many backup file types here, including MobileTrans, Kies, iCloud, iTunes, OneDrive, BlackBerry. You only need to select the corresponding option according to your existing backup file type.
Step 2: Use the USB cable to connect the your Samsung Galaxy A72 5G to the computer, the program will detects your device soon.
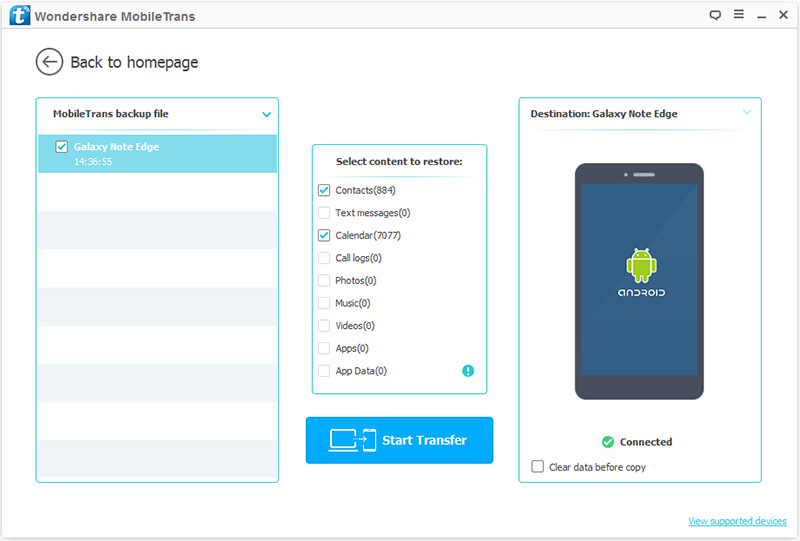
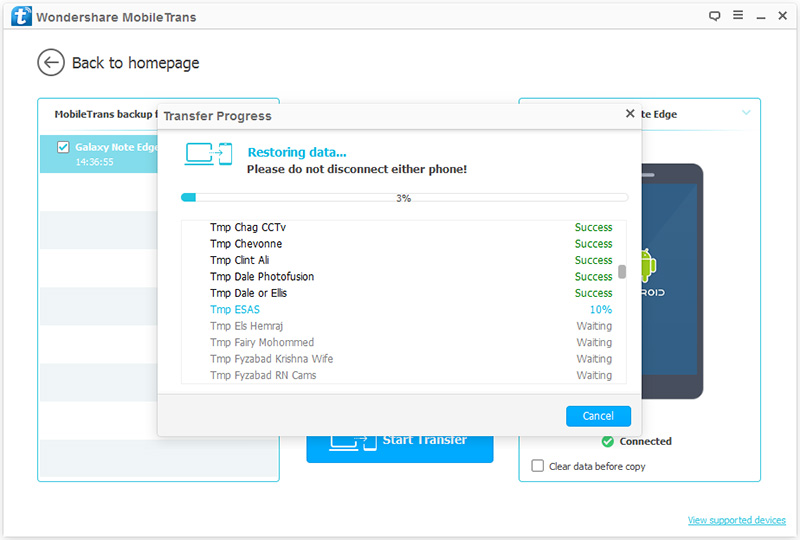
Step 3: You can view all the backup files on the page. Select the desired backup data and file types, and then click “Start Transfer” to synchronize the selected data from the backup file to your Samsung Galaxy A72 5G.
Tip: No matter you choose the Part 1 or Part 2 to sync your phone data, if you want to wipe all data of your Samsung Galaxy A72 5G before transferring data, you just need to check the “Clear data before copy” option.
Seeing the configuration of the Samsung Galaxy A72 5G, I was able to buy it immediately. It runs very fast and can meet my needs for mobile phones. However, recently some important data in my mobile phone was accidentally deleted by my child Do you know any safe and efficient way to help me recover data in Samsung Galaxy A72 5G? –Daniel.
No matter what device we use, we may encounter problems like Daniel, that is, due to some reason, the data in the device is lost or deleted. When you accidentally lose important data in your device, please don’t worry. At the same time, please do not use some recovery methods on the network at will. Because those methods may be stealing your information while helping you retrieve the lost data in the device. In order to allow you to use the safest and most efficient method in the world to retrieve lost or deleted data from Samsung Galaxy A72 5G, now I will introduce you three methods to help you restore the data you need to Samsung Galaxy A72 5G.
Samsung Data Recovery is your best choice for data recovery. First of all, no matter what your device is because of the data loss, Samsung Data Recovery can help to complete the recovery. Therefore, even if your data is not backed up, the software can help you restore the lost data to your Samsung Galaxy A72 5G. Second, the type of data that this software can recover is very rich. It can help you recover almost all the data in your Samsung device, such as contacts, call logs, photos, videos, audios, text messages, message attachment, WhatsApp chat records, WhatsApp attachments, etc. Third, this software has super compatibility. It is compatible with more than 7000 models of devices including Samsung Galaxy A72 5G. Last but not least, the safety factor of this software is quite high. Use Samsung Data Recovery to recover the data in the device, it can ensure that your data will not be exposed to any leakage.
So your lost data is not backed up, then you can choose this method. This method will directly help you recover lost or deleted data in Samsung Galaxy A72 5G without any backup.
Step 1: Download and install Samsung Data Recovery on your computer, and run it. Then select “Android Data Recovery” on the main page of the software.

Step 2: After entering the page of the software, use a USB cable to connect the Samsung Galaxy A72 5G to the computer. In order to better recover the lost data in the device, you need to complete the USB debugging on the Samsung Galaxy A72 5G.

Tip: If you don’t know how to complete USB debugging, Samsung Data Recover provides corresponding operations.
Step 3: Select the file type to be recovered on the Samsung Data Recovery page, and then click “Next” to begin scanning your device under the standard mode.

Step 4: After scanning, you can view all the data that can be restored to Galaxy A72 5G. Select the data that needs to be restored to Samsung Galaxy A72 5G on the page, and then click “Recover” to recover the selected data.

If you have previously used this software to back up your phone data, then recovering the lost data will become easier. The following are the detailed steps.
Step 1: Run Samsung Data Recovery, and then select “Android Data Backup&Restore” mode on the page.
Step 2: Connect the Samsung Galaxy A72 5G to the computer using a USB cable. Then select “Device Data Restore” mode on the page.

Tips: If you want to restore the whole backup file, here you can also choose the “One-click Restore” option.
Step 3: From the backup list on the page, you can view all the backup files. Select the desired backup file, and then click the “Start” button to extract the data in the backup.

Step 4: After that, select the data that needs to be restored to Samsung Galaxy A72 5G from the extracted data. After selecting, click “Restore to Device” to complete data recovery process.

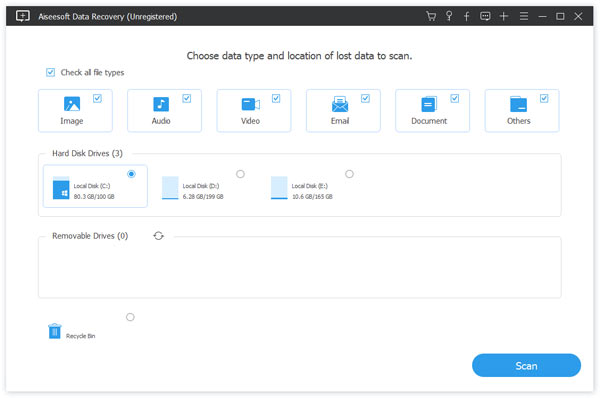
Best Data Recovery is a very simple data recovery software. With its help, you can quickly restore the deleted and lost files including photos, videos, Emails, audio, documents and more to the Samsung Galaxy A72 5G without backup.
Step 1: Download and install Best Data Recovery on your computer, the launch it and use a USB cable to connect your Samsung Galaxy A72 5G to the computer.
Step 2: When your device is recognized, select the file types that needs to be restored to the device, and choose the storage disk of your phone, then click “Scan” to begin to scan the selected data in regular mode.
Step 3: After the scan is completed, you can preview all the scanned data on the page. According to your needs, select any data on the page. After selecting, click “Recover” to restore the data to Samsung Galaxy A72 5G.

Tip: If you can not find the data you need, please don’t worry, just click the “Deep Scan” button scan your device again.