Summary: This is an article about an efficient method for transferring data from old mobile phones to Motorola Moto G Series and recovering data from Motorola Moto G Series.
Motorola released the Motorola Moto G on January 26, 2015. It uses a 5-inch IPS screen with a resolution of 720P, equipped with a Snapdragon 400 quad-core processor, clocked at 1.2GHz, using 1GB RAM, and the new Moto G adds a microSD card slot, Motorola Moto g uses a 2 million + 8 million pixel camera configuration for taking pictures, and the battery capacity is 2070mAh. Until 2020, the Motorola Moto G series has been released to G8. Moto G Play has a 6.5-inch display, 720p resolution, and a 5,000mAh battery. Moto G Power may be the most eye-catching product in the Moto G series. On the front, there is a 6.6-inch display with a resolution of 720p. The Moto G Power has a Qualcomm Snapdragon 662 processor, a battery capacity of 5,000mAh, and a triple camera system consisting of a 48-megapixel main sensor, a 2MP macro sensor and It consists of a 2MP depth sensor.
Motorola Moto G Series has released many mobile phones since 2015. Customers who own this series are by no means a minority. I believe that everybody who has been using the Motorola Moto G Series for so long will encounter the situation of inexplicable loss or accidental deletion of mobile phone data. If you haven’t found a good way yet, then the following content is worth reading carefully. The following content will solve the problem of how to transfer the data of other mobile phones to the Motorola Moto G Series and restore the data of the Motorola Moto G Series.
Applicable Devices: Moto G Stylus, Moto G Power, Moto G Play, Moto G Fast, Moto G? Plus, Moto G?, Moto G? Play, Moto G? Play Amazon Alexa, Moto G? Amazon Alexa, Moto G? Google Fi, Moto G100, Moto G30, Moto G10, Moto G10 Power, Moto G9 Plus, Moto G9 Power, Moto G9 Play, Moto G8, Moto G8 Power, Moto G8 Power Lite, Moto G8 Plus, Moto G8 Play, Moto G7 Play, Moto G7 Power, Moto G7 Plus, Moto G7, Moto G6, Moto G6 Play, Moto G6 Plus, Moto G5, Moto G5 Plus, Moto G5S, Moto G5S Plus, Moto G4, Moto G4 Play, Moto G4 Plus, and so on.
When you change your phone, you always want to transfer the data from the old phone to the phone you are using. With so much data, what we need is a fast and efficient method. There are many software in the market that can solve this problem. This article will introduce you to a convenient and efficient software-Mobile Transfer.
The operation steps of Mobile Transfer are very simple and do not require users to have corresponding professional knowledge. You only need to follow the steps. The reason why it is recommended is not only because of its simple operation, but also because of its outstanding functions. The first is that it has a wide range of data types that can be transmitted, such as contacts, call logs, text messages, pictures, photos, audios, videos, calendar, Apps, App data, documents, etc. Next, it has a high safety factor, it will not cause any harm to your phone during the data transmission process, and will not leak your data. Precisely because it is very safe and reliable, it is now widely used, and it has also been praised by users. In addition, it has super compatibility, not only can transfer data between various Android devices, but also between iOS devices, and also between Android and iOS devices. Because the operating steps of Android and iPhone are the same, we will take Android phones as an example to introduce you to the specific operating steps.


Step 1: First download, install and run Mobile Transfer on your computer. Then click the “Phone To Phone Transfer” mode on the main interface, and click “Start” button.
Step 2: Now, please connect your Android phone(iPhone) and Motorola Moto G Series phone to the computer via their USB cables. After the connection is successful, the Android phone(iPhone) is displayed on the left of the main interface, and the Motorola Moto G series phone is displayed on the right.

Note: If the order is not correct, in order to ensure that the next steps can be carried out, you need to click the “Flip” button to swap the positions of the two phones.
Step 3: Next, please select the data you need to transfer in the data directory of the main interface, and click “Start Transfer” after confirming what data you want to transfer to your Motorola Moto G series phone. At this time, you can see the progress bar of the transfer on the main interface.

Note: If you want to delete the existing data of your Motorola Moto G series phone before transferring, you can select the “Clear data before copy” option. Please do not interrupt the connection between the phones and the computer during the whole transfer process. Please be patient, the amount of data determines the transmission speed.
If you have known it before and use Mobile Transfer to back up data, then you will know that the next transfer will become easier. Since the operation steps of Android and iPhone are not the same, we will introduce the specific operations for you respectively.
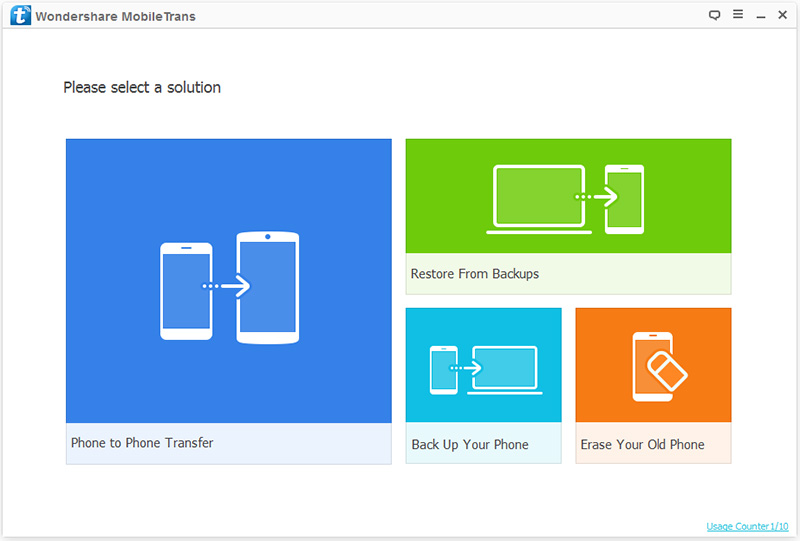
Step 1: Run the software, then click the “Restore from Backups” mode on the main interface, and then click “MobileTrans” or “Kies” among all the items.
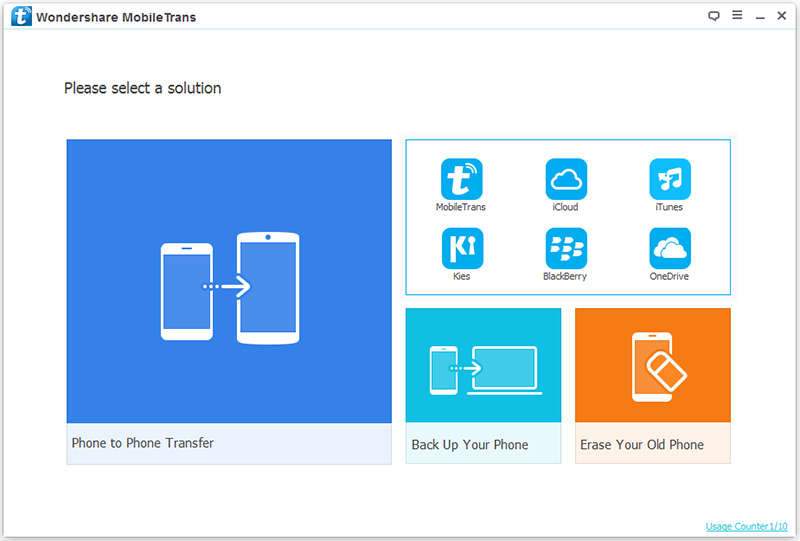
Note: The prerequisite for selecting “MobileTrans” is that you have backed up the data in your Android phone with this Mobile Transfer software. As the same, if you have backed up your Samsung phone data with Samsung Kies, then you can choose “Kies”.
Step 2: Now please select a backup file in the left panel of the interface, and then use a USB cable to connect your Motorola Moto G Series phone to the computer.
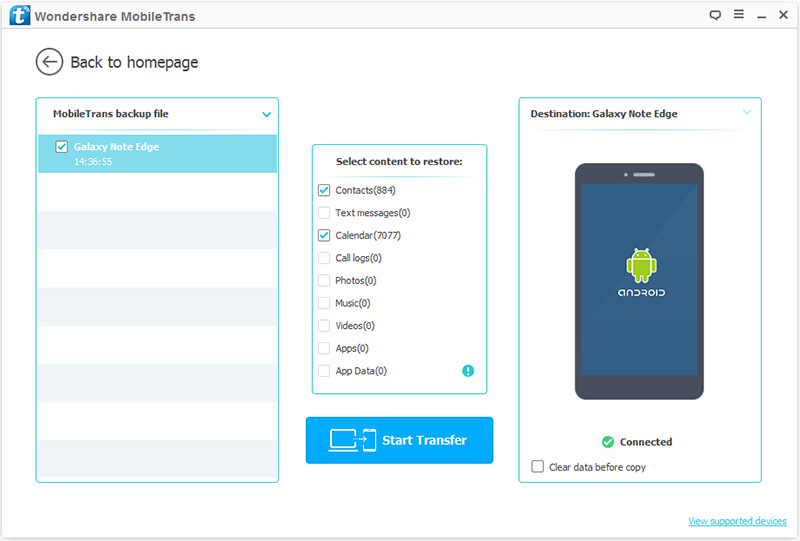
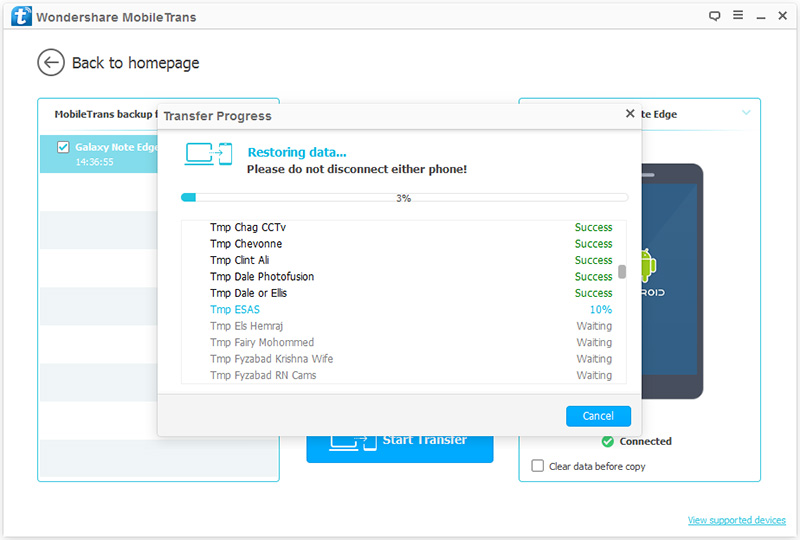
Step 3: After the computer detects your device, select the file types as needed, and then click “Start Transfer” button to sync them to your Motorola Moto G Series phone. Immediately after that, the transfer progress bar will appear on the interface.
For the old iPhone or iPad users who have ever sync their data to iTunes or iCloud, then they can restore data from the iTunes/iCloud backup file to Motorola Moto G Series phone as well. The specific steps are as follows:
Step 1: Run Mobile Transfer on the computer, then click the “Restore from Backups” mode on the main interface, and then click “iTunes”.
Step 2: Now you need to connect Motorola Moto G Series phone to your computer with a USB cable.
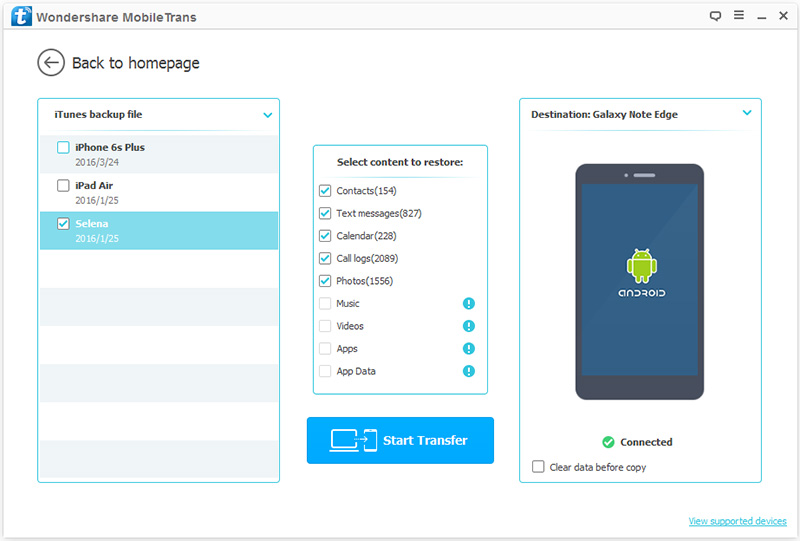
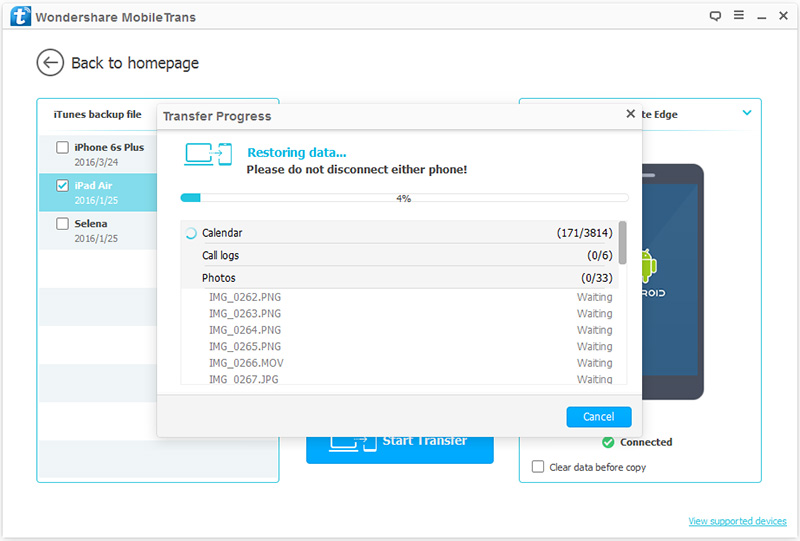
Step 3: Now, please select a backup file on the left panel. The software will extract all the transferable files from the selected backup file and display it to you. Please select the file types that needs to be transferred. After the computer detects your device, click “Start Transfer” to synchronize them to your Motorola Moto G Series phone. At this time, the main interface shows the progress bar of the transfer.
Step 1: Run the software, then click “Restore from Backups” on the page, and finally select the “iCloud” option.
Step 2: Now, sign in to your iCloud account which was used to back up your data of the iOS device, and then connect Motorola Moto G Series phone to the computer.
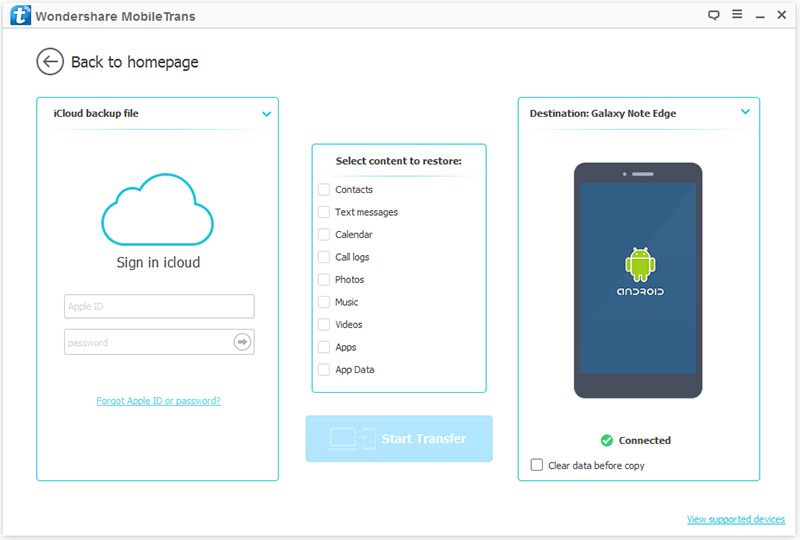
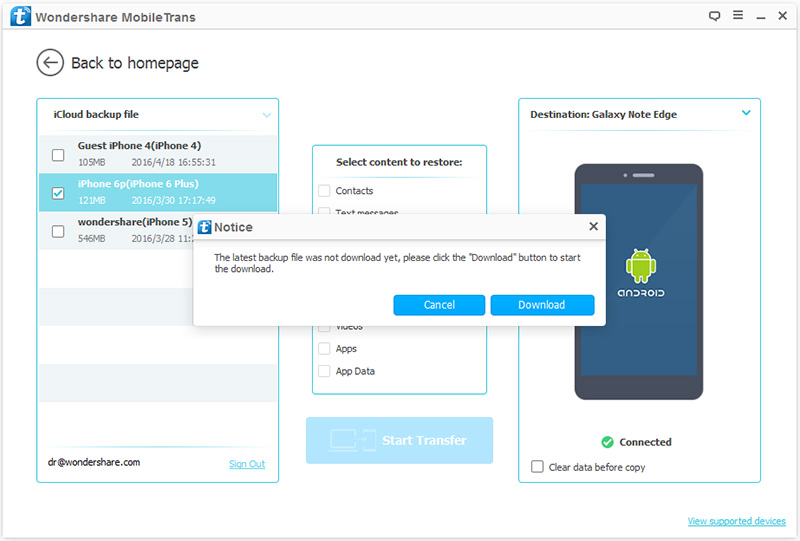
Step 3: Check an iCloud backup file as needed, and then click “Download” to download it to the computer.
Step 4: After the download is complete, select the file type to be transferred, and then click “Start Transfer” to synchronize the selected files to the Motorola Moto G Series phone. Please be patient, the transmission speed depends on the amount of selected data.

In fact, many people lack the awareness of backing up data, and it takes a lot of time to restore data if it is accidentally deleted or lost. But if you have Android Data Recovery, then these questions will be answered very efficiently.
Android Data Recovery can help you effectively and efficiently recover the data you need, whether you have a backup file or not, it can easily help you solve it. There are many data recovery software on the market, but Android Data Recovery is recommended mainly because of its powerful functions. First of all, it can recover data like contacts, call logs, text messages, photos, pictures, audios, videos, WhatsApp messages, documents and more that cannot be recovered by other softwares. Secondly, its compatibility is very good, applicable to almost all Android smartphones and tablet on the market, in addition to Motorola, but also including Samsung, Huawei, Honor, Xiaomi, Redmi, vivo, OPPO, Google, OnePlus, ZTE, Realme, Meizu, LG, Sony, HTC, Nokia, Lenovo, etc. Besides, it is very safe, it will not cause any harm to your phone during the recovery process, and it also guarantees that 100% of the original data is recovered.
Step 1: First download, install and run the program on your computer. After entering the program, please check the “Android Data Recovery” mode on the main interface.

Step 2: Now please connect Motorola Moto G Series to your computer via USB. Immediately after that, the connection progress bar will appear on the main interface. After you enter the program completely, it will automatically detect your Android version. You need to turn on the USB debugging of Motorola Moto G Series according to the steps provided by the program, and then click “OK”.

Step 3: Now, tick the type of data you need to recover on the main interface, and click “Next” after confirming. Then the program will scan your phone.

Note: Here, the program needs permission to scan for deleted and lost data. If your device pops up a window, remember to click on the device’s “Allow” to make sure the request is remembered. If your device does not pop up such a window, please click “Retry” to try again.

Step 4: After the scan is completed, the main interface displays the type of data that can be recovered. If you preview and confirm the data type, click “Recovery”. All the data that needs to be recovered will be saved on your computer. Please be patient, the length of time required for recovery is directly proportional to the amount of recovered data.

Android Data Recovery can not only restore data from your device without backup, but also back up your phone data and restore data from backup to any supported devices. If you have ever backed up your phone data via this software, the process of restoring data will become easier. The specific operations are as follows:
Step 1: Run the program on the computer, and then click on the “Android Data Backup & Restore” option.
Step 2: Connect your Motorola Moto G Series phone to the computer via its USB cable.
Step 3: Now, the “Device Data Restore” and “One-click Restore” options appear on the main interface, please choose one of them as you like.

Note: If you are not restoring all the data, we recommend that you select the “Device Data Restore” mode here, because it will take less time and take up less phone memory.

Step 4: Now, please select a backup file you need from the backup list, and then click “Start” to preview and restore the needed data from the selected backup to the Motorola Moto G Series phone.
