Lost some important data on your iPhone 13 device? Don’t worry, we will help you to solve this trouble.
As an iPhone user, it’s strange to suddenly find your contacts, bookmarks, memos, messages, photos and other data disappearing while you’re using your device, as Apple enhances data security with every version update.
Why does your data in iPhone 13 suddenly disappear? Human error is a big part of it, such as accidental deletion or if you reset your phone without backing up your data. There are also bugs in the system software that can cause data loss, for example, after you have updated your iOS version.

So, how do we recover lost data on iPhone 13?
If you created a backup of iCloud or iTunes before you lost your data, then your data is most likely safe and you can recover them from the backup file, otherwise, you need professional iPhone data recovery software to help you get back your lost data. If necessary: How to Unlock iPhone/iPad, Bypass the Lock Screen on iPhone/iPad
The following are the methods to recover lost data from iPhone 13:
iPhone Data Recovery is the easiest and fastest solution to retrieve your iPhone or other iOS device data after it has been lost.
iPhone Data Recovery can find and recover contacts, videos, photos, audio, chat messages, calendars and more that have been lost on your iOS device. You can use this software to recover old data without having to change existing data and settings. In addition the software supports extracting data from your iCloud and iTunes backups.
iPhone Data Recovery is compatible with iPhone 12/11/11 Pro/XS/XR/X/8/7 and below and supports the latest iOS 14, 13, 12 and below.


Steps to recover iPhone 13 data using this software:
Step 1: Install and run iPhone Data Recovery on your computer
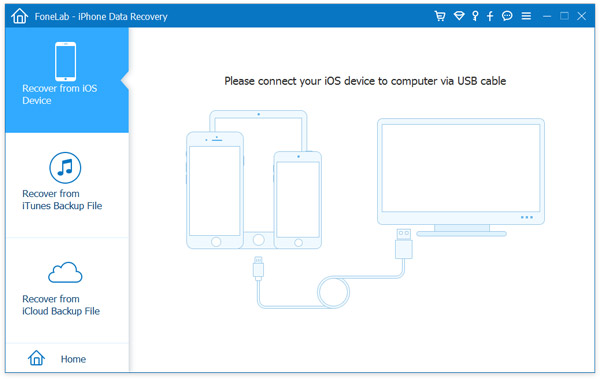
Step 2: Connect your device to the computer via a suitable data cable
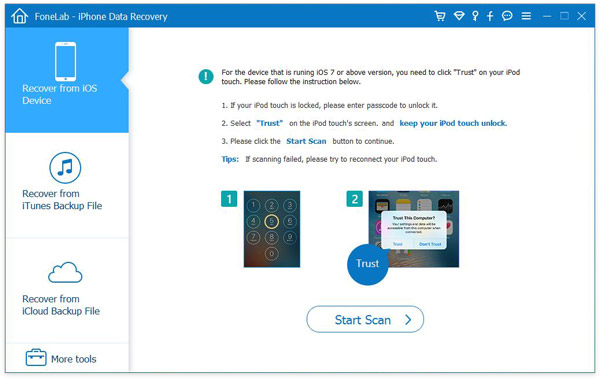
Step 3: Go to the home page of the software and select “recover from IOS device”, then the program will scan your device
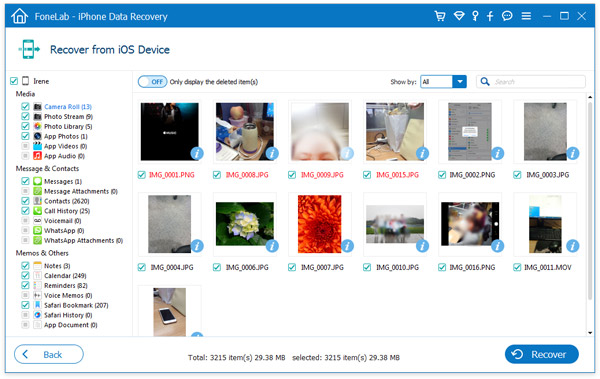
Step 4: After the scan, preview the data, select the data you want to recover, and then click “Recover” to start data recovery
If you don’t want to go through the hassle of resetting your phone on your iPhone and then recovering your iCloud backup files, then iPhone Data Recovery is the right choice for you, where you can easily recover your iCloud backup files.
Step 1: Connect your device to the computer via a suitable data cable.
Step 2: Click on “Recover from iCloud Backup” on the home page of the software
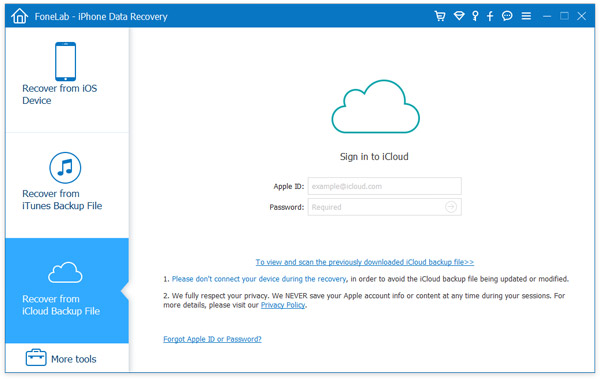
Step 3: Enter your Apple ID and password to sign in to your iCloud account, then click on “iCloud Backup” on the page
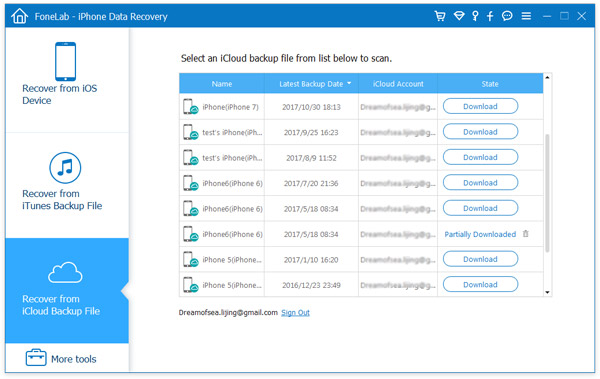
Step 4: Select your iCloud backup files from the list and click “Download” to download them to your computer.
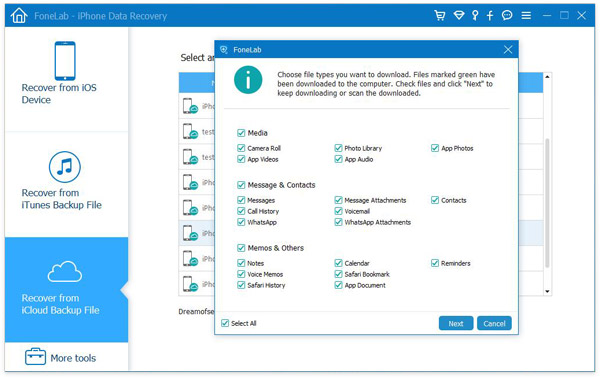
Then select the type of data you want to recover and click “Next” to continue.
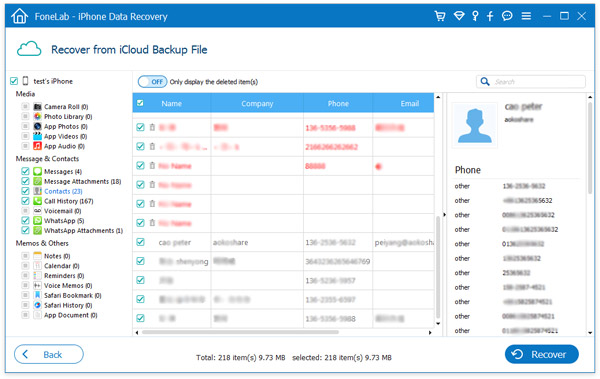
Step 5: Once the download is complete, select the files you want to recover from the list and click ‘Recover’ to save them to your computer.
Step 1: On a Macos Catalina 10.15 or later, open the Finder. On a Macos Mojave 10.14 or earlier, or on a PC, open iTunes
Step 2: Connect your device to your computer using a USB cable
Step 3: Select your iPhone device when it appears in the Finder window or iTunes
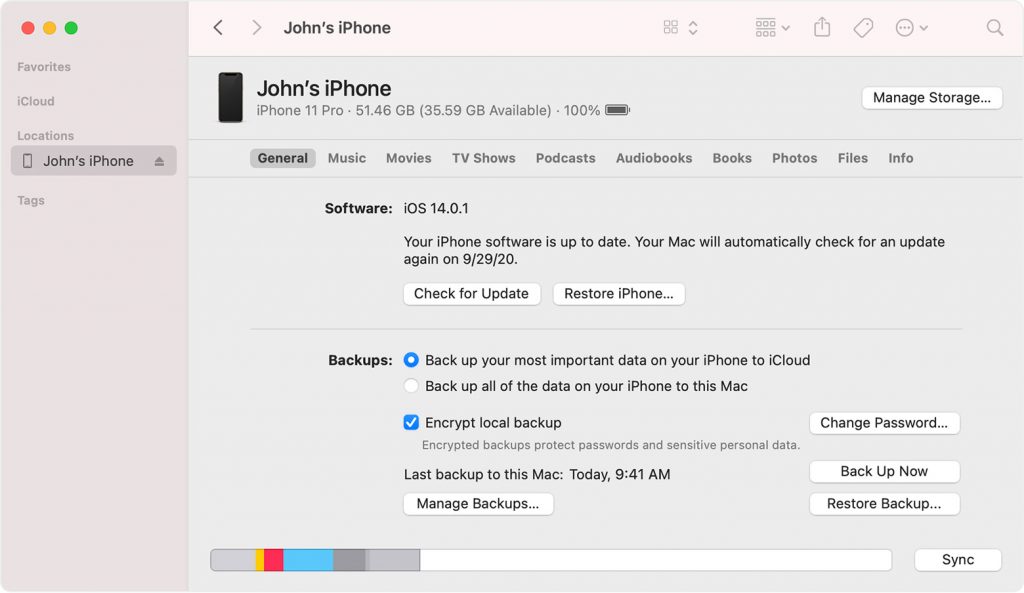
Step 4: Select ‘Restore Backup’.
Step 5: View the date of each backup and select the most relevant one.
Step 6: Click ‘Restore’ and wait for the restore to complete.
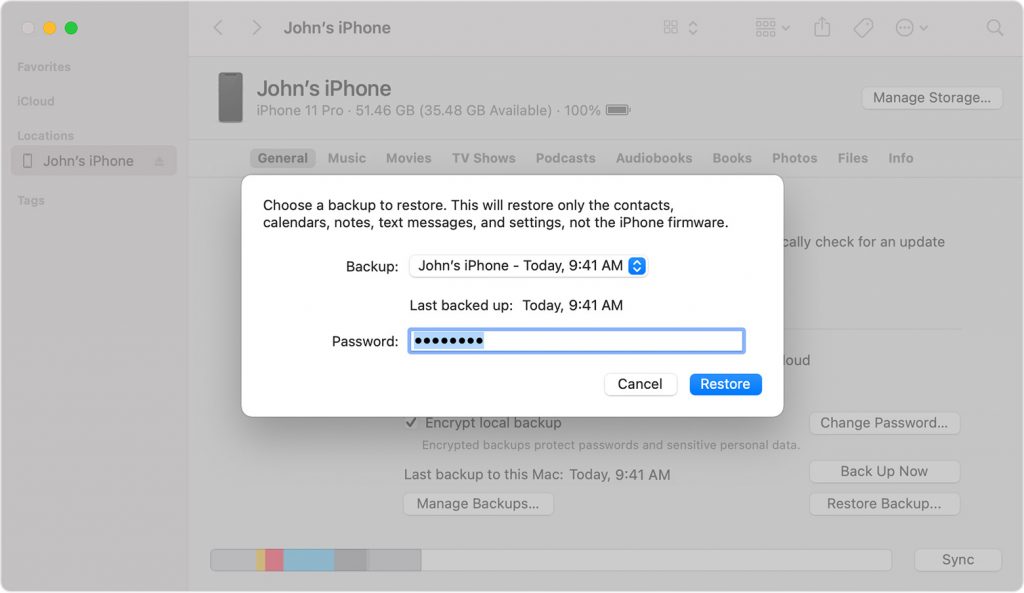
Step 7: After restarting, keep the device connected and wait for it to sync with your computer. Once the sync completed, you can disconnect.
If Necessary: How to Recover Contacts Messages Photos Videos from Water Damaged iPhone
Changing the iPhone, restoring the device or synchronizing music may sometimes delete your contact details. If you encounter this situation, the easiest way is to restore through iCloud. If you have enabled iCloud contact synchronization (usually selected by default), you should be able to restore your contacts in a few simple steps:
1. Go to Settings on iCloud.com, and then click Restore Contacts (in the Advanced section). Available versions are listed by filing date and time.
2. On the right side of the version you want to restore, click Restore. There may be more versions than one that can be displayed at a time.
3. If you find that your contacts are not in your iCloud account, you can also examine your iTunes account carefully. By connecting the iPhone to the PC and restoring iTunes, you can download all the archived information stored on iTunes. However, please note that will delete all data on your phone and replace it with the content stored in your account.
With the release of iOS, Apple can more easily retrieve deleted photos and videos from the iPhone. You just need to follow these steps, but there’s an important caveat that I’ll explain later:
1. Go to the photo app for the iPhone and click on the album on the bottom toolbar.
2. Scroll down the list and then click on the latest deletion. As the name implies, you can find albums of recently deleted photos and videos here.
3. If you find the lost image, just click on a single photo, then choose to restore it to add back to the album, or if you want to delete it permanently, choose to delete it.
Warning: Recent deletions show only photos and videos from the past 30 days. After that, the file will be permanently deleted. If you’re looking for photos over 30 days, you can restore the iPhone from an old backup using iTunes. If necessary: How to Recover iPhone iPad iPod Lost Data on Mac
Users of the iPhone can download third-party software, etc. But before using these third-party applications, you can try another way to retrieve deleted text messages from your iPhone.
This method is invalid if you disable the synchronization option in iTunes. If you have enabled the synchronization option, you may recover lost text messages, because as long as your device is connected to the system, the synchronization function creates a backup on your PC.
There are three steps to retrieve lost messages in iTunes:
1. Connect the iPhone to PC/Mac (which you often use) and open iTunes.
2. Now select the “Restore Backup” option in iTunes (after selecting the device).
2. The “Restore Backup” option replaces the current data of the device with backup data. This may take a few minutes, and the message you lost will eventually be displayed on your device. However, backing up data is possible only after deleting messages.
Conclusion
It’s always better to use backup applications on smartphones. Retrieving lost messages is not easy and usually unsuccessful. Many times deleted messages cannot be restored.
Police and intelligence agencies can retrieve information because they have experts to help them. Authorities can also request help from mobile phone operators because they can also access users’messages. However, operators only provide help to the authorities, not to customers.
* Reset Your iPhone or iPad to Factory Settings
Factory reset restores the device to factory settings by resetting the entire system. All data and applications will be deleted because the drives in the device will be reformatted. To reset your iPhone’s settings (the iPad’s steps are basically the same) and clear all of the data, follow these steps:
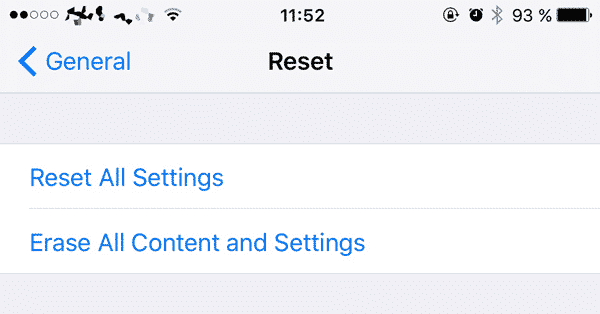
1. Go to Settings and scroll down until you find the Reset tab. You’ll see some options that you can reset, such as a keyboard dictionary or home screen layout.
2. To restore your iPhone to its factory default settings, click “Erase all content and settings” and then click “Erase iPhone.” If a password or a restricted password is set, you will be asked to enter a password before you can reset the device.
3. After entering your password, you will be asked to enter your Apple ID password. Enter it to start erasing all data in the device.
4. The reset back to factory settings will run and should not exceed a few minutes. When you see the welcome screen, it means that the factory reset is complete and there is no personal data on the device.
* Perform Reset with no Passcode using iTunes
There is a way to replace the above method, which can be done using iTunes. It’s good when you can’t open your iPhone because it’s disabled (too many wrong password attempts) or when you don’t remember the password. Proceed as follows:
1. Open iTunes. To prevent any potential obstacles during the reset process, make sure your iTunes version is up to date, just click “Check for updates” in the drop down menu.
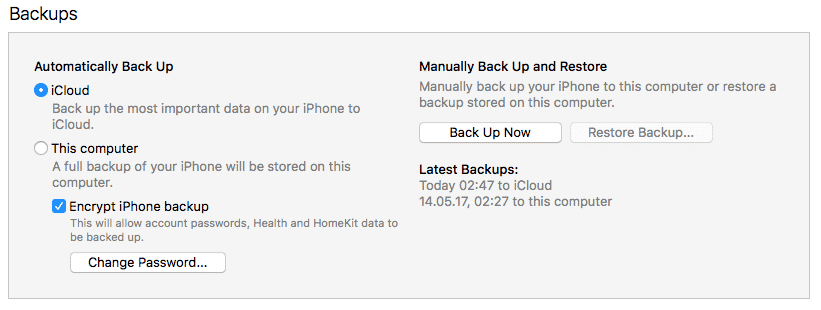
2 Connect your iPhone to your computer. If you want to keep some files, you can click “Backup Now” to back up. If you only want to delete everything without saving it first, you can skip the backup.
3. Click the “Restore iPhone” option in iTunes and click “Agree” to confirm your decision. If you change your mind and decide to restore your data on your phone, click Restore from Backup….
* Reset Your iPhone or iPad using Find My iPhone
Alternatively, you can use “Find My iPhone.” If your iPhone is lost or stolen, and you want to make sure that no one can access its data, this is very convenient. To do this, perform the following steps:
1. Visit the “Find My iPhone” website and sign in with your Apple ID.
2. If there are multiple devices in this account, select the device you want to reset from the list of available devices.
3. Click the “Erase iPhone” (or iPad if you are resetting your tablet) option in the device info box. You will be asked to confirm your decision. After that, the reset will begin. If the device is offline, it will start as soon as the device comes online.
Keep in mind that if you set the Family Sharing setting, you can also reset your family member’s device to the factory default settings. When you reset your iOS device, you will be asked to enter your phone number and message, which will be displayed on the screen when the reset is complete.