Summary: As we age, there are more and more contacts on mobile phones, and there will be more contacts for workers. However, if the phone encounters any problem that causes the contact to be deleted, it may cause some trouble. Don’t worry, this article will introduces you how to recover deleted and lost contacts on Samsung Galaxy Note 20 Ultra.
The first batch of Samsung Galaxy Note 20 series is equipped with Qualcomm Snapdragon 865+, which is a more reasonable starting storage space of 256GB. Galaxy Note 20 Ultra is also equipped with 12GB of running memory, with OneUI2.5 newly optimized animation, and 120Hz adaptive refresh The rate screen is very silky when used. The network supports 5G and WIFI6, so that the network connection is stable and low-latency. The 4500 mAh super-large battery is also the pinnacle in the history of the Note series. After many days of practical use, it can be charged once a day, easily, and the charging power of 25W can be fully charged in one hour.
Although the memory of contacts is not large, the possibility of accidental deletion or loss is still great. If we have software to recover data, we don’t need to be afraid of this problem. Android Data Recovery is an excellent data recovery software.
Android Data Recovery is specially developed to recover data, so its professionalism is beyond doubt. It has now been widely used by everyone, and the feedback is benign. In terms of functions, it can recover all kinds of data, such as contacts, call logs, memos, pictures, audio, videos, Whatsapp messages, photos, SMS, etc. In addition, it has strong compatibility and is suitable for all kinds of Android phones. The most important thing is that its safety does not require us to worry about it.


Step 1: Connect mobile phone and computer
First download, install and run Android Data Recovery on your computer, then click “Android Data Recovery”, and finally connect the Samsung Galaxy Note 20 Ultra to your computer with USB, and the connection progress bar will appear on the main interface.

Step 2: Turn on the USB debugging of Samsung Galaxy Note 20 Ultra
After entering the program completely, it will automatically detect your Android version. You need to turn on USB debugging according to the steps provided by the program, and then click “OK”.

Step 3: Select the data type to scan
At this point, the main interface displays the directory where the data can be recovered, check the “Contacts & Messages” option, then select the “Contacts” in the project, and finally click “Next”. After operating the program, your phone will be scanned.

Note: The program needs permission to scan for deleted and lost data. If your device pops up a window, remember to click on the device’s “Allow” to make sure the request is remembered. If your device does not pop up such a window, please click “Retry” to try again.

Step 4: Preview and recover the selected contacts
After the scan is successful, the contacts will be displayed on the main interface as a list. Please preview and select the contacts you need, and then click “Recover”. All contacts that need to be recovered will be saved on your computer.

Step 1: Run the recovery software on the computer, and then click “Android Data Backup & Restore”.
Step 2: Now, please use a USB cable to connect your Samsung Galaxy Note 20 Ultra to the computer.
Step 3: Now, the main interface has the options of “Device Data Restore” and “One-click Restore”, just choose one.

Step 4: Select the desired backup from the backup list, after selection, click “Start” to preview all recoverable file types in the selected backup.

Select the desired contacts, and then click “Restore to Device” or “Restore to PC” to save them all to the corresponding device. During the entire data recovery process, please do not disconnect the phone from the computer.

This method is used if you have backed up your contacts with Samsung Kies before the contacts are lost. By the way, regularly backing up data is a good habit!
Step 1: Launch Samsung Kies on the computer, then using a USB cable to connect your Samsung Galaxy Note 20 Ultra to the computer.
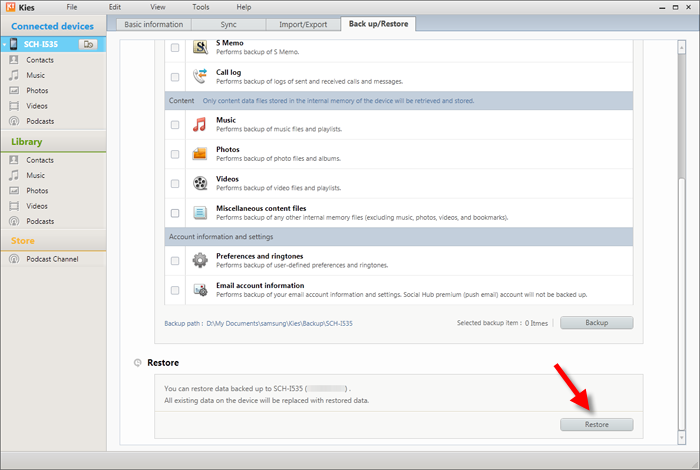
Step 2: Choose “Back up/Restore” from the menu at the top of the page, and then click “Restore” in the lower right corner to proceed to the next step.
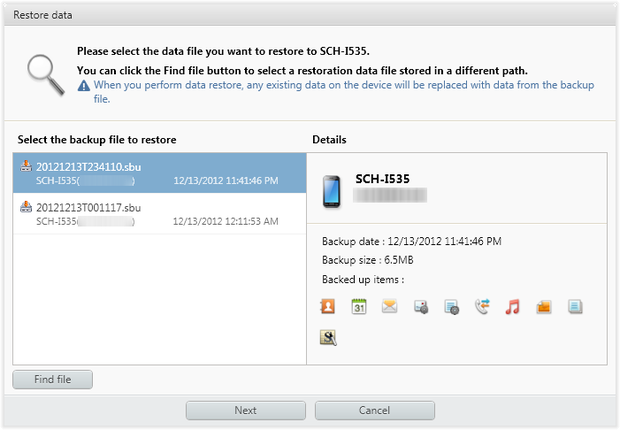
Step 3: Select the Kies backup file you created earlier, and then click “Next” to go on.
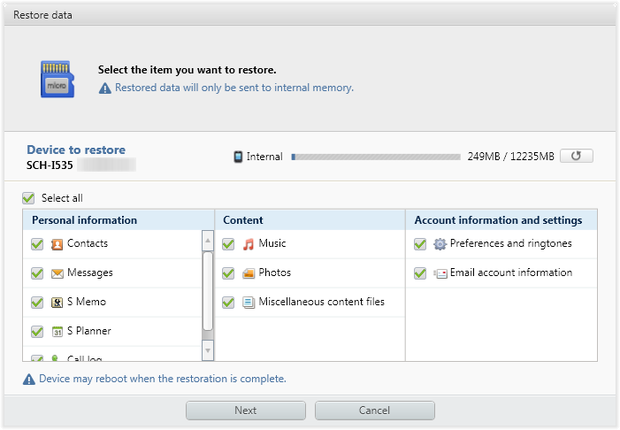
Step 4: Select the file type (if you just want to recover contacts, just select “Contacts”) you need and press “Next”.
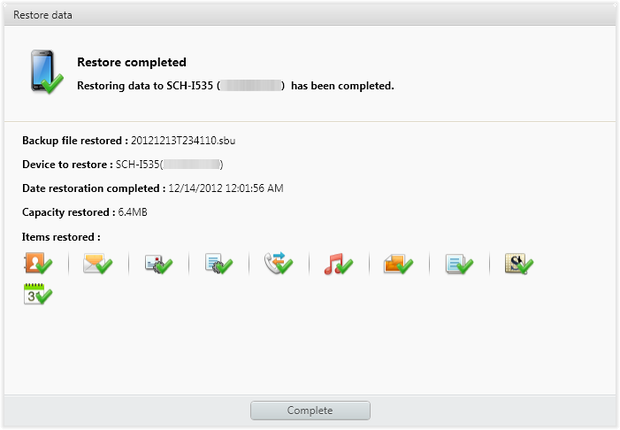
Step 5: Once your Samsung Galaxy Note 20 Ultra is recognized, you can restore all the contacts to your device with one click.
Step 1: Click the below button to free download a trial version of Best Data Recovery to your computer.
Then install and run this software on your computer. Then connect your Samsung Galaxy Note 20 Ultra to the computer via a USB cable.
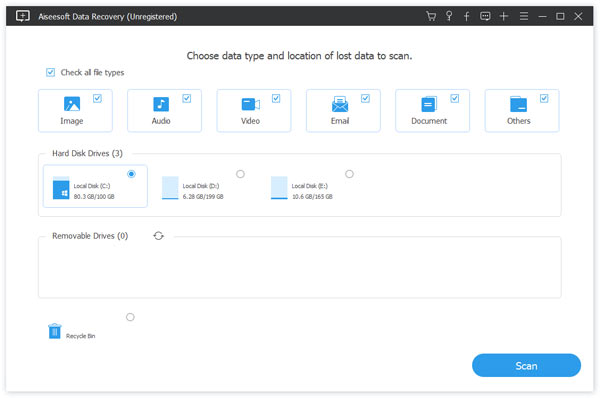
Step 2. Best Data Recovery enables you to recover any popular file type like photos, pictures, videos, image, document and more. When you enter the main interface, you should choose the data type(s) you want to recover first.

When your Samsung Galaxy Note 20 Ultra is recognized, please choose your device from the removable devices option bar.
Step 3. As you can see, there are two scanning ways to be offered, “Quick Scan” and “Deep Scan”. Clicking “Scan” button will give you a quick scan on your Samsung Galaxy Note 20 Ultra.

Step 4: After the scanning is completed, you will find that the scanned result are divided into different formats. Click the file as needed to see the details of a specific item, and then select them. You can use the “Filter” feature to quickly locate the files you want to recover. After selecting, click “Recover” on the page to save the contacts to be recovered to the computer.
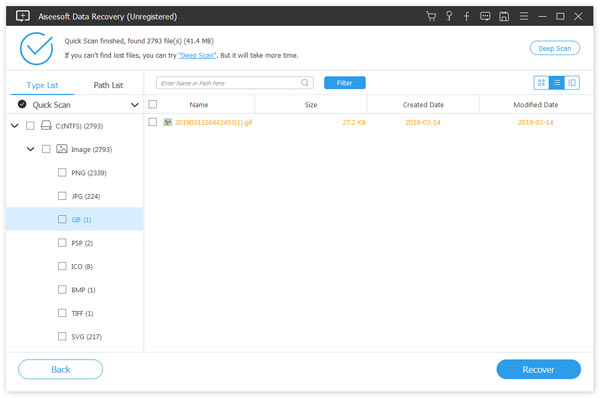
Note: If you can’t find the contacts you need, just pressing the “Deep Scan” button which is in the upper right corner of the interface to scan it again.