iOS Data Recovery Software is an easy-to-use tool that can help you easily recover lost or deleted data from iPhone 6/5S/5C/5/4S, iPad mini, iPad Air, iPad, such as photos & videos, contacts, SMS, call logs, memos and more.


iOS Data Recovery enables you to restore deleted or lost contacts, messages, call history, notes, Calendars, reminders, Safari bookmarks and more from iPhone 6/5S/5C/5/4S/4/3GS, iPad Air, iPad mini 2 (Retina), iPad mini, iPad with Retina display, The new iPad, iPad 2/1, and iPod touch 5/4. At the same time, you can use it to scan camera roll, photo stream, photo library, message attachments and voice memos that exist on your device.
Note: In order to protect your lost data from being overwrote by the generated new data, please remember not to use your iOS device after you lost or deleted data from it.
Step 1:Connect your device to the computer
Launch the iOS Data Recovery on your PC, and connect your device via an Apple USB cable. Then you can see the main window pop up.

Note: If you are the user of iPhone 4, iPhone 3GS, iPad 1 or iPod touch 4, you can switch to the "Advanced Mode" through the button at the lower-right corner.
Step 2: Scanning to search the lost data from your iDevice
Click on the "Start Scan" button, and the program will immediately scan the data from your iPhone, iPad or iPod touch.

Note: For the "Advanced Mode", you are allowed to follow the description in the window, so as to enter the DFU mode, and get your idevice scanned deeply. The scan will take you some time.
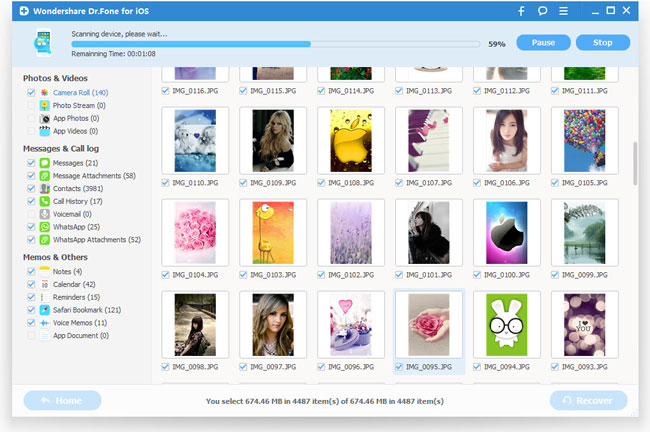
Step 3: Preview and restore your data from iPhone, iPad or iPod touch
Once the scanning complete, all scan result generated by the program including the lost and existing data are displayed in categories and will be shown to you. Choose the data you want and preview the detailed one by one. If everything is OK, tick any item you want and save it on your PC by clicking on the "Recover" button.
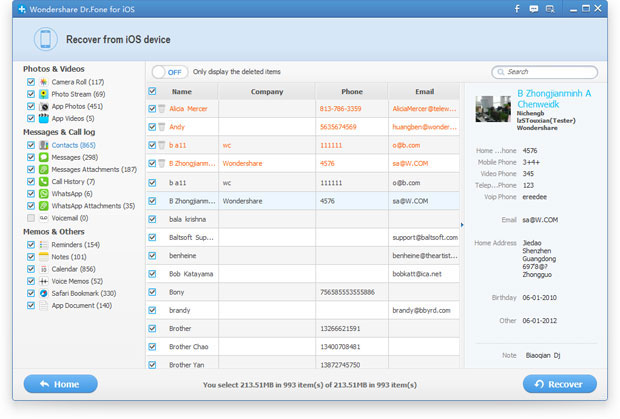
Note: If you're trying to recover text messages and iMessage, a pop-up will ask: Recover to Computer or Recover to Device. If you want to put these messages back to your iOS device, click Recover to Device.
This data recovery mode allows you to restore both existing data and deleted data from the previous iTunes backup files, as long as they were not overwritten.
Note: In order to successfully recover your lost or deleted data through this recovery mode, please keep in mind that do not sync your iPhone, iPad, iPod with iTunes when you realize that you've lost data, or the iTunes backup file will be updated after the sync.
Step1 :Choose your iTunes backup and scan to extract it
Run the iOS Data Recovery and click on "Recover from iTunes Backup File" to enable the recovery mode.
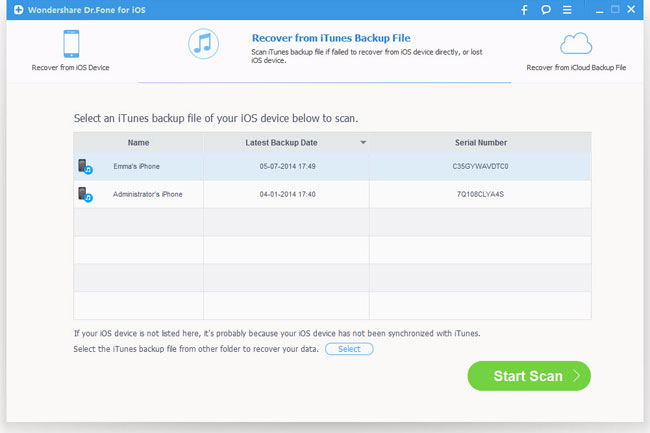
Here, all the previous synced iTunes backup files of your iDevice on this computer will be automatically found and listed. According to your need, choose the one you want and click "Start Scan" to extract it with a click. This process will spend you a few seconds.
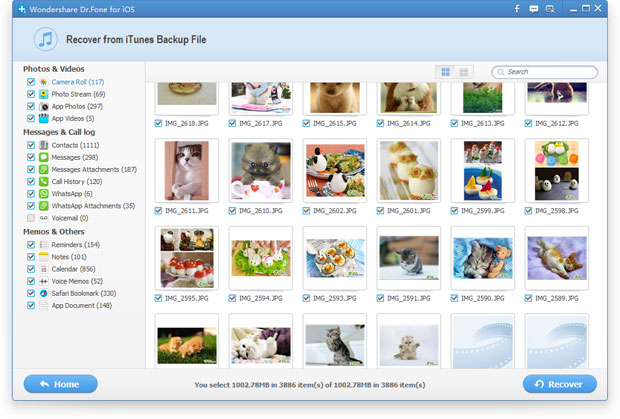
Step2 :Preview and recover previous data
After that, all the extracted data in your selected backup file will displayed in categories. You can preview them one by one and marking to recover selectively by pressing the "Recover" button at the bottom.
Haven't found the data from your iOS device and the iTunes backup file? There is the third method to restore from your iCloud backup files if you haven't found the lost or deleted data from your iTunes backup or iDevices. It allows you to preview and retrieve all data in your iCloud backup. Therefore, do not backup your iPhone, iPad, iPod with iCloud immediately when you find your data loss.
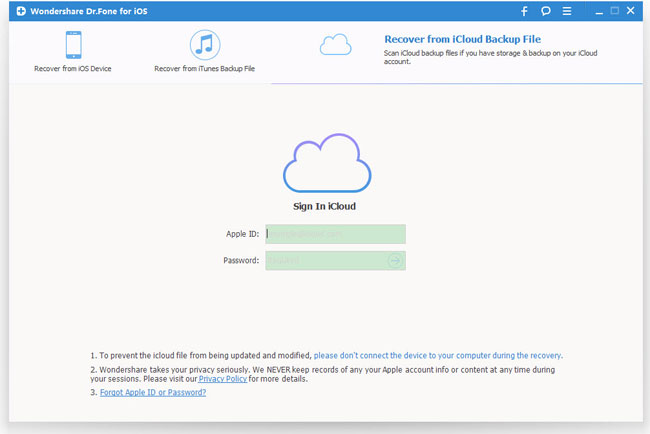
Step1: Choose the recovery mode and Sign in your iCloud account
After launching the recovery program, choose the "Recover from iCloud Backup Files" recovery mode on the top. When you see the window as below, please sign in your iCloud account.
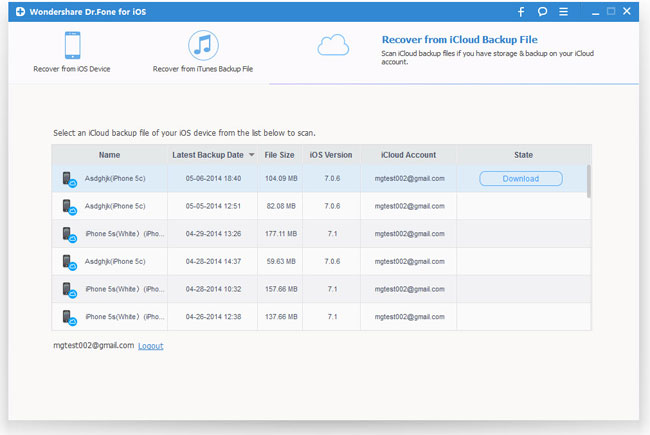
Step2 :Download and scan your iCloud backup
All the iCloud backup files in your account will be found by the program after you logged into iCloud. Select the one you want and click on the "Download" button following it. Then you can choose the type of files you would like to download in the pop-up, which will reduce the time of downloading the iCloud backup file.
If the download finished, you are able to scan the iCloud content by clicking on the "Scan" button. The scanning process will take you some time, please wait patiently.
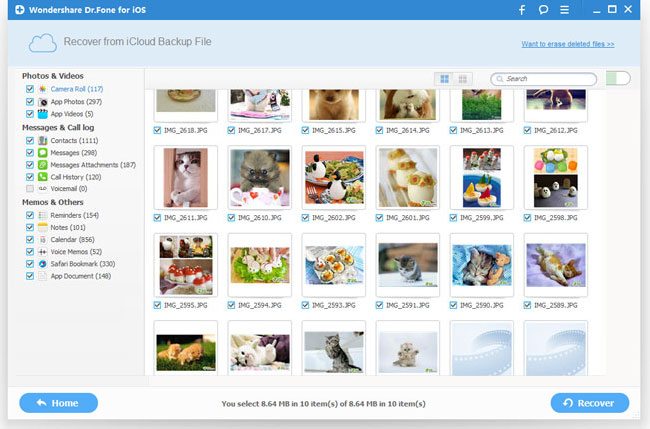
Step3 :Preview and selectively recover what you want
Once scan stops, almost all data you can preview in the downloaded iCloud backup file, including contacts, messages, notes, call history, photos, and so on. Preview and tick the item you want one by one. Then click on the "Recover button" to save them on your computer with one click.