“What on earth is going on here? Why are all my text messages gone on my Samsung Galaxy S9? They are important for me. I’ll have a meeting after 30 minutes and I need them to make a report. What should I do to recover my text messages?” – Asked by my co-worker Mary.
In our daily life, we always experience something out of our expection. Just like Mary, she lost her significant data by accident when she didn’t backup her data in advance. Nowadays, we use our phones more and more frequently, thus, the more we use our phones, the more data will be stored in our phones, especially some vital text messages, call logs. Therefore,it’s necessary to backup our data in case of losing them by chance. Maybe you’ll be nervous when you happen to need them in this case. When Mary turned to my help, I recommend her two softwares to recover her data, which strike me as awfully practical. And it was no wonder that these software assisted her to recover data efficiently. So here I want to introduce them to you, maybe one day it’ll come in handy.
The first software is Android Data Recovery, which is the best recovery tool to directly recover deleted files from Android phone/SD card/tablet on Windows 10/8/7 and Mac OS Sierra/Mac OS High Sierra. As a practical software, Android Data Recovery has plenty of features. First,it highly supports loads of mobile phones, also plenty of data, consisting of text messages, videos, audio, photos, videos, contaccts, documents, etc.. Second, it has a high speed of recovering data. Just in a few minutes and one click, your data will be recovered. However, maybe you’ll doubt whether the data will be leaked or lost during the process in a few minutes. Actually, this Android data management program will only read your Android data and you’re the only one who can accese it. Your personal privacy will be protected perfectly. Last but no least, it’s easy to operate, it doesn’t require any professional tech knowledge. Also, there are more practical features you’ll find if you have a try.
Having known so much practical features, are you curious about how to use it? Do you want to have a try? You can download the trial version below and follow my instructions. Please let me take the Samsung Galaxy S9/S9+ as an example to show you how to recover text messages from Samsung Galaxy S9/S9+.


Step 1. Launch the program and connect your Galaxy S9/S9+ to PC
To beginning with, please download and run this powerful Android data recovering software on your computer. Then connect your Samsung Galaxy S9/S9+ to the computer via USB cable. After managing to concatenate your phone, the program will detect it by itself.

Tips: In order to initiate the data-recovery process, you need to enable the debugging mode on your phone. If you don’t open it, Android Data Recovery will facilitate you to do. It will detect your Android version and teach you how to enable the USB debugging mode on your phone. Just follow the instructions. When finishing it, click “OK” button to go to the next step.

Step 3. Select the data types you want to recover
After connection, all file types on your Android will be displayed in the interface. It’s flexible so you can choose the file types you tend to recover. For instance, you can select the “Messages” to recover the lost and delected meaasges. Then click “Next” button to scan the selected Android data.

If your phone is not rooted, the program will provide two options: scanning deleted files and scanning all files. It takes longer to scan all files. And then click “Next” to continue the data recovery process.

Step 4. Preview and recover the SMS selectively
When the scanning is complete, all types of files will be listed in categories on the left control. You are able to check the detailed information of each data. Preview and select the text messages you have an inclination to recover, and then click “Recover” button to complete recovering process.

If you ever had a backup of your phone data with Kies or Mobile Transfer, then you can also restore data from these backup files with Mobile Transfer. Mobile Transfer is thoughtfully designed and very capable. It’s an all-in-one transfer tool. Not only it can backup your phone, transfer data from one device to another one, but also it can restore data from backup. As to recover data, it enables you to recover plentiful files, including text messages, contacts, photos, videos and so on. What’s more, it can complete all your orders with a few clicks without any lost, it’s so efficient that it will not take you long time to wait. Over and over, this software for phones only reads the information on your device. Your personal information will not be stored in the software, so you needn’t be afraid of leaking your privacy during the process.
Similarly, I will show you some steps of recovering text messages from Samsung Galaxy S9/S9+.
Step 1. Download the software and connect your device
Above all, download and install Mobile Transfer on your computer. At the same time, you can connect the Samsung Galaxy S9/S9+ to the comouter. When appearing the primary window, click “Restore From Backups”, and choose “Kies” in the options presented.
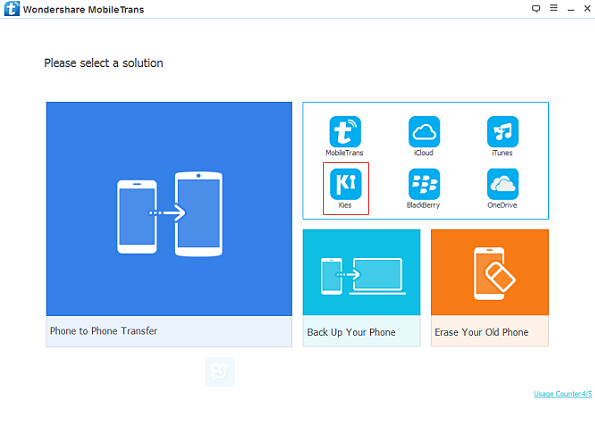
Tips: If you have once backed up your phone with Mobile Transfer, you can choose “MobileTrans” here.
Step 2. Restore SMS from Kies backup to your Samsung Galaxy S9/S9+
Select the file you would like to transfer from the available backup files on the left. However, if you don’t see the file you tend to transfer, click on “Add Backup File” for additional options.
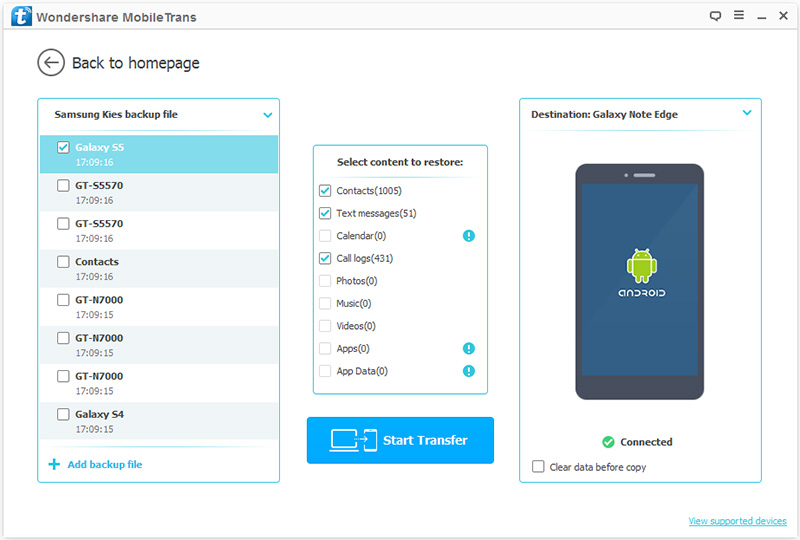
After choosing, click on “Start Transfer” to proceed the process. Attentionally, you can also decide to erase the Samsung Galaxy S9/S9+ before copying any files. If you want to do this, you can just check the “Clear data before copy” box below the destination phone.
Warm Tips: Whether on the Android Data Recovery or Mobile Transfer, please ensure that your Samsung Galaxy S9/S9+ and computer are connected all through the process, or else it’ll be not smoothly and take you longer time to wait.
When you have read what I have talked about, you can find that the methods of recovering data with Android Data Recovery and Mobile Transfer are similar. You just need to install one of them and select the file you feel like to recovering. If you need to recover data one day, remember take them into consideration.
At last, pleaase let me simply introduce the upcoming mobile phone-Samsung Galaxy S9/S9+ to you. At the MWC mobile conference at the end of next month, users will be able to see a number of manufacturers ready to launch their annual flagship. One of the biggest concerns, however, is samsung’s Galaxy S9 series, which, after all, has more evolution on its full screen. It’s said that the forehead and chin of the Samsung Galaxy S9/S9+ are further narrowed and the screen ratio is increased. At the same time, it supports IP68 waterproof and dustproof.
More Information:
In today’s digital world, the loss of mobile contacts seems to be a trivial problem, but it will not disappear. With all the focus on data consumption, camera quality and social media features, it’s easy to forget that contact lists are one of the most valuable features of mobile phones. It’s painful to have all the contacts missing from your family, friends and work, so we’ve created a dedicated, comprehensive post that tells you how to recover them when needed.
How did this happen?
The most common reason for losing contacts is to upgrade the operating system of mobile devices. Whether your phone runs on iOS, Android or Nokia Symbian, manufacturers send intermittent software updates to refresh the phone with the latest features. Unfortunately, this can sometimes lead to the loss of your contacts, depending on where they are stored. Or, you may accidentally delete or delete contacts when synchronizing with new applications.
Recover Deleted/Lost Contacts from Android
Method 1: Recover androic contacts with Address Book application
Don’t worry! Your contacts may still be on your mobile phone.
If you are using an Android Samsung/Huawei/Sony/Vivo/Oppo/ZTE/THC/Xiaomi/LG/Meizu/Google/Nokia… device, the system sometimes hides your contacts and makes them look like they have been deleted.
Fortunately, there is a simple way to check if this is the case:
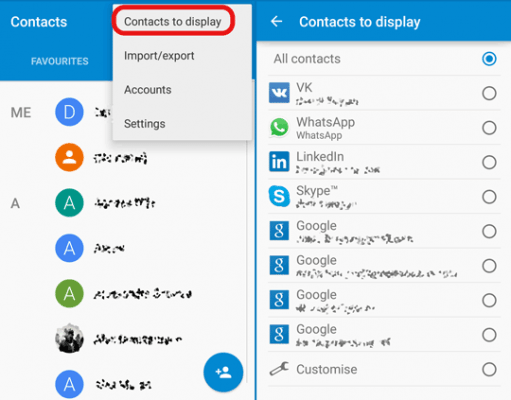
*Open the Address Book application.
*Press the menu in the upper right corner (three vertical points).
*Select Contacts to Display.
*If not, please click “All Contacts”.
*If “all contacts” are not selected, the problem should be solved.
Method 2: Recover android contacts from Google
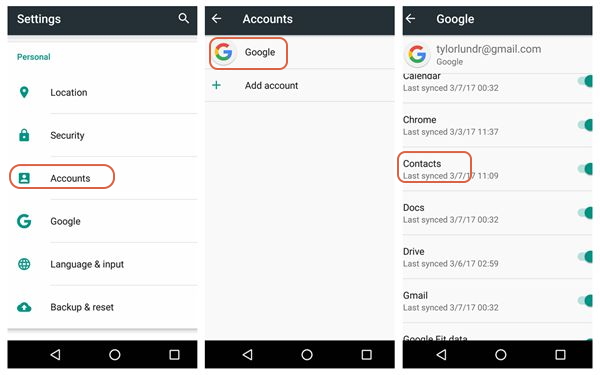
If you are an Android user, you should first check the Google account that has been linked to the mobile device. When you first create an account on your mobile phone, you may automatically accept the transfer of your contacts. If you do, the good news is that you can restore all contacts directly to your mobile phone.
To do this, go to your inbox and select Contacts from the drop-down menu.
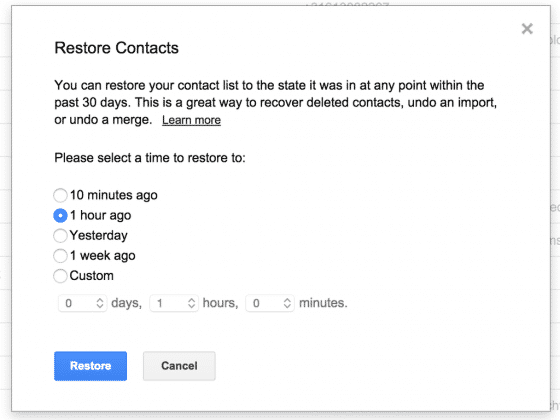
If you can see your contacts, click More, and then click Restore Contacts.
You can also take some measures to prevent this from happening again.
*Start your contacts, and then select the menu/more buttons.
*Then navigate to Settings > Address Book > Import/Export Contacts > Export to Device Storage
*Select the contact you want to transfer from the list, and click Finish.
*Then delete the current SIM card and insert another SIM card into the device.
*Then navigate to Settings > Address Book > Import/Export Contacts > Export to SIM Card.
*Select contacts and confirm that they are copied to your other SIM cards
Your contacts are now backed up to other SIM cards
Method 3: Recover android contacts with Gmail
If your Android device is synchronized with your Google account, the chances of restoring lost contacts will certainly be in your favor. Gmail provides a great feature that allows you to restore backups of all contacts, which can be traced back up to 30 days at most. After doing this, you can resynchronize the device with the Google account and restore all contacts.
Side note: If your contacts appear in Gmail but not on your mobile phone, please refer to the above steps and/or try to completely resynchronize your Google account.
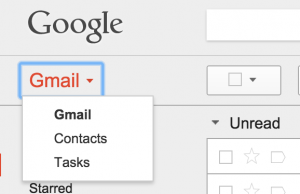
To restore the backup of Gmail contacts, go to your inbox and select Contacts from the drop-down menu on the left.
Once you see the contact list (or not), click More to enter the drop-down menu, where you need to select the “Restore Contacts…” option.
Frequent problems in SD card
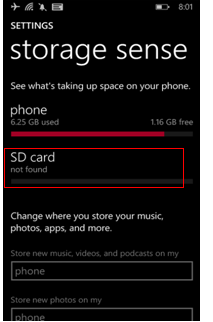
1 Android mobile SD card can not be detected
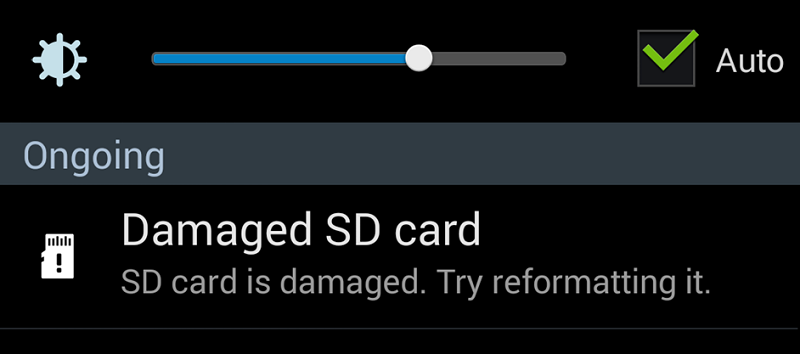
2 The SD card is damaged. Try reformatting it
3 Unexpected deletion of SD card
4 Blank SD Card
1 Android mobile SD card can not be detected
Method 1: Update memory or SD card driver
* Connect SD card to PC
* Right-click my computer and select “Manage”
* In the taskbar, click “Device Manager” and then click the “+” icon next to “USB Serial Bus Controller”. Yellow exclamation marks will appear.
* Right-click and select Update Driver Software, then press “Auto Search Update Driver Software”
* Wait patiently and allow the driver to install and restart it
Method 2: Repair “undetected SD card” using CHKDSK command
First, right-click My Computer > Select Management > Disk Management, and then look up the device in the Drive Viewer to see if the PC can recognize the memory card.
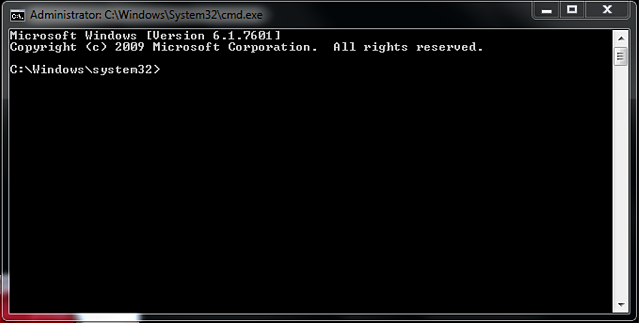
If no card is detected, press Win + R > type: cmd, and then press Enter.
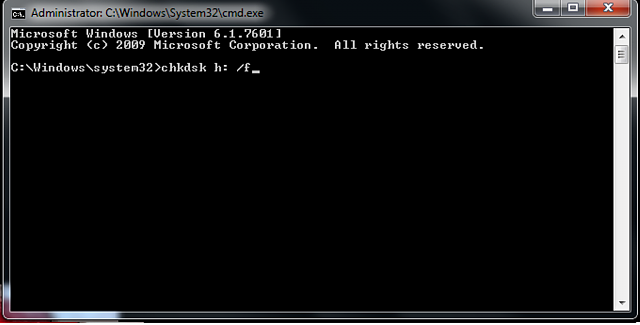
If an SD card is detected, enter CHKDSK D:/ F and press Enter. Or you can type CHKDSK D:/f/offline scanandfix and press Enter. (Remember that D is a drive letter)
2 The SD card is damaged. Try reformatting it
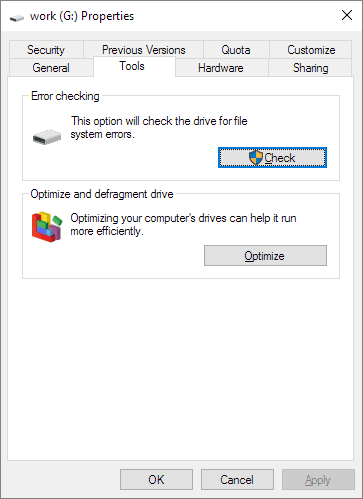
Method 1: Scanning and repairing SD cards
The best way to solve the problem is to right-click the SD card and choose to fix the error from the properties menu.
First, connect the SD card to the computer, then go to my computer > SD card. Now right-click the SD card and open the properties. Click the Tools tab > Check button. Now allow the scanning process to complete and then close it. Finally, right-click the USB flash disk and click “pop-up” and take out the SD card.
Method 2: Solving problems using CMD commands
Using the CHKDSK command can help fix any type of SD card problem, and it can help you access files from Android devices.
Step 1: Connect SD card to computer using card reader
Step 2: Now go to the Start menu, type “cmd”>click “input”, and you will get “cmd.exe”
Step 3: Then click “cmd. exe” and you will see the following commands
Step 4: Enter chkdsk/X/f [sd card letter]: “or” CHKDSK [sd card letter]:/ f“
3 Unexpected deletion of SD card
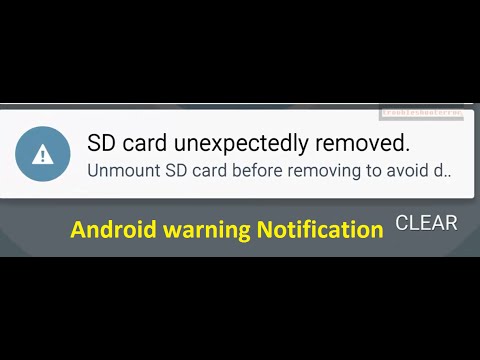
Method 1: Check whether the SD card is damaged
Such errors occur when SD cards are damaged or damaged. Therefore, you should check by removing the card from your mobile phone and putting it on another system or device. When you are still unable to access the card, transfer data immediately and get a new SD card.
Method 2: SD Card Infected by Virus
Many times, SD cards can be infected with viruses, so you may encounter such errors. Therefore, in this case, you need to recover the data as soon as possible and run anti-virus software to scan the SD card.
Method 3: SD Card Unformatted
When SD cards are formatted for a long time, there may be an “accidental deletion of SD cards” error. So the best solution is to format the SD card once and check if the problem has been solved.
4 Blank SD Card
Method 1: Try to restart the phone
Whenever you see a “blank SD card” error on your mobile phone, you need to do something to solve the problem. But don’t think about formatting the card, just restart it. This will help you solve the problem and your card may start working again.
Method 2: Reinsert SD Card
Another thing you can do is take the SD card out of your phone and insert it again. This is a simple way to fix such problems immediately./p>
Method 3: View hidden files on SD cards
Most of the time, files are hidden form, you will receive a message “blank SD card”. In this case, you should follow the following steps to display the hidden file.
Step 1: First, connect the blank SD card to the computer using a card reader
Step 2: Now run the control folder to get the File Explorer option
Step 3: Then open the View tab
Step 4: Finally, select Show Hidden Files, Folders and Drives and make changes
Restore photos and videos
If you delete an item and delete it, check your trash can to see if it is there.
On an Android phone or tablet, open the Google Album application for photos.
In the upper left corner, click on the menu in turn, and then click on the wastebasket.
Touch and hold the photo or video to be restored.
At the bottom, click “Restore”. Photos or videos will be returned:
Application of Graphic Library in Mobile Phone
In your Google Album Library
In any of its albums
If the project is not in your garbage can, it may be permanently deleted.
Can’t see photos or videos?
If the deleted photos or videos are not in the garbage can, they cannot be restored.
If the following situation occurs, you will not be able to restore the photos:
You moved it to the dustbin more than 60 days ago.
You move it to the garbage can and empty your garbage.
You have permanently removed it from the garbage can.
You have permanently deleted the device from its library application without backing it up first.
To find and restore photos easily, enable backup and synchronization.
The app won 4.5 star ratings in Play Store. It is completely free to download and provides many functions.
Text messages are in XML format. It also saves your data in the cloud and local storage. To save data in the cloud, you must install additional applications in your application. It will automatically save your message.